
Gear Dive: My Ten Essentials
Have you ever gotten yourself into a tricky spot while hiking? Only brought one granola bar for a much longer day, or ran out of daylight on the way back to the trailhead?
In this post, I’m going to talk about the ten essentials. What they are, why you need them, and how you use them on all of your hiking and outdoor adventures!
Hiking is a wonderful activity. There is so much to see and experience out in the wilderness. And if you’re anything like me, you probably first started hiking with hikes that you wouldn’t consider “hiking”. Maybe it was a small nature walk in your town or a short trail in a local park. You probably didn’t bring much more than a bottle of water or maybe a snack. And while you might not need much on those small hikes where you have cell phone service, carrying the ten essentials becomes crucial when you leave the pavement and the “real world” behind.
Note: this post contains affiliate links and I may earn a small commission if you choose to purchase an item (at no additional cost to you). Thank you for your support if you do choose to use these links.

What Are The Ten Essentials?
The ten essentials are a grouping of items that have been deemed necessary to survival in the outdoors. Below, you’ll find a little blurb from me about why something could be considered essential, especially if something were to go wrong on your hike.
Should I Always Carry The Ten Essentials?
Ideally, yes, you should carry the ten essentials with you on your hiking trips. In practice, do I carry an emergency shelter or firestarter on all of my hikes, especially very local ones? No, I don’t. If something goes horribly wrong one day, will I kick myself for not carrying all of the essentials? Maybe!
Generally, I tend to carry the full ten essentials when I’m backpacking, and I always carry them on day hikes when I’m in unfamiliar territory, or somewhere I don’t have any reliable cell phone service. I would recommend carrying the ten essentials with you on every hiking trip, or at least having the ten essentials spread out within your hiking group if you are with others.
The Ten Essentials
1.Navigation
Navigation is a very important ten essential. It’s also the one I see forgotten a lot. I know we live in the digital age, and having a phone with AllTrails downloaded seems like the only thing you need for hiking, but it’s really not sufficient to have as a standalone navigation item.
Honestly, the best navigation tool comes from knowledge of how to read a topographical map, how to triangulate your location on that map, and of course, keeping aware of your surroundings to not get lost in the first place.
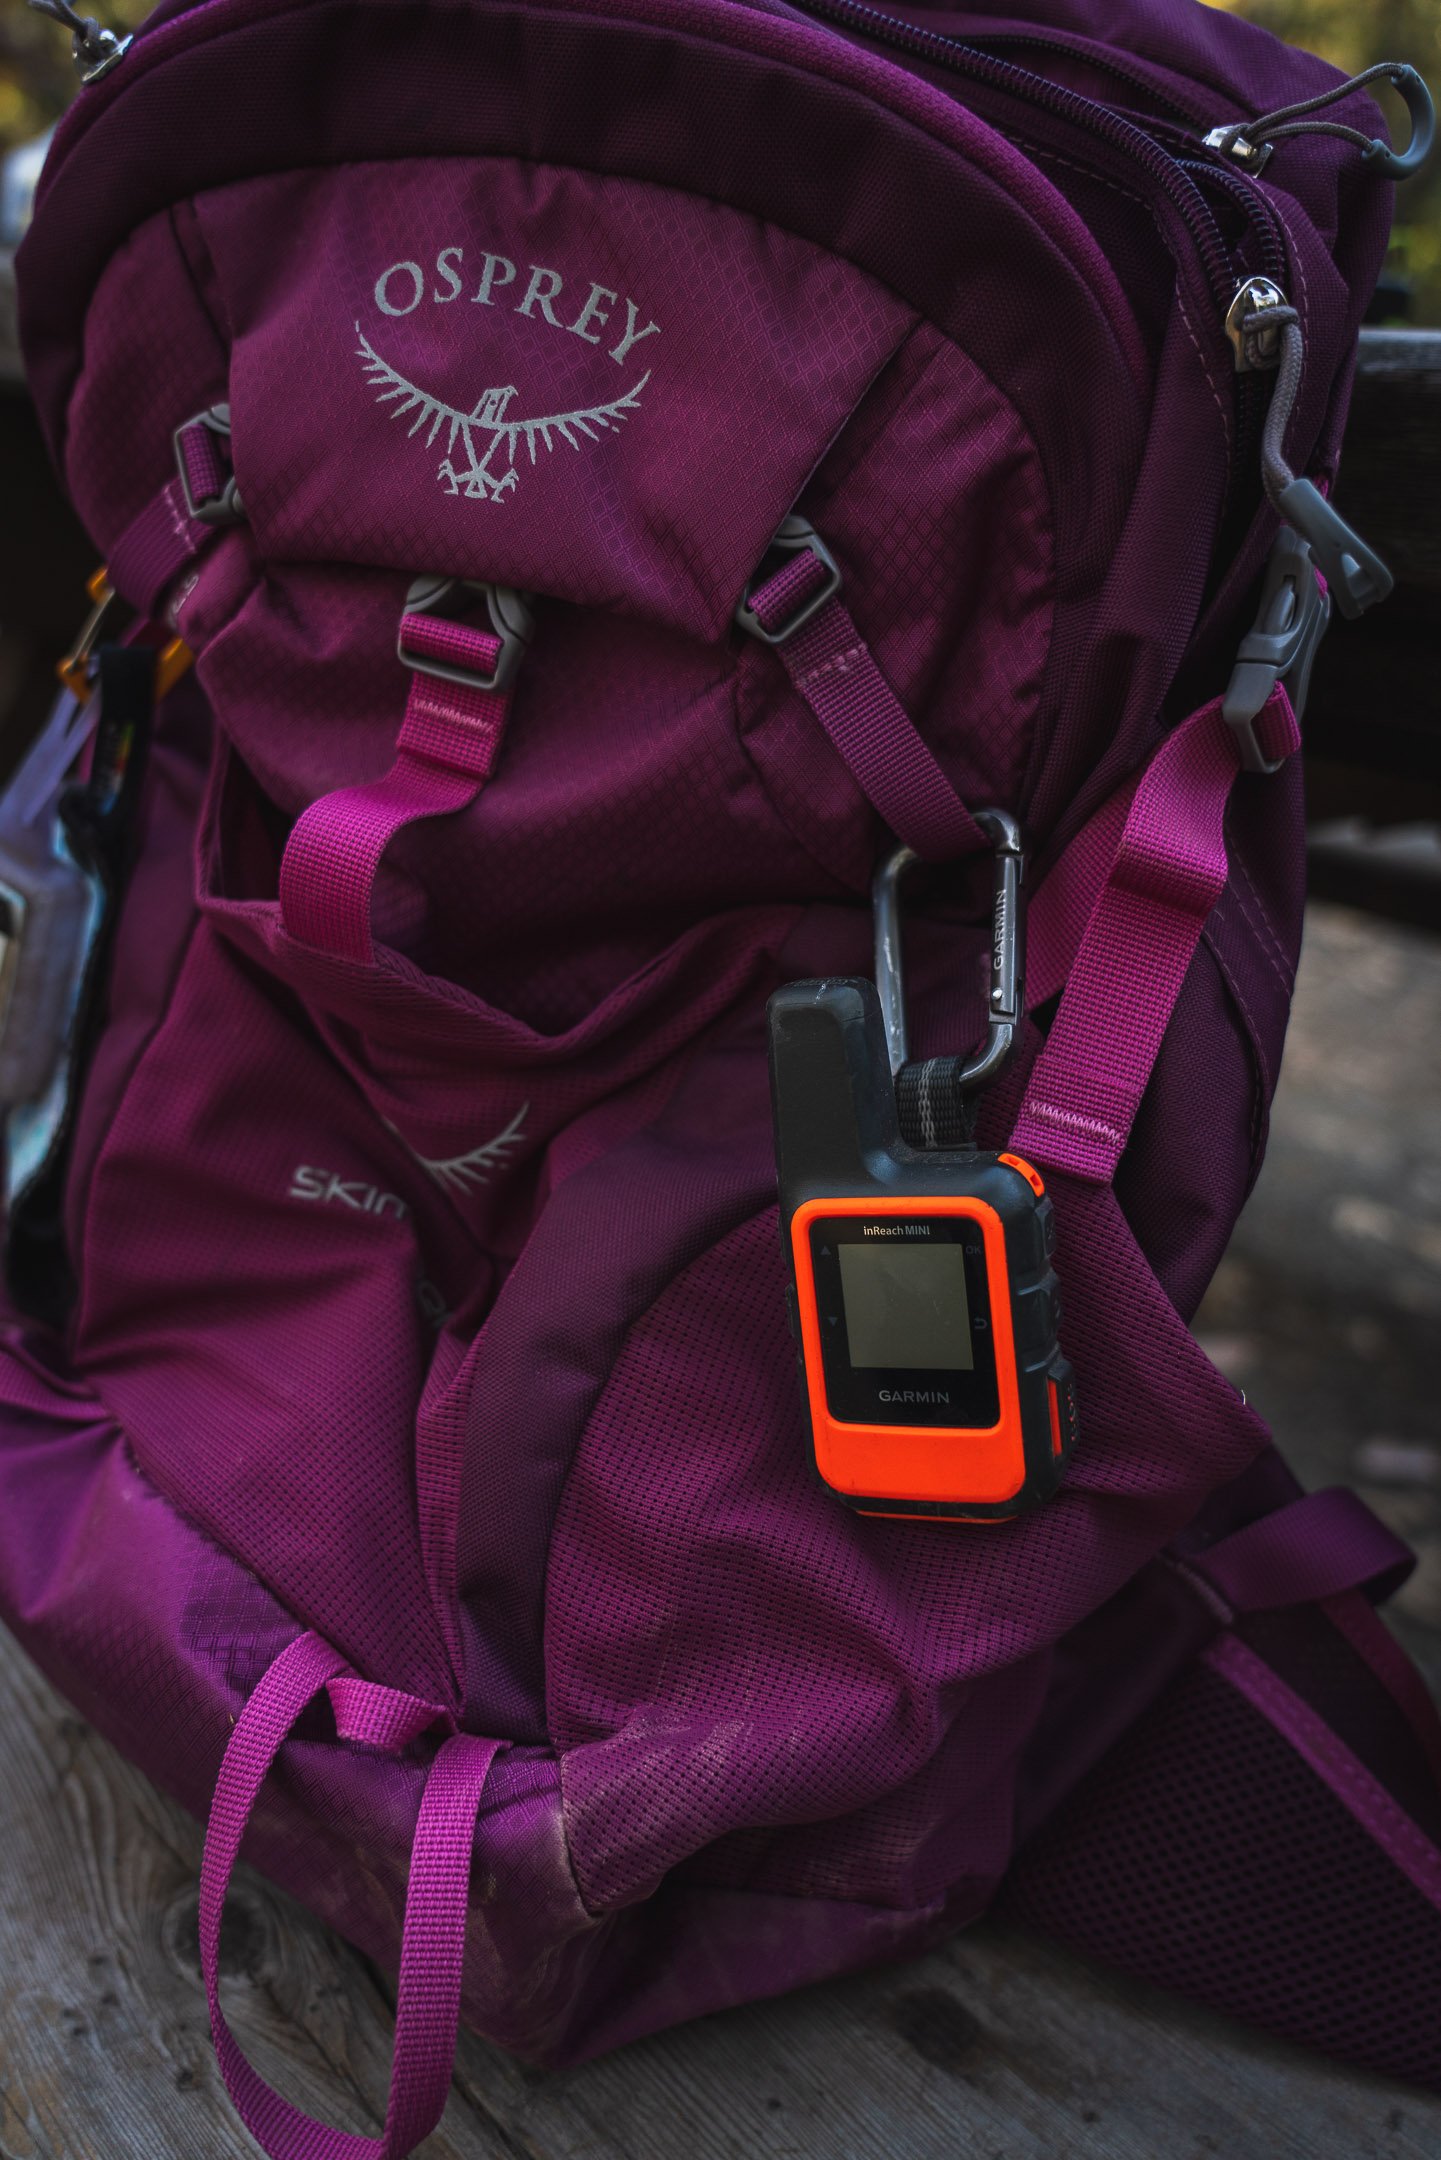
Obviously, accidents can happen and mistakes can be made, and you might end up lost. A compass can help in this situation, but only to a certain extent because you really need to be able to place yourself in the terrain, and know which direction you should be going. Enter the GPS. GPS in combination with a detailed topo map - whether through a phone app (like AllTrails, or my personal favorite, GaiaGPS), or on a dedicated GPS device like the Garmin GPS Map 66i - is a really wonderful tool to keeping you on track. The Garmin devices also have SOS features and 2-way satellite messaging, just in case you get into a really bad situation.
On my hikes, I carry a combination of these things. I always have my Garmin inReach Mini with an active subscription on me. This is linked to the companion Earthmate smartphone app from Garmin, which has a basic topo map, and enables you to use your phone’s keyboard for typing out messages. I also have downloaded offline maps on my GaiaGPS phone app, which has multiple layers of detailed information. My personal favorites are the NatGeo Illustrated Maps, the GaiaTopo, and the precipitation forecast. Smoke forecasting layer is also good, and I download the slope angle layer for winter excursions to avoid avalanche terrain. Because I am heavily relying on electronics for staying found, I always carry an external phone battery and keep it in an ultralight, waterproof stuff sack. My favorite battery for shorter trips is the Anker 10,000 mAh battery. This battery is one of the lightest, fastest-charging, most power-efficient portable batteries out there!
When do I carry paper maps and a compass? Mainly when I will deliberately be going off trail. I find carrying custom zoomed-in topo maps (printed from Caltopo.com) works best for me, but will also buy larger, waterproof ones when they work for my trip. Detail is important when going off trail, and sometimes the large maps just don’t provide enough of it. One of my favorite printed map brands though is Tom Harrison maps. The maps are not cluttered, and show trails, and vegetation cover.
2. Illumination
Having light can be really important on a hike, especially if you like to hike around sunrise and sunset. But, even if you only anticipate hiking during the daylight hours, having a light source can be super helpful if you get delayed on your hike for some reason.
I prefer to use a headlamp with an internal, rechargeable battery.
Survivalists will tell you that for this category to truly be complete, you should also carry spare batteries for your headlamp. What if the batteries are close to dying and then they go out at the time you really need them? This is why I like a rechargeable one: I’m usually carrying a small battery for my navigation back-ups, so it’s also a backup option for charging a dying headlamp too.
I love the Nitecore NU25 headlamp for a variety of reasons. It’s incredibly ultralight at only 33 grams with the UL headband. It has multiple white and red light settings. And, you can buy replacement parts for it: like if the mounting bracket or the band breaks. I love having repairable gear!

3. Sun Protection
Everyone is going to have different sun protection needs based on their skin. If you burn, you should definitely be covering up. Not only for the long-term health of your skin, but because dealing with severe sunburns while hiking - or even after - is a big pain in the butt.
Story time! I got second-degree sunburns on my arms on the PCT after I switched from a long sleeve sun shirt to a short sleeve one. They were super painful, and I also had all of the symptoms of “sun poisoning” including chills, nausea, dizziness, and fatigue. I was severely dehydrated. This caused me to spend an extra night in town, and slow down significantly in the following days. I also had to hike for miles in my rain jacket to cover my arms until I found a trail angel with - I’m not exaggerating - a First Aid ROOM at her cabin. There I slathered my arms in aloe and also covered them with gauze and wrapped them for the next week or so of the trail. This was the most pain I was in during the whole PCT. All because I overdid it with sun exposure.
I’m still working on finding a face and body sunscreen that I love, but I’m obsessed with this Blistex chapstick with SPF. I have used this Supergoop sunscreen that feels velvety and weightless and doesn’t leave behind any sunscreen residue, and it’s amazing! But definitely expensive. I’m also a fan of this Sunbum stick sunscreen since it’s so easy to apply, and the small stick lasts for a long time!
A couple of my favorite sun shirts are the Outdoor Research Echo Hoodie (runs small), and the Mountain Hardwear Crater Lake Hoodie. I prefer to wear a long sleeve sun hoodie vs. dealing with applying sunscreen on my arms.
For those who hike in very exposed environments, a hiking sun umbrella could be a great option. This is less great in windy conditions but really makes a difference when the sun is beating down on you all day long.
And don’t forget sunglasses to protect your eyes!

The ultimate sun protection: super dorky, but super effective! Hat, sunglasses, Buff coverage, sun shirt, sun gloves.
4. First Aid Kit
First Aid Kits are pretty important. You hope you never need it, but you’ll always want to carry it anyways! Something people don’t always think about with first aid kits is the fact that you should know how to use all of the items in your kit. So be sure to read up on wilderness first aid, or even consider getting your WFA certification, especially if you plan to go on longer, more remote hikes.
I have compiled my own first aid kit from stuff around the house, but I also like these Adventure Medical Kits.

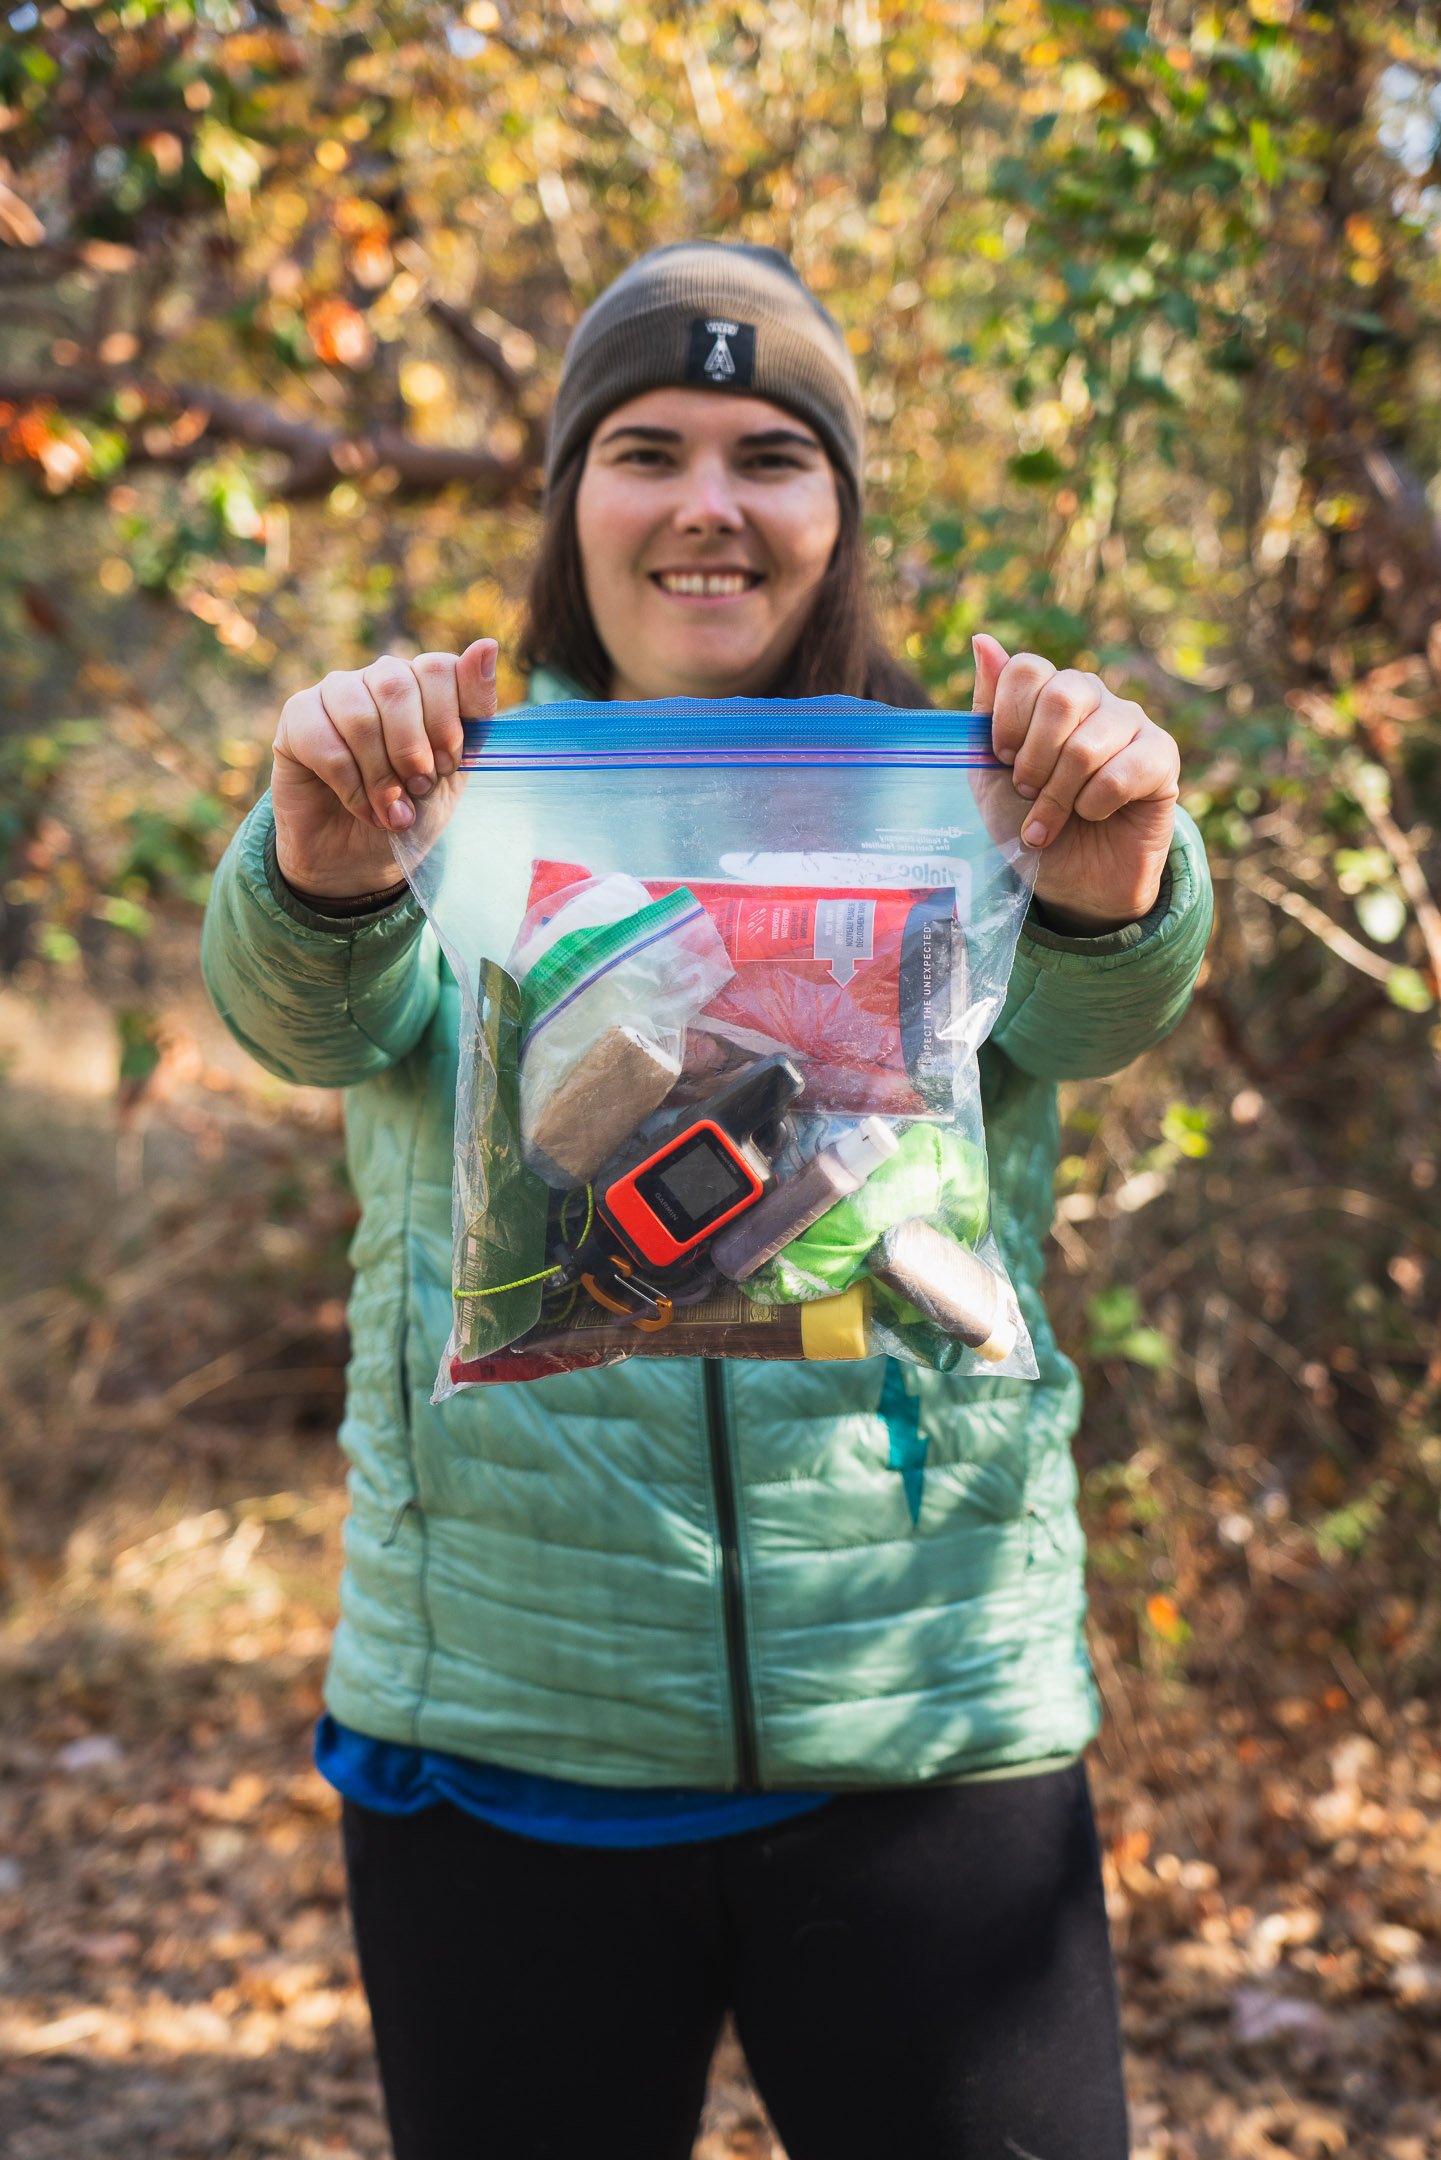
My first aid kit is in the ziplock bag under the nail clippers (and the pill bottle).
5. Knife and Gear Repair
Gear repair might not be the first thing that comes to mind when you think about going outside. I mean, you may have just bought nice gear that you have no intention of breaking! But, accidents happen, and gear is not indestructible.
What you bring with you for repair depends on what your gear looks like. For example, you won’t bring a sleeping pad repair kit if you use a closed-cell foam pad. And you won’t bring DCF repair tape if you have a silnylon tent.
One of my favorite repair items is Tenacious Tape. I’ve used it to patch puffy jackets, tent fabric, and mesh in the field. Cordage can be handy to have too if something happens to your backpack strap. A knife or multitool is necessary to cut both of these items to the length or amount you need.
6. Fire
Having the tools to get a fire started is essential if you were to get stranded overnight on your hike. Most search & rescue rescuers find their victims suffering from hypothermia. Being able to get a fire going will keep you somewhat warm, and smoke from the fire can show searchers where you are.
For myself, this item is a Bic lighter. I make sure to carry a real lighter - not the quick-click ones. The click lighters have a problem sparking at elevations higher than 8,000 ft. If you don’t want to trust a lighter, I like these waterproof matches. Carrying a stove with fuel could also help with boiling warm water to keep you warmer. You may want to consider carrying hand warmers, especially in winter conditions.
7. Shelter
A shelter may look different depending on what kind of trip you are on. If you’re backpacking, you probably already have a shelter. You aren’t going to pack an extra one.
If you’re day hiking though, a shelter isn’t something you’re probably thinking about. But remember, the point of this list is to help you survive unplanned nights outside. When I’m day hiking, I bring an emergency blanket as my “shelter”. You could also bring a tarp or bivy sack. It’s not something you ever want to use, but it is smart to carry with you.

8. Extra Food
Packing a day’s worth of food will certainly keep you happier and stronger if you were to get stranded overnight. Make sure you bring snacks that are super easy to prepare. For example, bringing a freeze-dried Mountain House meal as your extra meal, but not having a stove to cook it with is probably not the best idea for extra food. Bring extra granola bars or other non-perishable, ready-to-eat food for your emergency stash.
9. Extra Water
Having a way to get yourself clean, safe water is imperative when you’re outside. I always bring my personal water filter and filtering bag with me on all of my day hikes and backpacking trips. I’ve used many different filters, but my current favorite is the Platypus Quickdraw. The filter bag is high quality, the filter screws onto Smartwater bottles, and you can test the filter to see if it’s still working easily in the field. On cold-weather trips, I opt for chemical treatment instead of mechanical filtering. I also like to bring a few Aquatabs as a backup treatment in case my mechanical filter does fail. They weigh almost nothing!
Aside from having a way to filter new water, you should make sure you are bringing the right amount of water for your hike in the first place. Generally, you should drink a liter of water per 2 hours of moderate activity. I count my liters per mile - I usually drink 1 L per 5 miles of hiking. I’ll drink more in warmer temperatures, and a little less in cooler climates.
If you’re hiking somewhere with no natural water sources, you’re going to need to carry all of the water you need for your whole hike. Your mind might immediately jump to desert locations, but as a hiker in the SF Bay Area, I can tell you I’ve gone on many longer hikes without any water sources! Do your research and make sure you don’t run out of water!

10. Extra Clothes
The extra clothes you bring will definitely depend on the season you’re hiking in! In general, I’d bring a puffy jacket and rain jacket- at the very least. Adding liner gloves and a beanie, and maybe rain or wind pants - especially if you hike in shorts - is also a good idea.
If you are hiking in alpine environments, remember that weather can change rapidly. The peak is colder and windier than the trailhead. Storms can roll in and be more impactful in the alpine than the valley floor.
Sure, if you’re going on a short four-mile hike in the middle of the day in the summertime, the weather probably won’t be changing all that much. But remember, these extra clothes are also for if something bad were to happen on your hike. If you sprained for ankle and that 2-hour hike turned into a half- or full-day hike and night is approaching, you’re probably going to want something to keep you more comfortable while you slowly self-evacuate or wait for help!

Using layers: Hiking shirt + Polartech Alpha lightweight fleece for some warmth + rain jacket to trap in heat and block wind. Buff for more ear and head warmth.

Wind Pants are a great ultralight, water-resistant layer that adds a bit of warmth to your legs. Great if you like to hike in shorts.
Bonus: Whistle
A whistle is a great item to have when you are truly lost. There are multiple stories or rescuers or even regular hikers finding a missing hiker because that missing hiker had a whistle and used it. These days, most day hiking backpacks have a whistle included on the chest strap. But, a standalone whistle is much stronger - volume-wise - than those little integrated ones.
Bonus: Trowel
For long day hikes, and especially backpacking trips, bringing a trowel is essential! If you don’t know, a trowel is a small shovel used for digging a hole in the ground that you can go #2 in. Let’s Leave No Trace and keep our outdoor spaces clean: bury your doo-doo! And make sure to pack out your toilet paper while you’re at it. A ziplock bag will do.
How To Carry the Ten Essentials
The best way to carry all of these items is inside a day pack! Day packs are anywhere from 10 liters to 30 liters. Day packs specific to hiking usually have better padding and some extra features compared to regular knapsacks or school-style backpacks. I usually suggest people use whatever backpack they have lying around to start, and then you’ll be extra aware of what features you’ll want in a more specialized backpack.
Some of my favorite day hiking packs I’ve used are:
PRO TIP: Something I recently started doing to keep all of my ten essentials collected together is putting them all in a gallon ziplock bag. Now, the extra food and layers don’t fit in that bag, but the little things that are easy to lose are all in there. I found this to be really helpful when I was flying and traveling with my hiking gear. I also go back and forth between a few different packs, so having everything in this ziplock bag is perfect!