
How To Build Your Dream Gear Wall
What’s something that every outdoors lover with too much gear needs?
A Gear Wall!
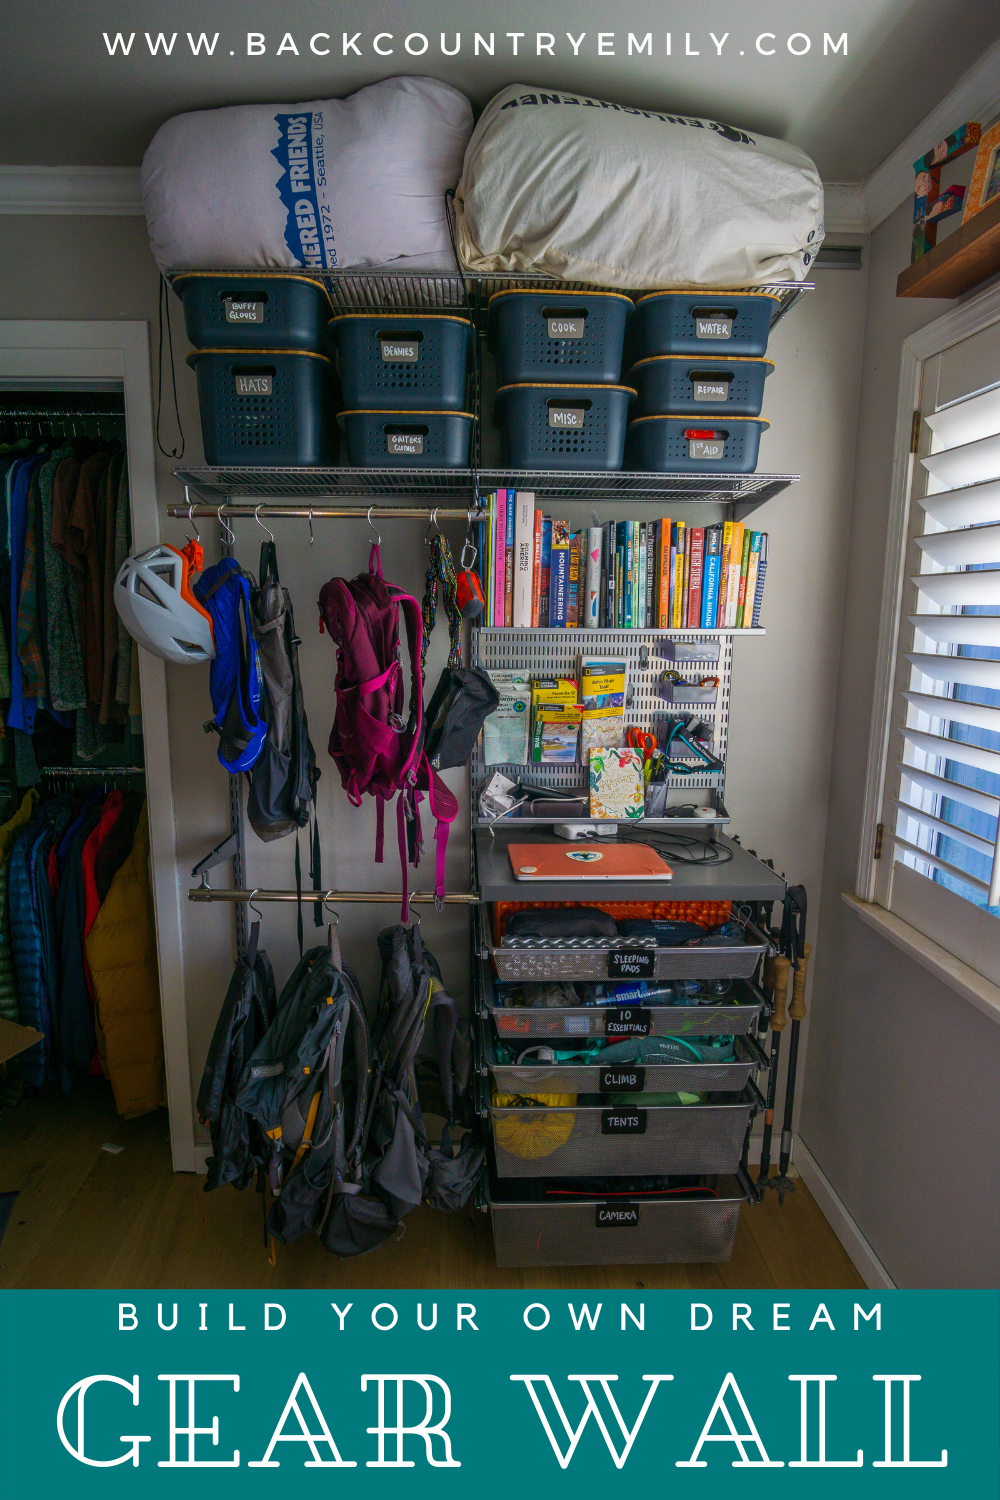
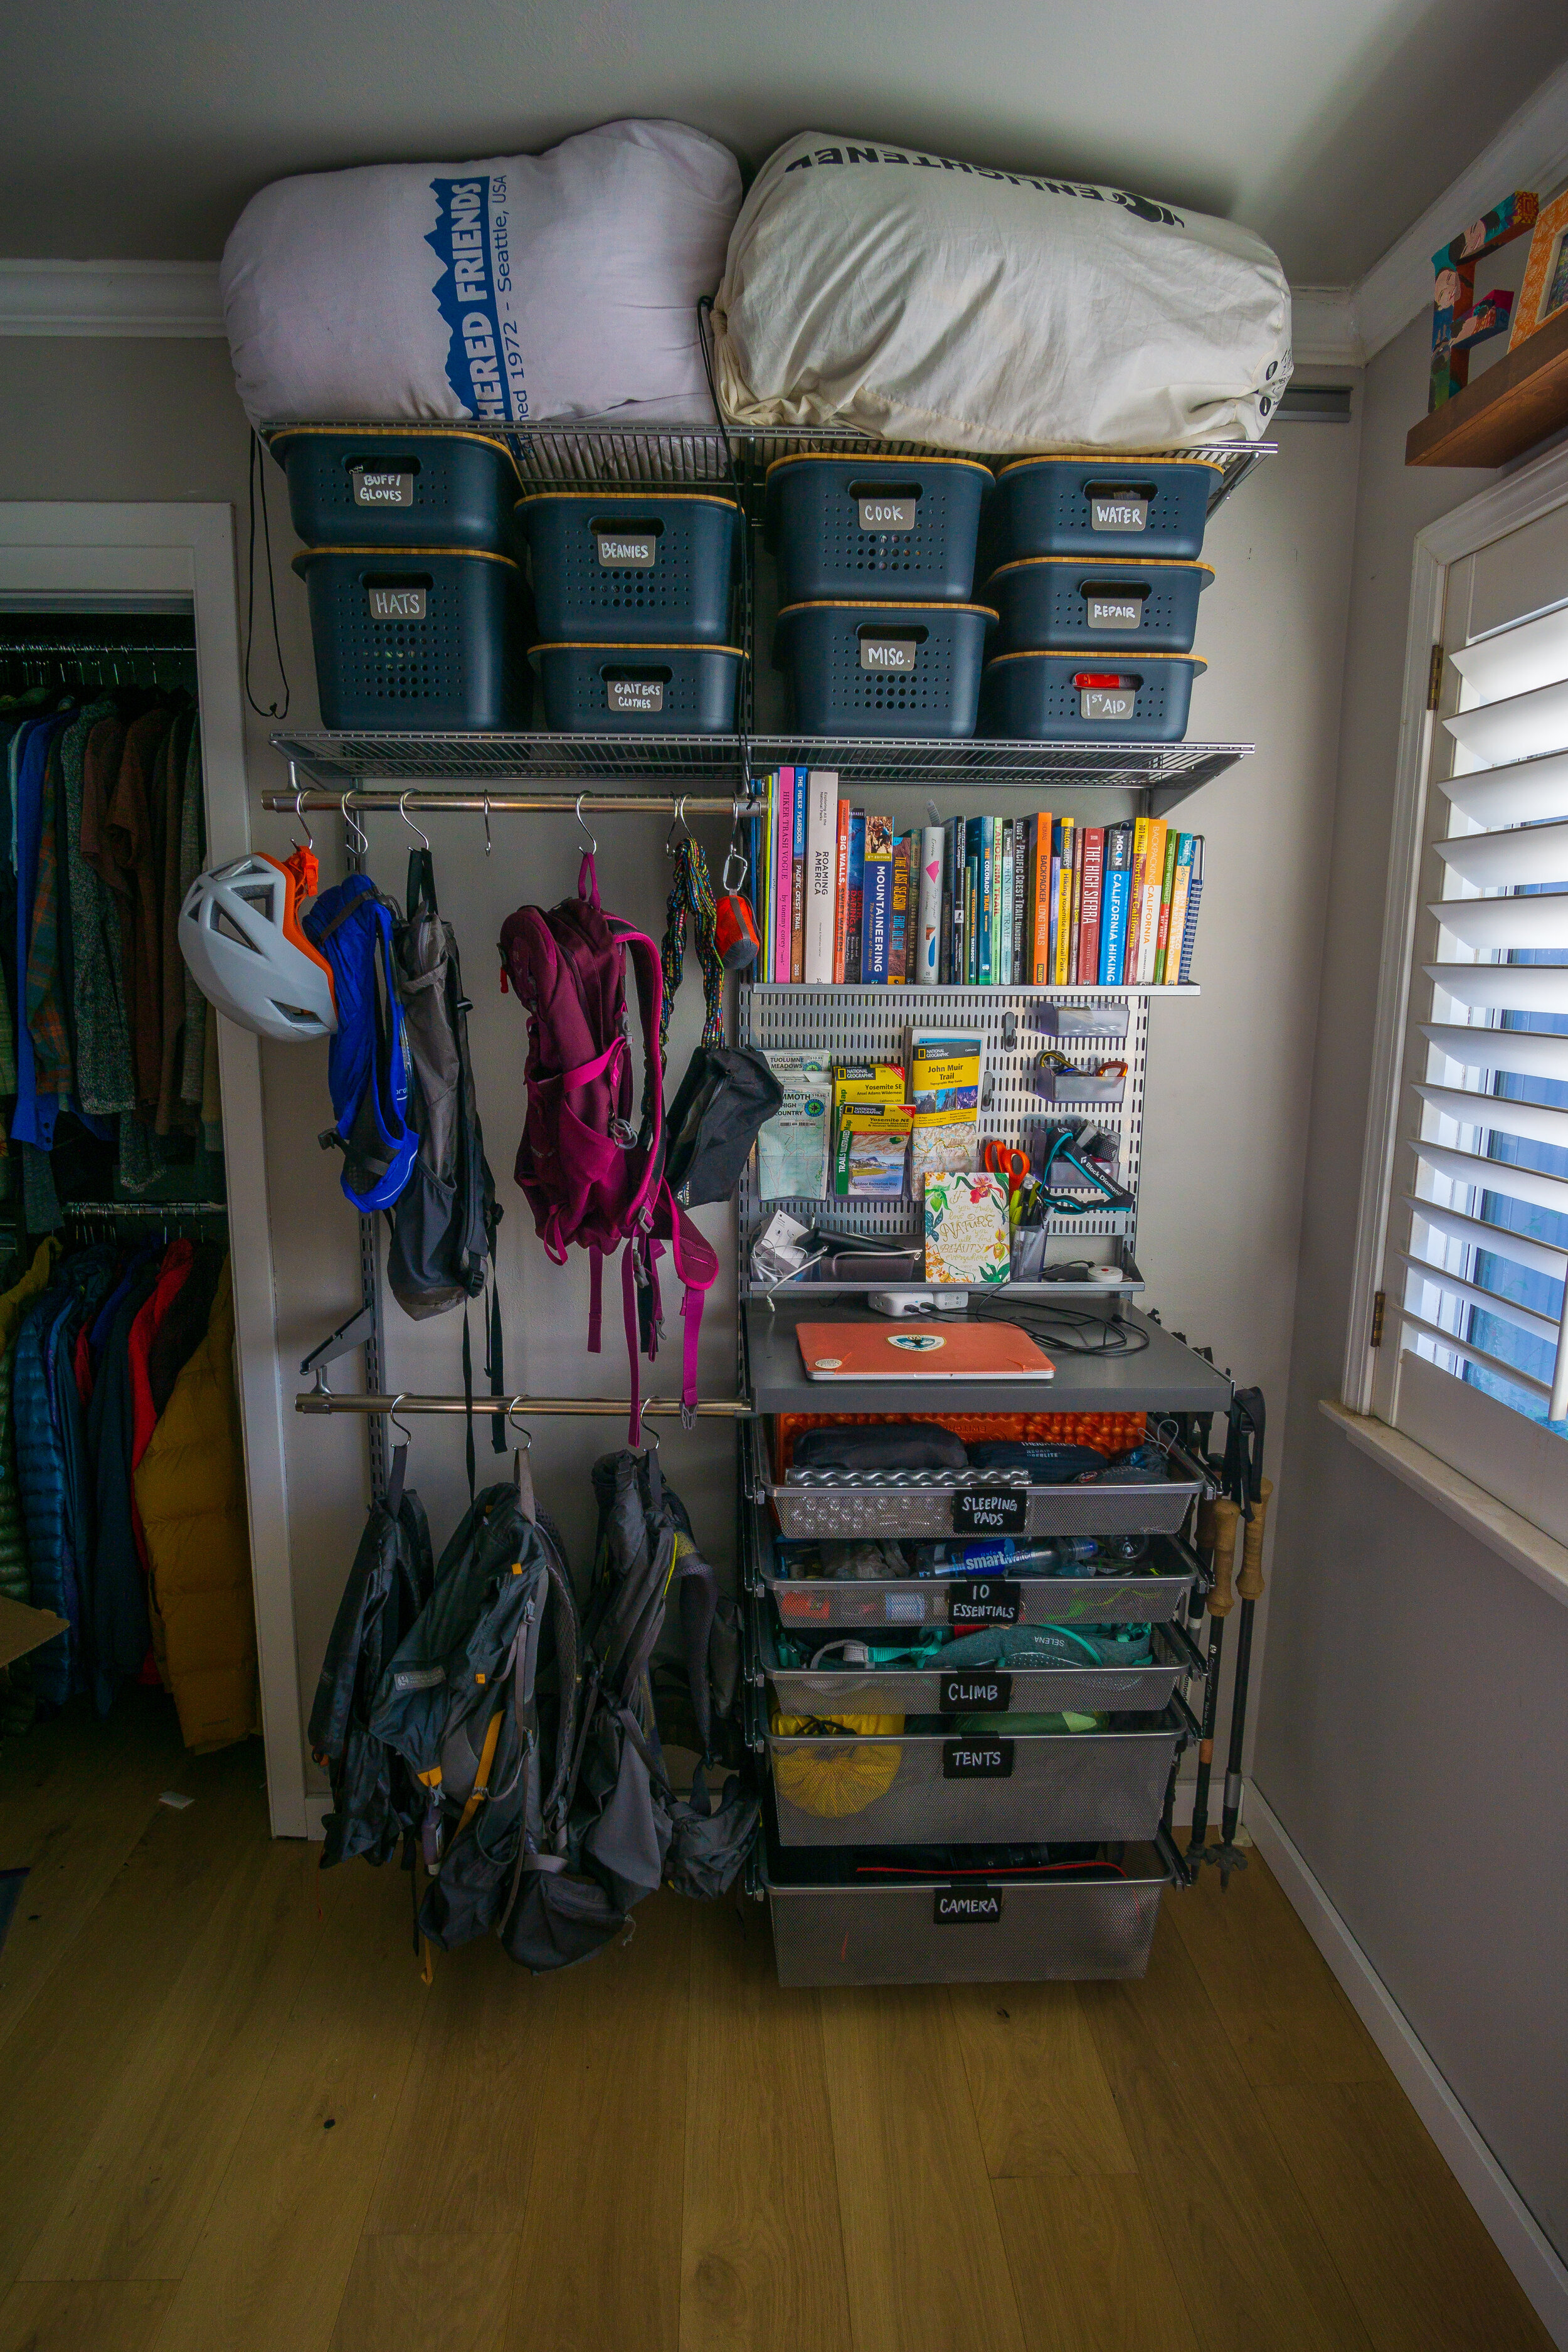
My gear collection has grown exponentially since making my way into the outdoors world. Working in the outdoor industry and being exposed to new and fancy upgrades to everything tempts me greatly. And my obsession with having niche pieces for certain objectives is… extreme to say the least! I had been storing my regularly used gear in a pile on my bedroom floor and in crates in the living room, and my lesser-used gear in big bins in the garage. Neither was very organized or functional. I have always admired (re: drooled over) beautiful gear closets I’ve seen online. Unfortunately, I only get a wall in my bedroom (and some garage space) instead of a huge closet or basement. Still, a wall just over 4 feet wide and about 7 feet high is a decent amount of space, especially if it’s organized properly! Want to know what I used and how I organized my gear? Read on to find out.
Getting Started:
Getting started is always the hardest part, isn’t it?
First off, I needed to figure out what space I had available to me. Luckily, my mom loves HGTV and room decor and design, and re-organizing things, so she is the one who suggested this wall and what to use in the first place, so thanks mom!
Second, setting a budget is probably a good idea. This wall was budget-less for me, because I wanted something very easy and to not put in any physical labor or construction on my part, and I was so desperate for change in my storage and room. So, if you’re lazy like me, this might work for you! Due to these parameters, I settled on using the ELFA Closet Solutions from The Container Store. I was particularly drawn to the Garage Solutions because it seemed to blend hanging, shelving, and drawers against a flat wall (rather than a closet) perfectly. I also really liked the industrial look vs. the “Decor” look of the home closet.
Third, was actually going through all of my gear, placing it into piles, or categories, and seeing how much stuff I had in each category, and how much space I really needed. This was easily the hardest part of making this gear wall, and the sorting and organizing was an evolving process.
Selecting Key Components:
Practically, I needed to figure out how to partition my wall. It was pretty obvious when looking at the offerings from The Container Store that going with two 2-foot sections would be the best solution for me. This was mainly because of the drawer options available to me, and once I started looking at all of the components, most were in the 2 foot width.
I’ll be honest, this took a ton of trial-and-error. I probably placed 5 different orders with The Container Store over the course of this project, and usually I was ordering things because my original “dream” wasn’t practical, or I figured out a better way to organize things. I racked up a very large pile of returns (that I’m still sitting on - thanks COVID-19!). And, to be honest, this gear wall is not just about storage. This storage solution is taking up a WHOLE WALL in my bedroom! My sanctuary! The place in my family’s house that is mine! So, I wanted this wall to be aesthetically pleasing, and let’s be real: #pinterestgoals. If I have to look at it every day, it has to be pretty. It’s basically a work of art!
Therefore, there were some items that I was particularly picky about how to display and store:
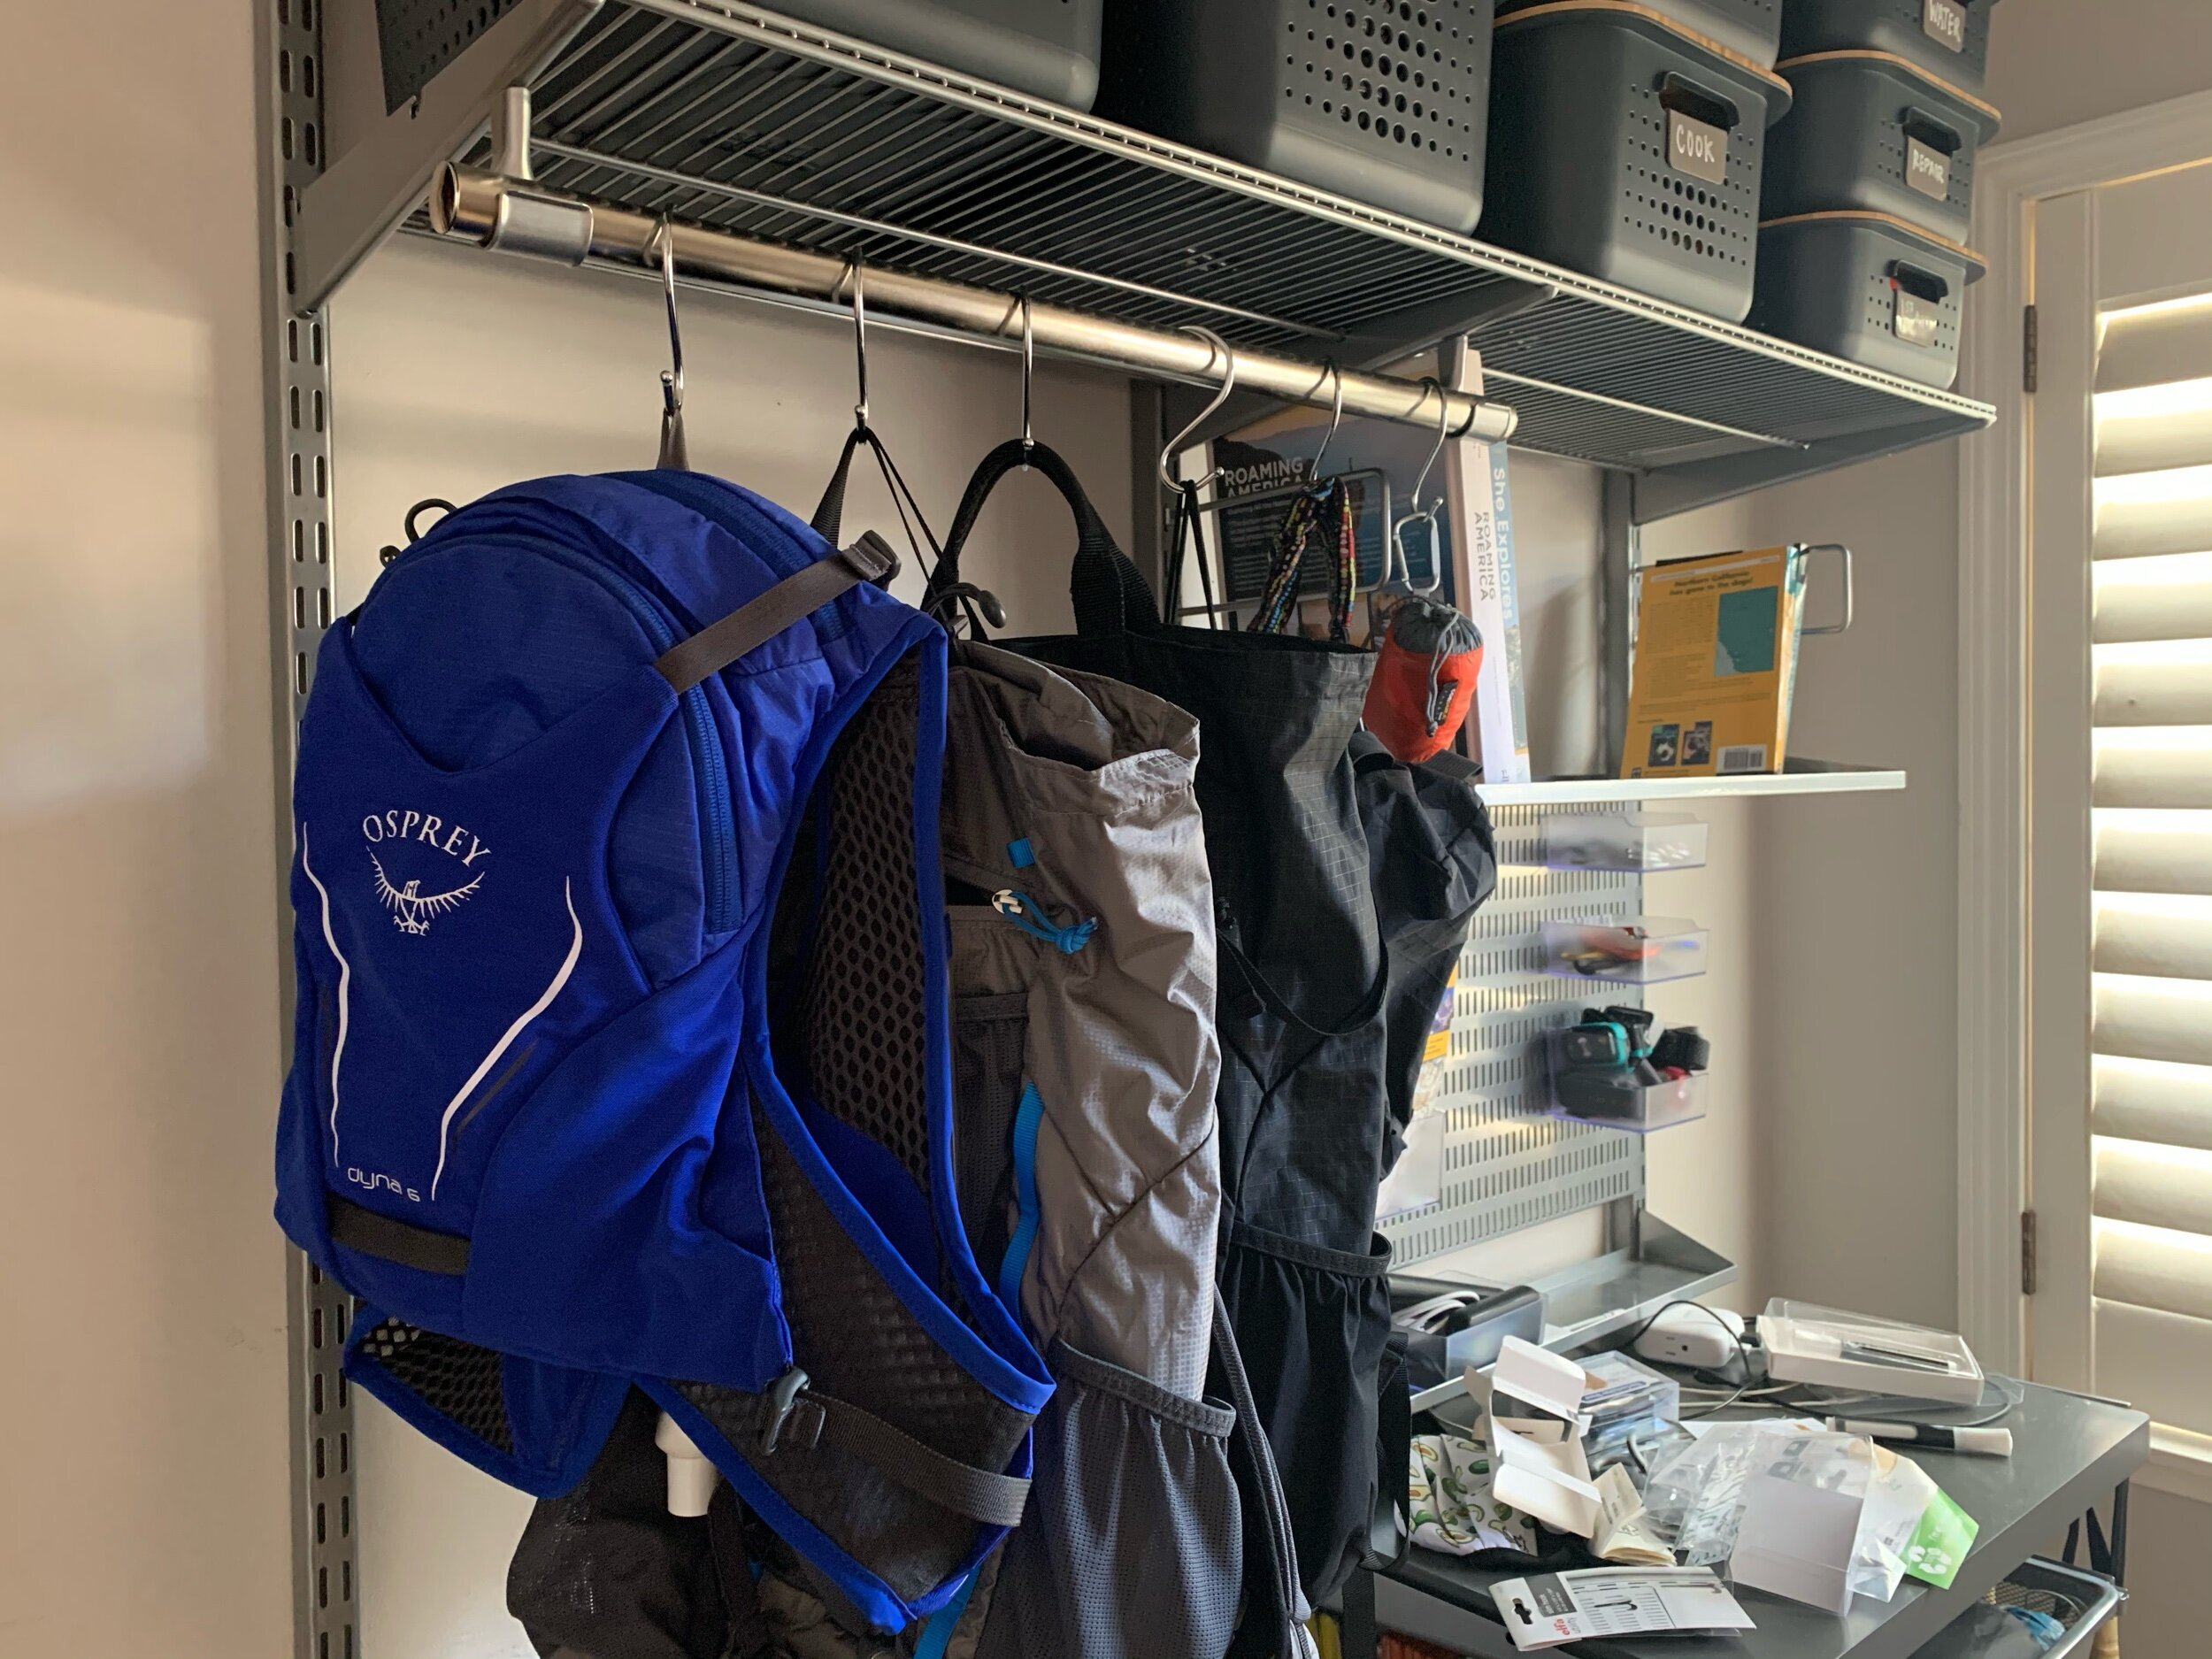
My Backpacks: I have running packs, computer packs, day packs, travel packs, fanny packs, and backpacking packs. So. Many. Backpacks!!! So finding a way to keep my backpacks presentable and usable was very important to me. Originally, I wanted to do a full peg board for hanging my packs on. I quickly found that the peg board route would be quite expensive with the ELFA system, and not the best use of space. Instead, I installed 2 hanging bars and bought kitchen “S hooks” to hang the packs with. This enabled me to get up to 5 backpacks on each rod (and my climbing helmet), instead of two side-by-side if I had used the peg board. Plenty of space!
Sleeping Quilts/ Bags: Because the insulation in sleeping bags cannot be compressed long-term without ruining them, I needed plenty of space to store my sleeping bags at their full loft. And since they are so light, for practical and safety reasons, putting them on the top shelf was ideal. I currently have 1 winter sleeping bag and 1 three-season quilt with my eyes on another. The current solution works well for 2 bags, so we’ll see if I can work in a third!
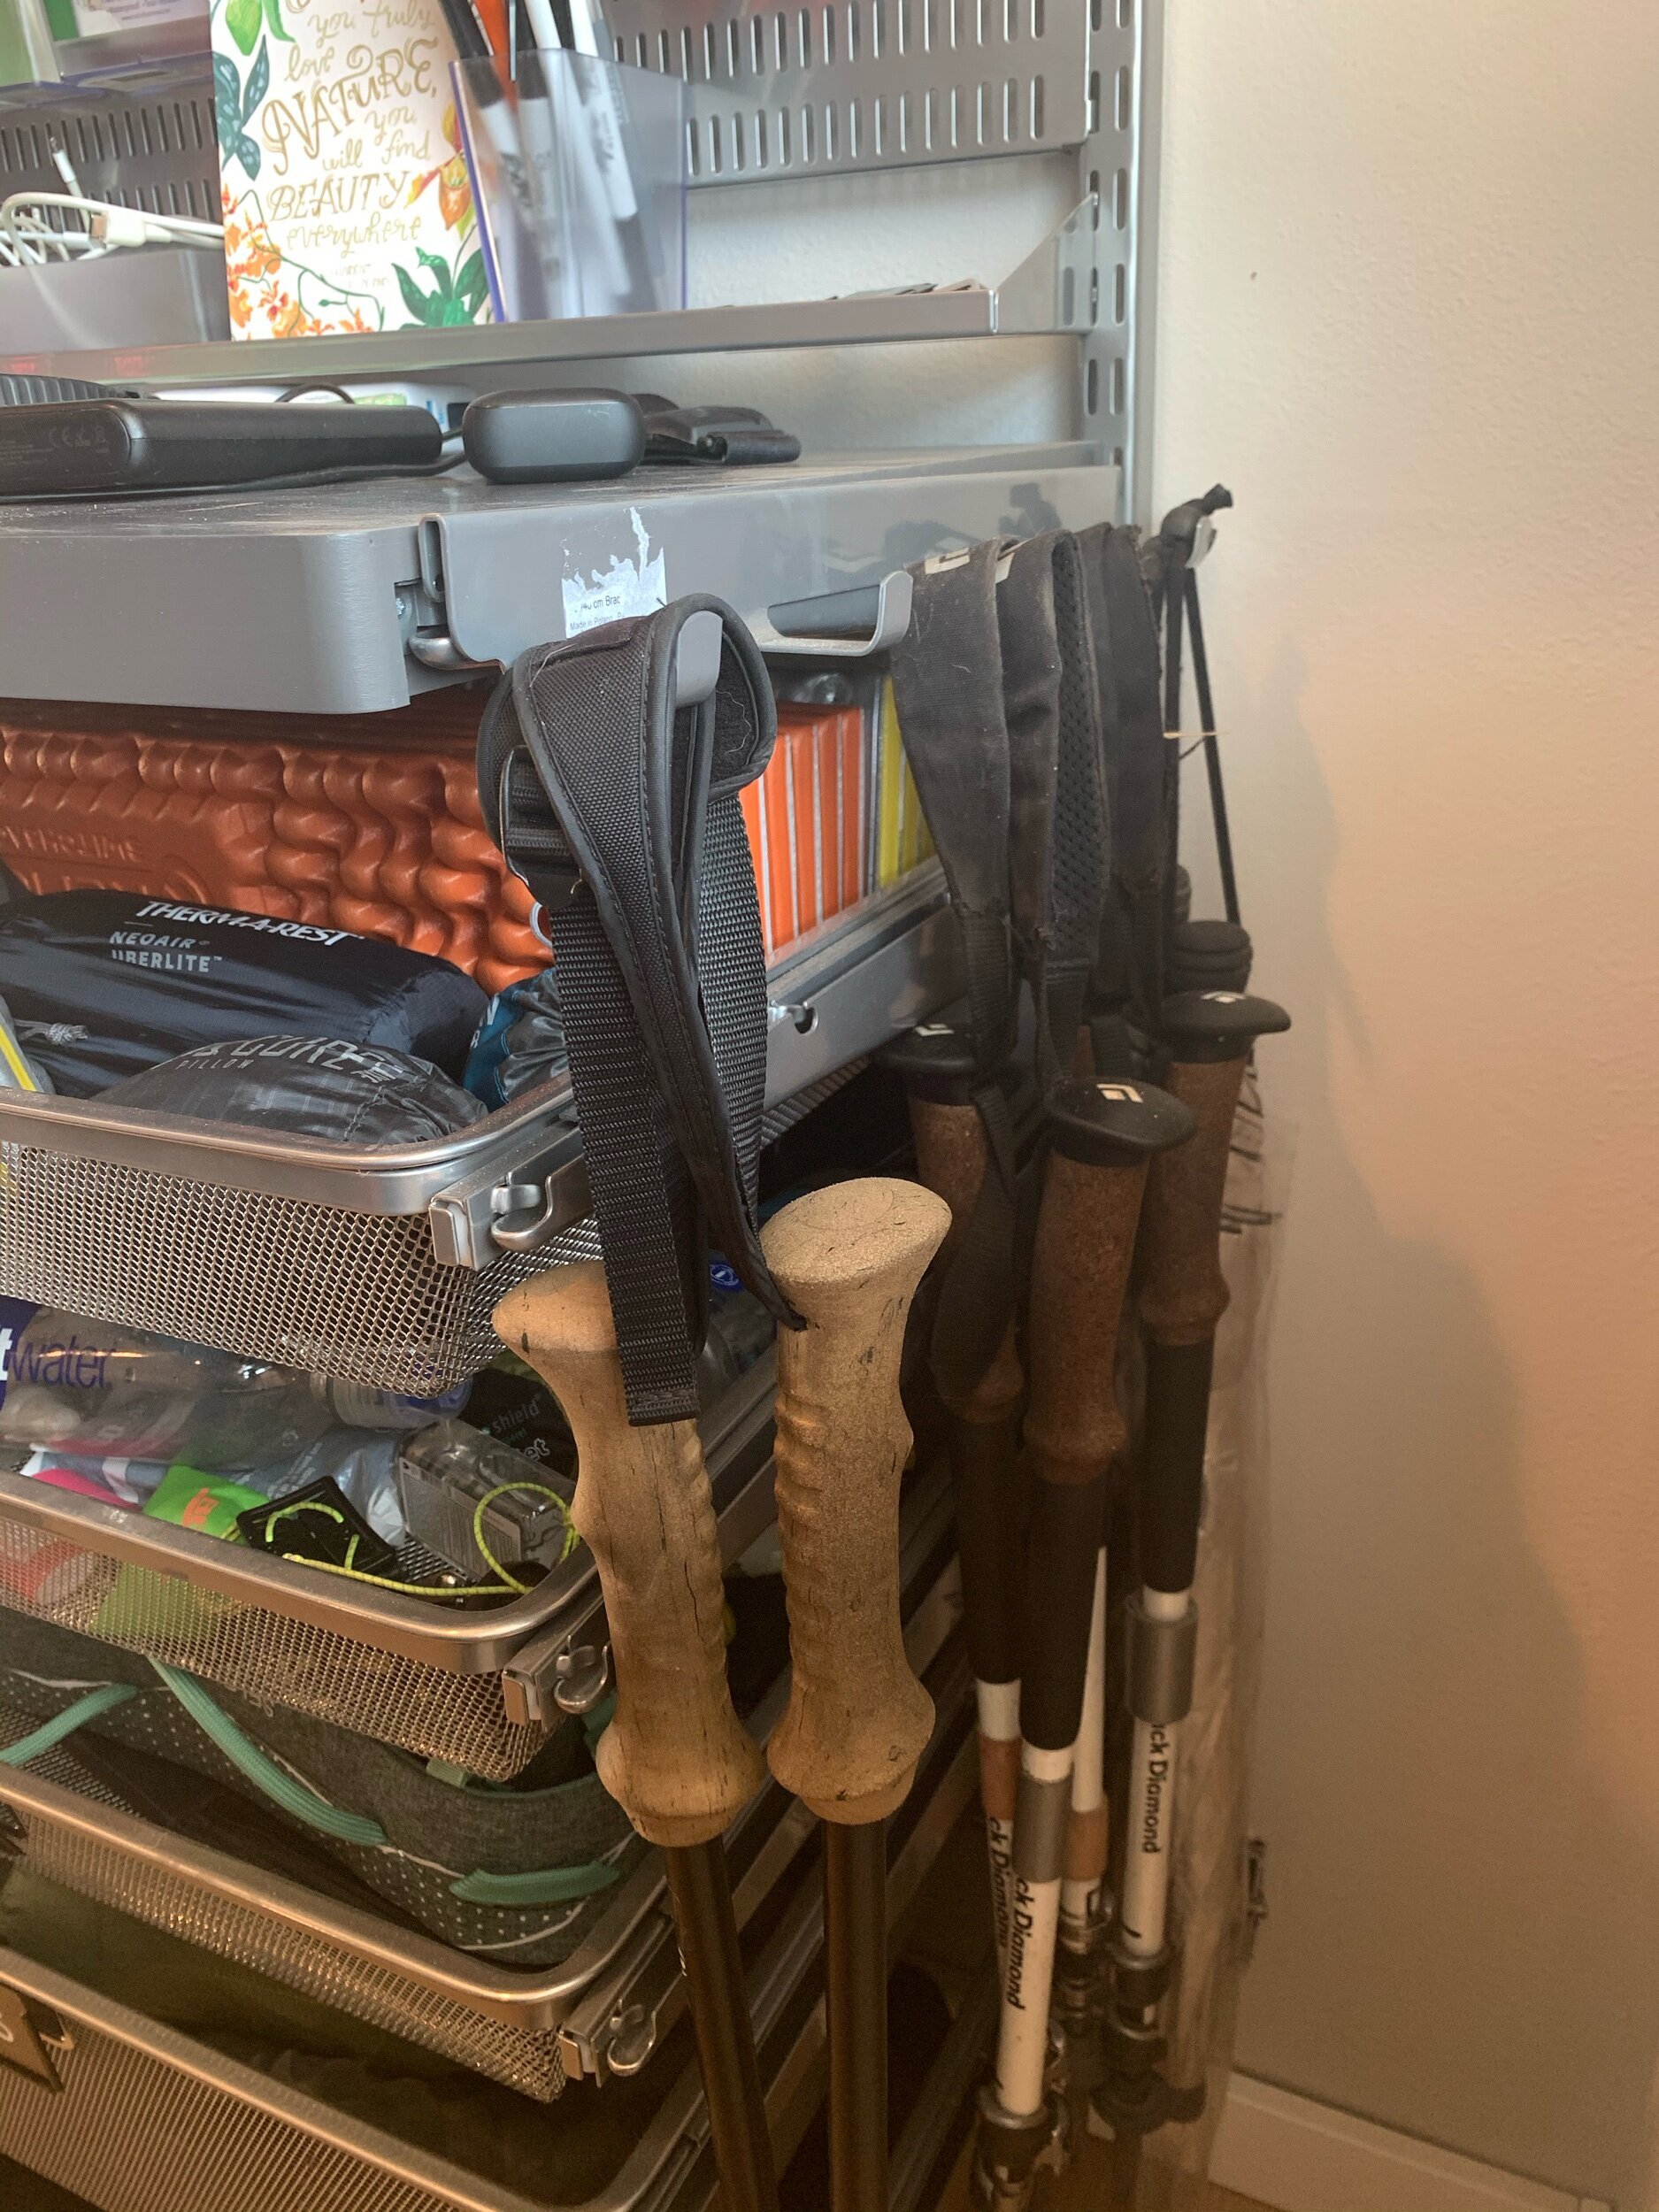
Trekking Poles & Umbrella: These guys are super awkward! Somehow I’ve wound up with multiple sets of trekking poles (don’t @ me) and a hiking umbrella. They are longer than 2 feet, even when collapsed, and really thin, so I couldn’t make them work in a basket. I was on the hunt for a solution and I found just the thing from The Container Store: Shelf Bracket Hooks. They’re clearly made for belts, but work amazingly for hanging my trekking poles off of! And they’re out of the way, on the side of the wall.
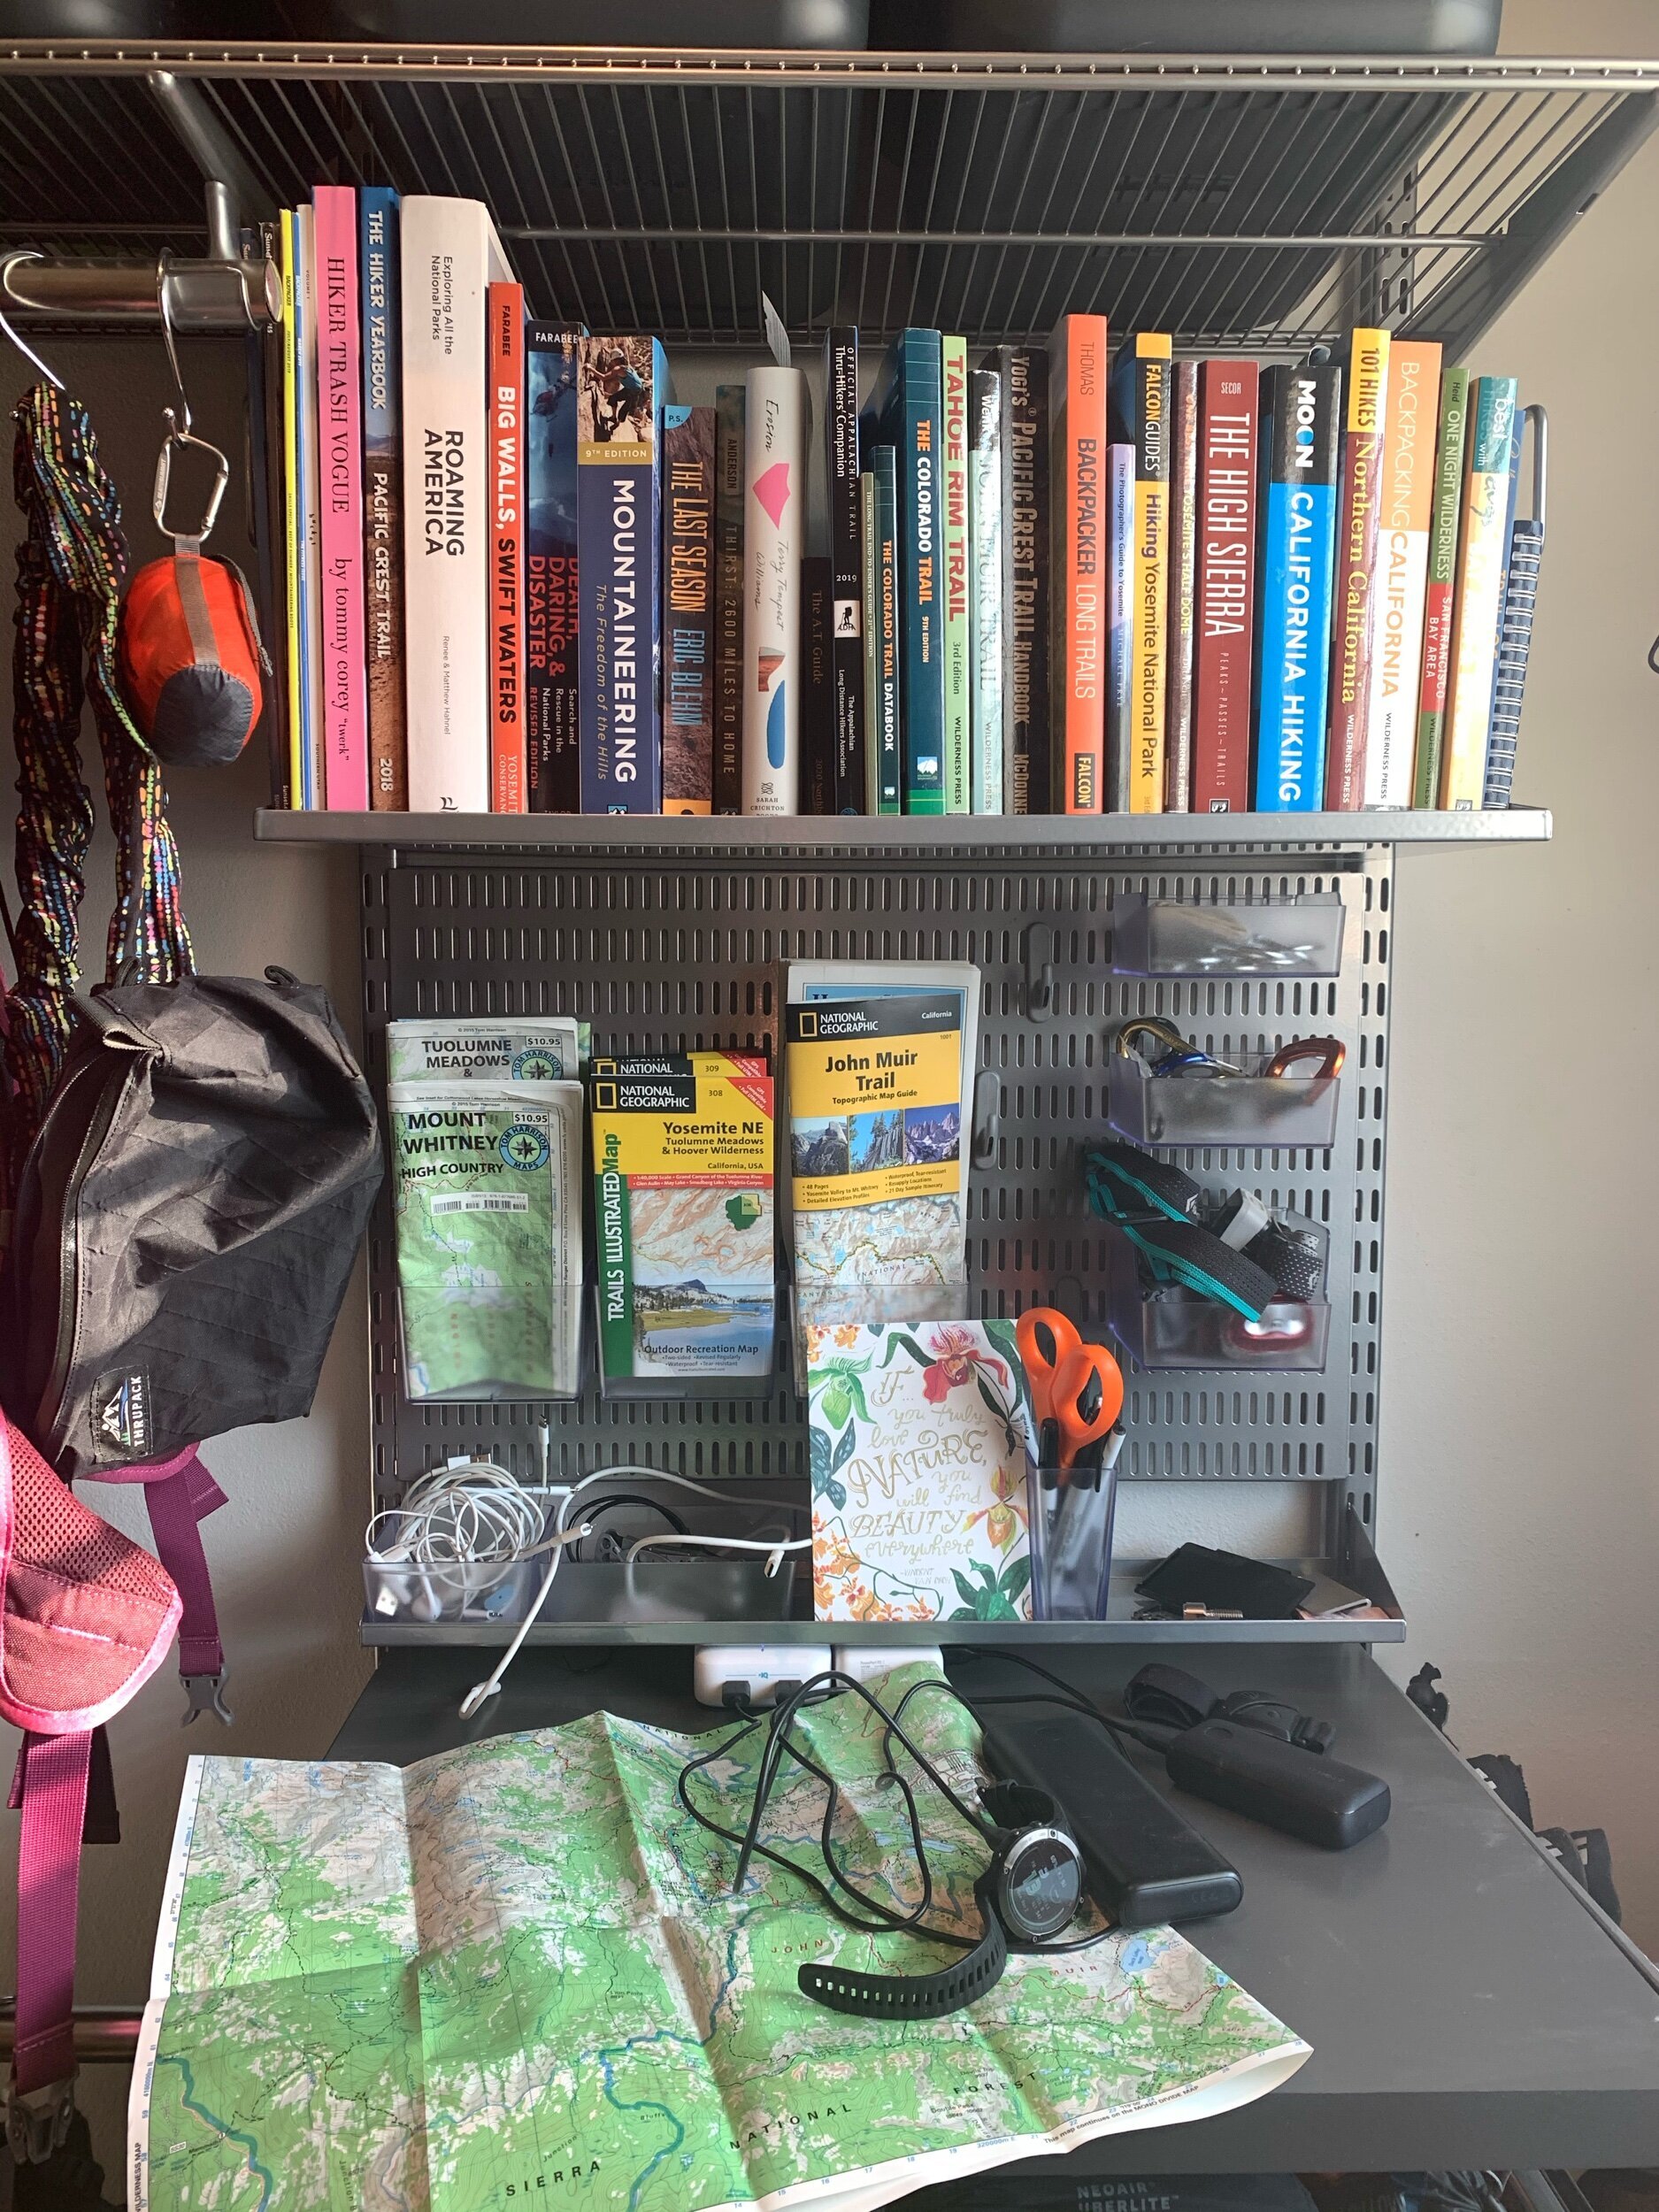
Electronics: I wanted a sort of “landing zone” for charging my headlamp and battery bricks before trips. And since I use these rechargeable items for more than just the outdoors and backpacking, I wanted them to be easy to access and not have to dig through anything. I also wanted a quick-grab spot for my camera. I decided that installing a shelf and placing one of my multi-USB charging stations on it would be the perfect item for part of my wall. This shelf could also do double duty for laying out maps and books and studying them, a spot to rest my storage bins when I’m pulling them down from the high shelf above it, and in a pinch, a drop zone for small things that need to be put away, but not quite yet (I’ll get back to you about how messy this shelf gets. update: …yeah it gets a little messy).
Guidebooks & Maps: These weren’t initially on my radar, but in order to make this wall work, I needed to purge my storage cubbies, which had lots of books and maps in them, my outdoor books intermingled in with old textbooks, childhood books, and the Harry Potter series. I found a cool bookshelf/ bookend combo that integrated with the ELFA system, which provided a place for my outdoor books. And because I still wanted to utilize a pegboard in some way, I found tall boxes that clip into the board, which were the perfect size for my NatGeo Topographical maps.
Step 1: Placing the Bones
Step 2: Aligning & playing around with configurations
Step 3: Troubleshooting, figuring out cords & odd objects
Step 4: Clear bins? Nope, they look cheap. How many wire mesh baskets can fit? This took a lot of work. Trekking pole solution! “Desk” shelf! Two rows of backpacks!!
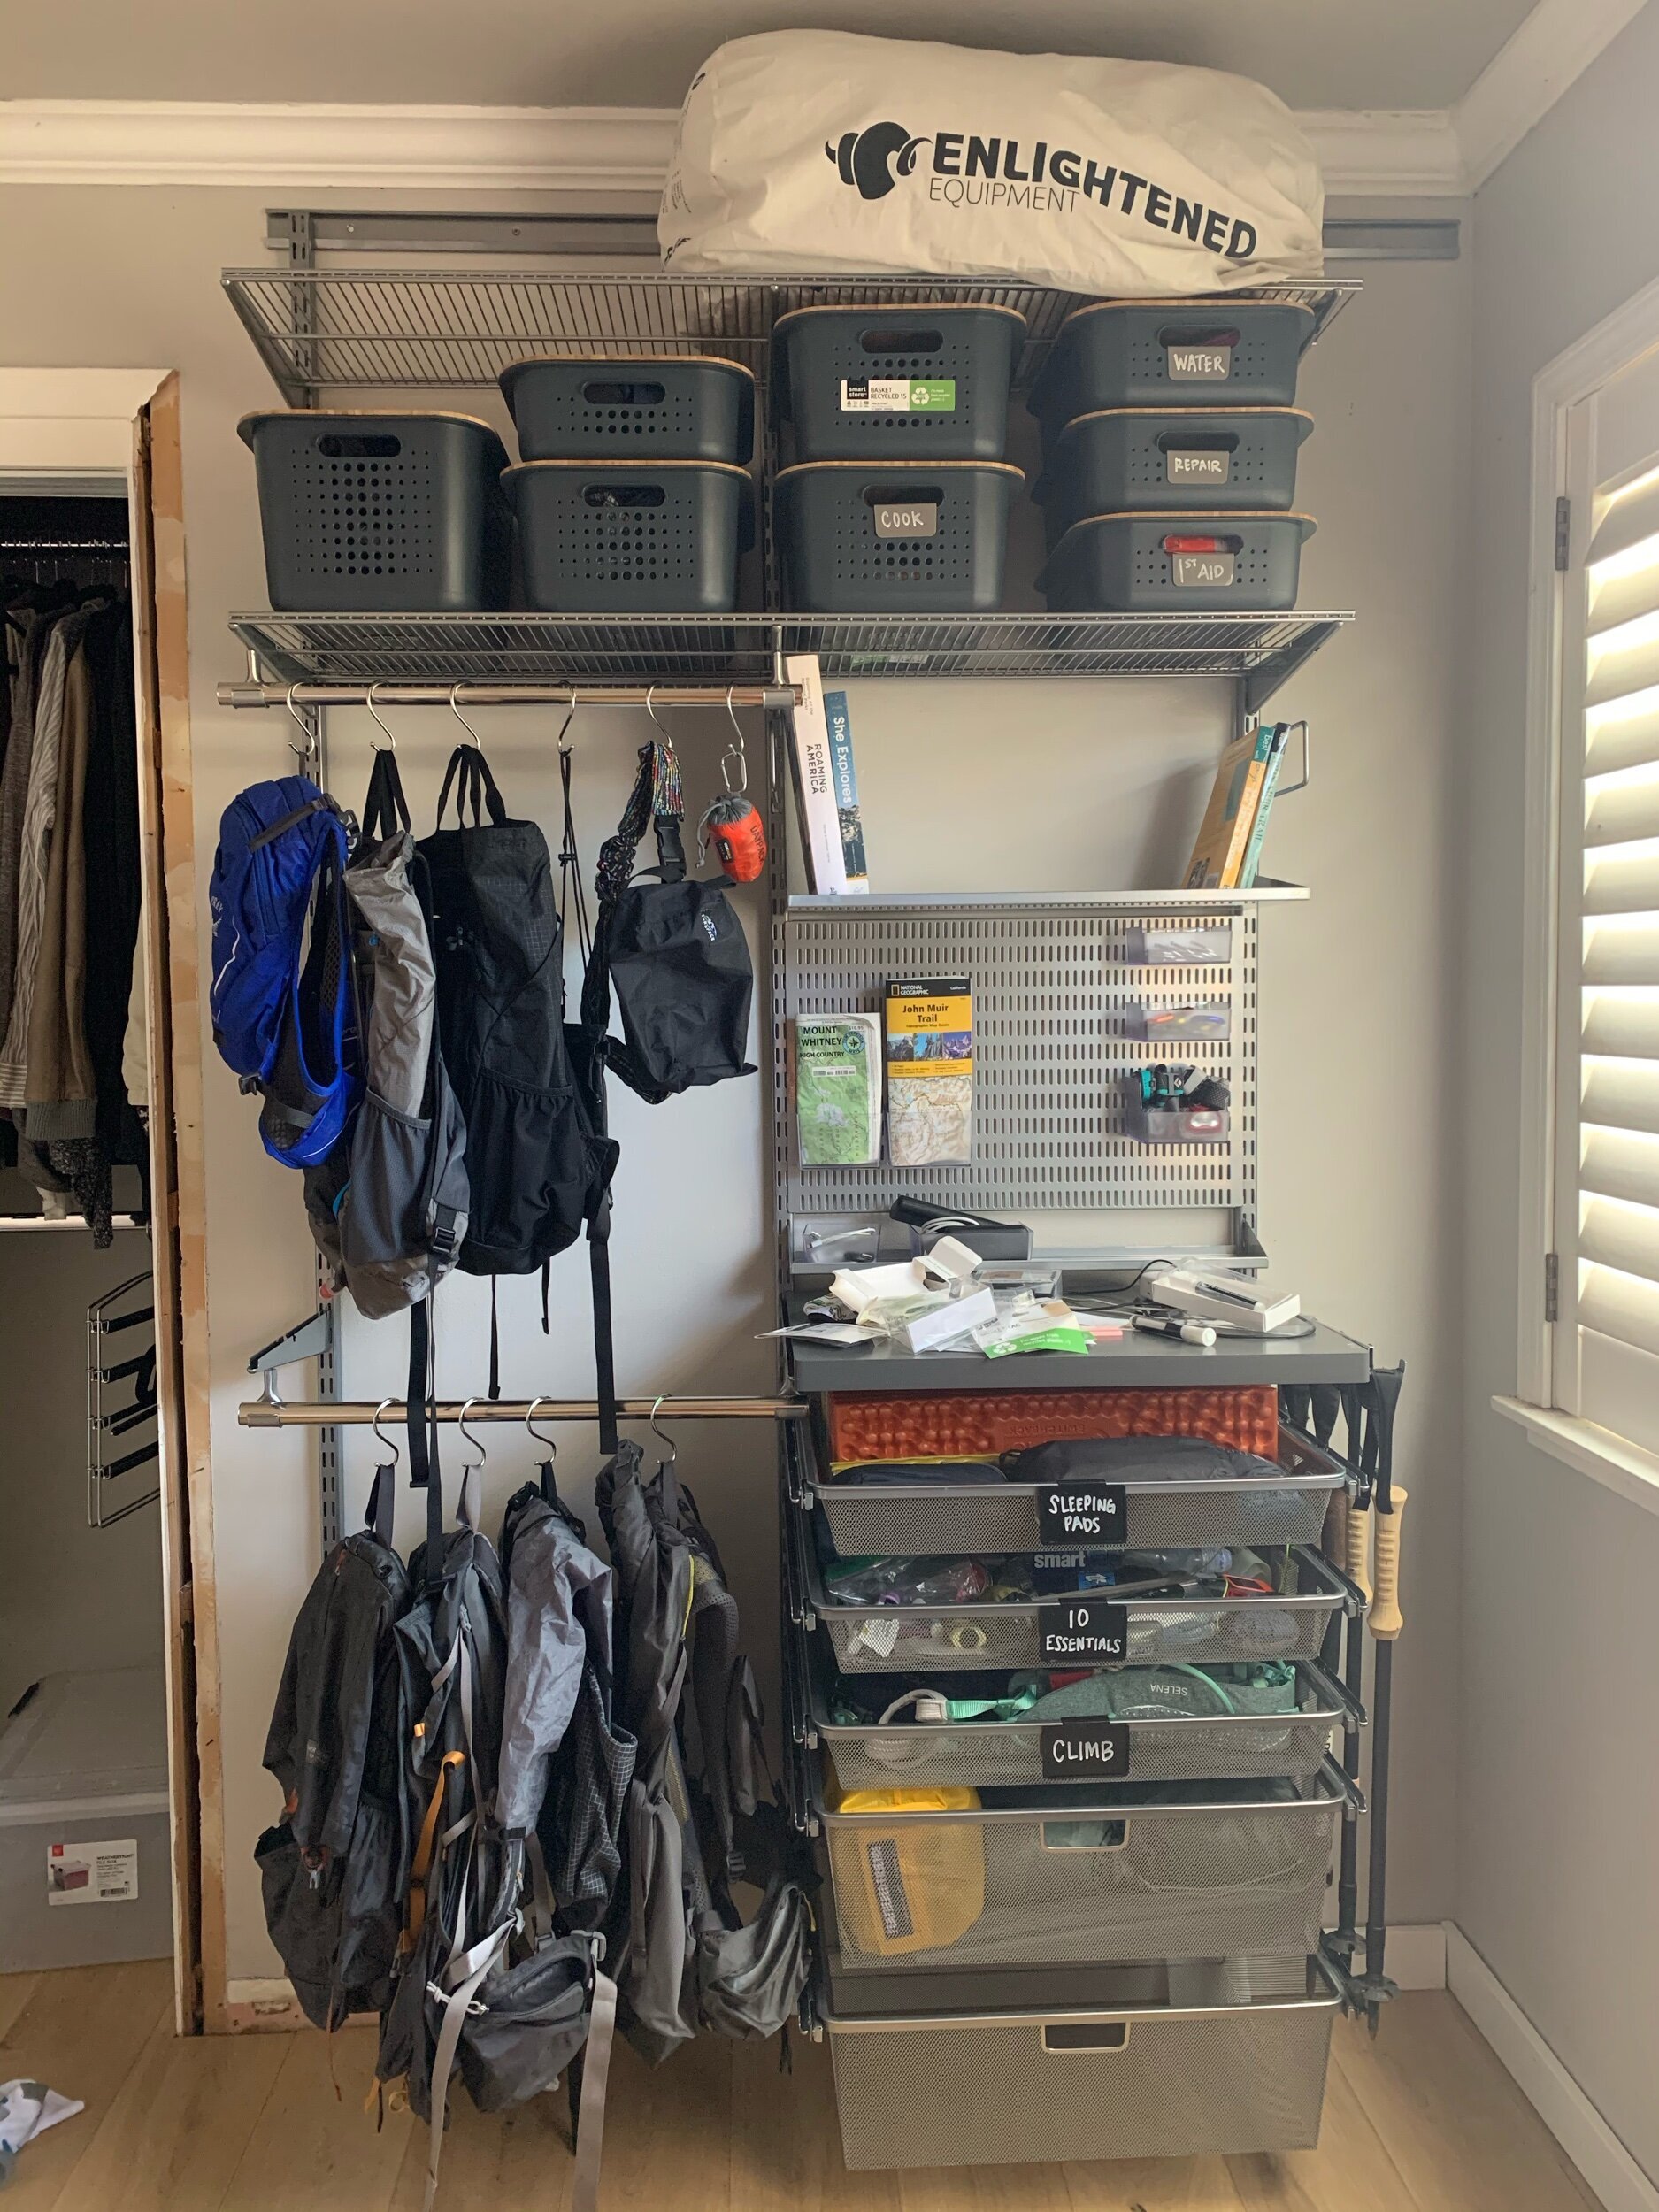
Step 5: Trialing & finalizing plastic bins, adding another row of backpacks, finalizing 5 wire mesh baskets, need more map space!
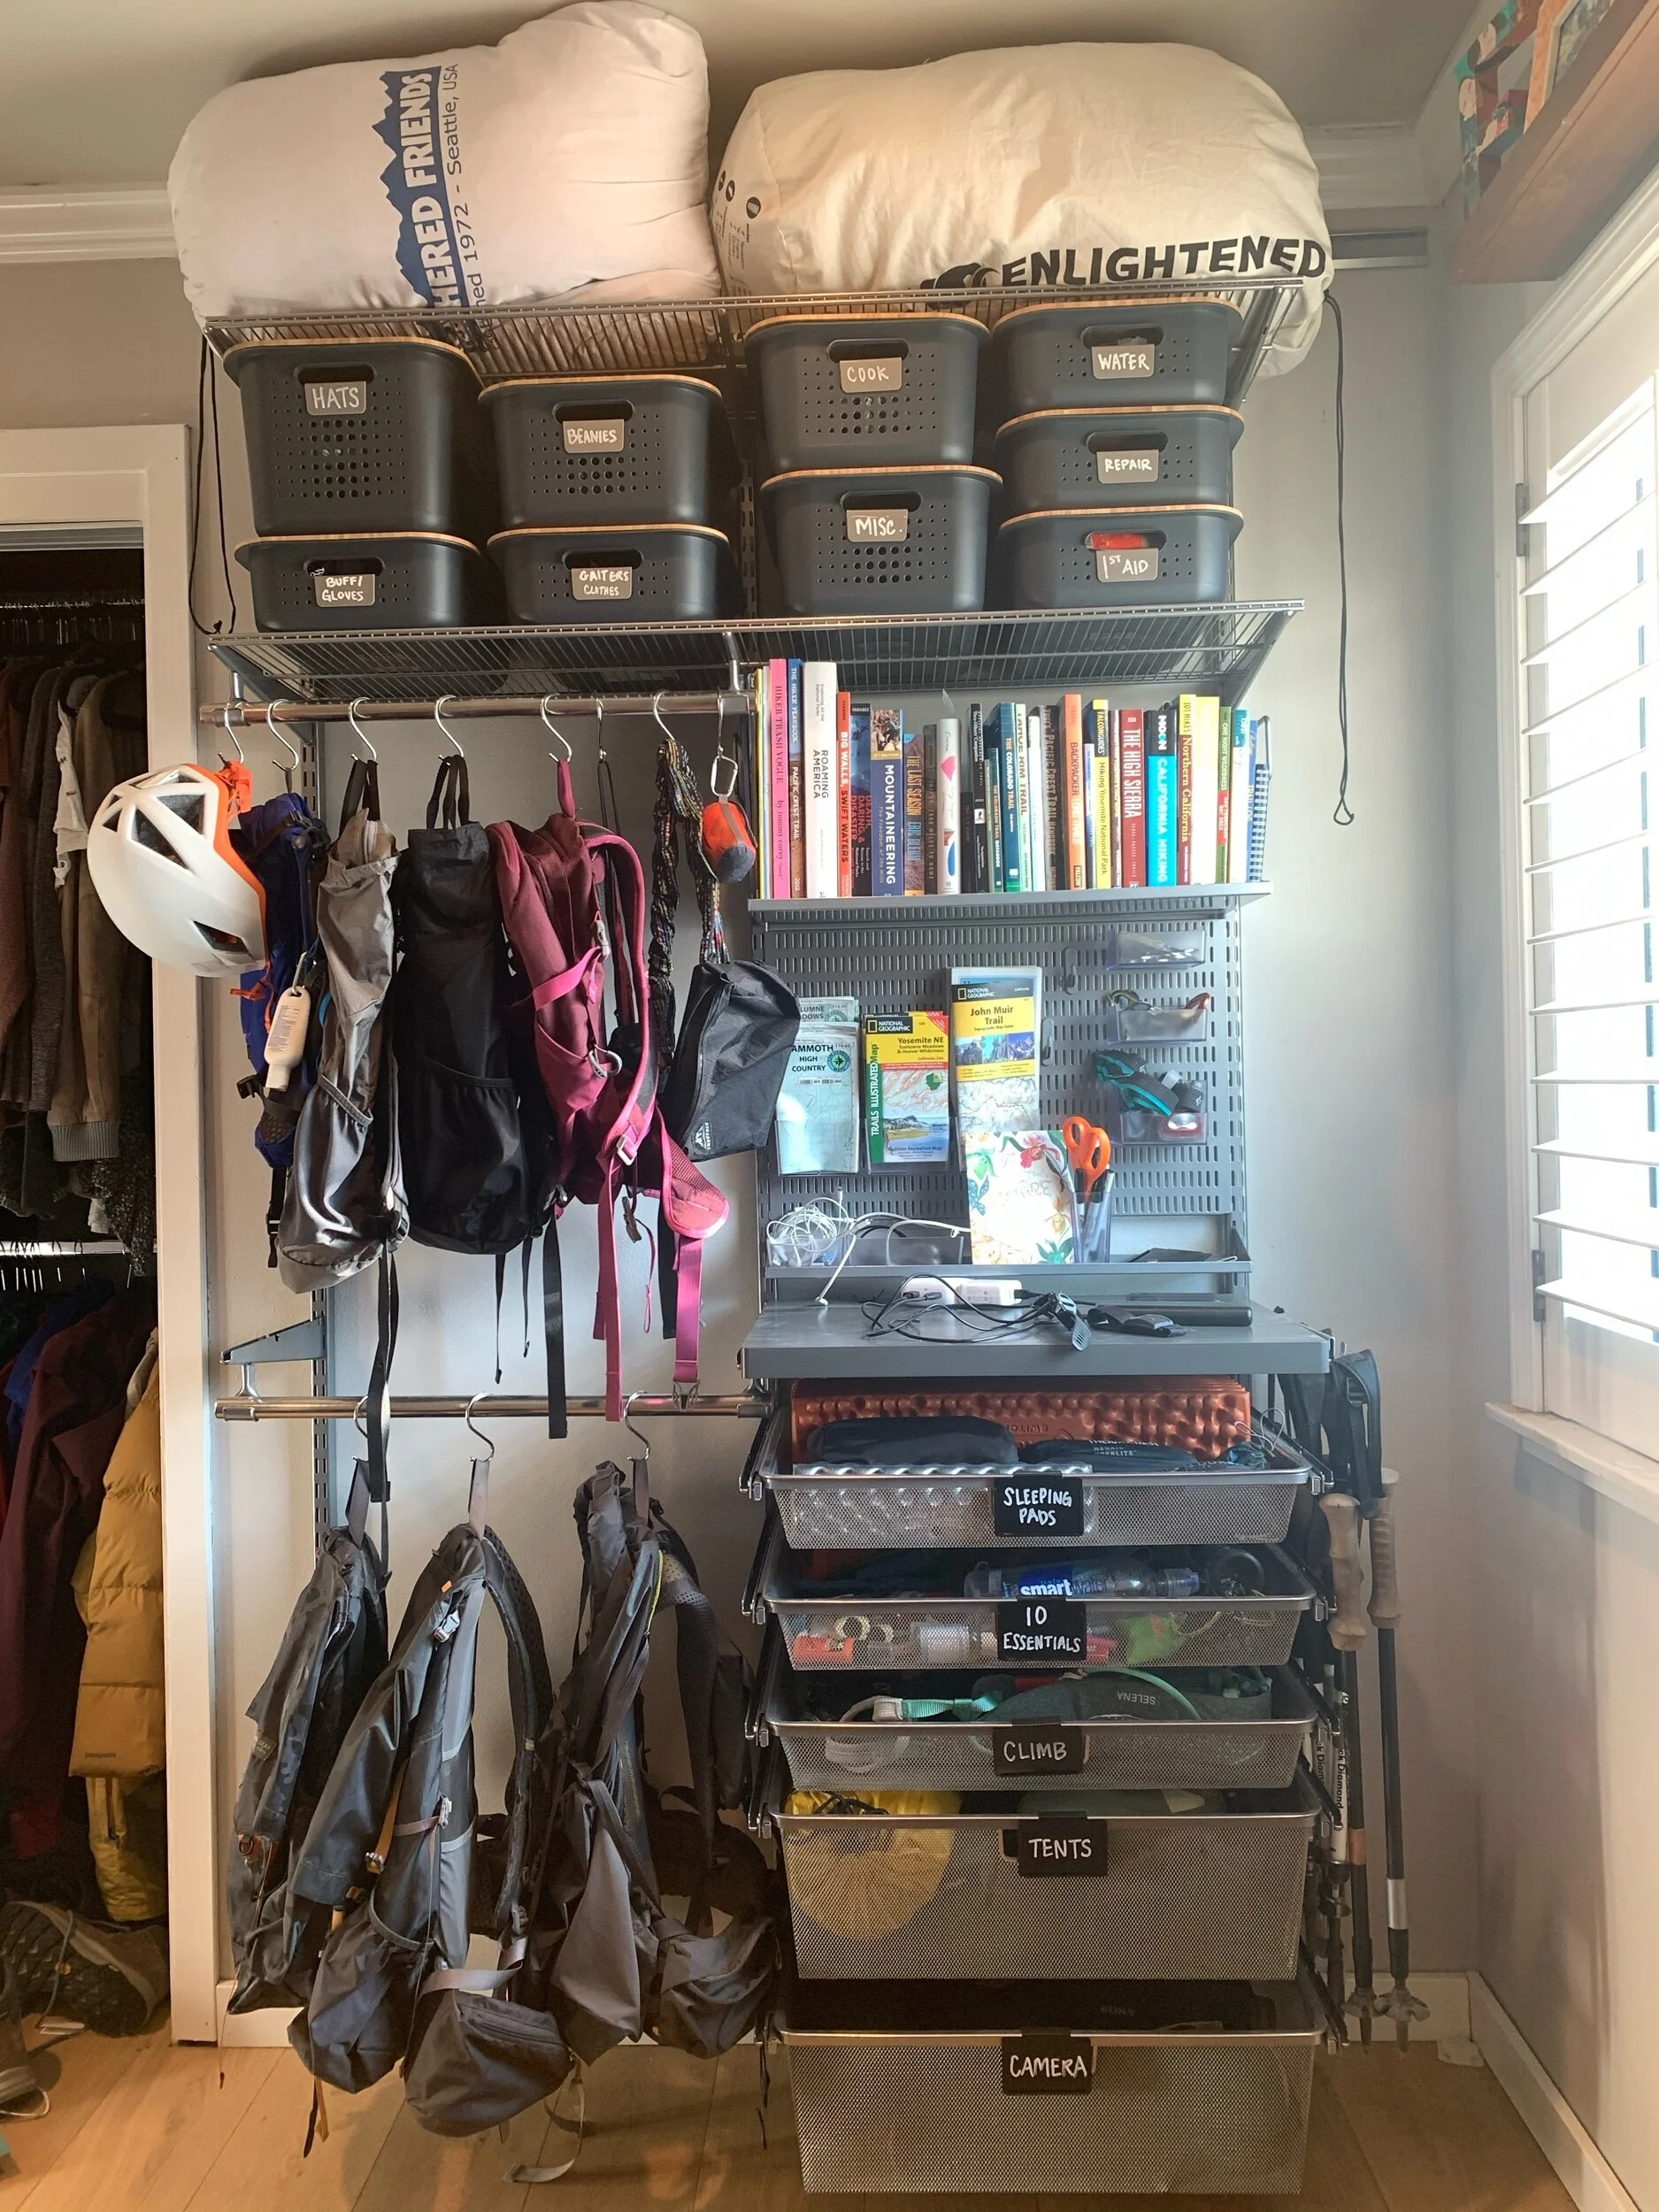
Step 6: The finished product! (Yes, the trims were also updated in an unrelated project)
Looking Into the Details:
Above: A closer look at the bookshelf, pegboard, mini shelf, and full shelf. As you can see, the wire shelf brackets have small holes underneath them which is where the backpack rod can attach to. The bookshelf & bookends attach right into the wall brackets, as does the peg board.
Right Top: Closet rod & S-hooks to hold the backpacks. Was eventually able to get even more items on there & a climbing helmet!
Right Middle: Various-sized bins with labels to keep the little things organized. 1 large, 3 medium, and 5 small. For the most part, everything is organized well. Don’t give me flack for a misc. bin - I’m not Marie Kondo, okay! The top wire shelf had to have enough ceiling clearance to fit my 0* F sleeping bag
Right Bottom: A close-up of my sleeping pad drawer. It fits 1 Nemo Switchback, 1 Therm-a-rest Z-lite (3/4 length), 1 Therm-a-rest Neoair Xlite Women’s, 1 Neoair Uberlite, 1 Zseat, a STS ultralight regular pillow, and a Big Agnes Q Core Deluxe pillow.
Bottom Left: A close-up of the mesh drawer organization. The “10 Essentials” is a bit junk drawer-y, but it has all of my quick-grab items that I need on almost every backpacking & day hiking excursion.
Bottom Right: The “belt bracket” for my (& my mom’s) trekking poles & umbrellas. Due to the ingenious ELFA design, this attachments hooks onto the same shelf bracket that is holding up the solid shelf.


Detailed Purchase List
Everything to create this gear wall was purchased from The Container Store! They regularly run sales on their ELFA products, making this a doable project. If you choose to shop through my Rock Porch closet, I greatly appreciate it! I will earn a small commission at no extra cost to you.