
Backpacking Havasupai
I was first exposed to Havasu Falls, way before I self-identified as a “hiker”, when I saw some professional photography from there. At the time, I didn’t know where these waterfalls were located, or that “normal” people could go there. I was immediately entranced by the amazingly turquoise water and red rock walls, though. But a few years later, I started seeing the same waterfalls on my Instagram feed and realized this was a real place I could actually visit, and that it wasn’t halfway around the world like I originally assumed.
While I don’t intend for this to be an all-encompassing trip guide, in this post I’ll be reviewing my trip and some procedural things that I wasn’t really aware of before the hike, permits & reservations, and things I learned for next time!
Reservations & Permits
Before I dive into permits, I want to touch on the fact that by visiting Havasupai, you are entering tribal land, and must obey the Havasupai Tribe’s rules. If you cannot or will not respect their laws, do not visit. It is incredibly generous of the Havasupai Tribe to open their land to tourism, so don’t be one of those drone-operating, cliff-jumping, alcohol-drinking, boneheads that disrespects the tribe and sets a bad example.
Reservations for camping are done entirely online now. On February 1st, at 8:00 AM Arizona time, reservations will be available for March - the end of next February. As of 2020, all reservations must be made for 3 nights/ 4 days. The fee per person is $395 total, no matter how many days you end up spending there, or which days of the week you visit. If you are a member of a tribe, they will process discounts at the time of check-in, in the village. Yes, this is really expensive, and might not be worth it for some people. If it is any consolation, it appears that this money is having a positive impact on Supai. They have been able to build more community buildings for its residents, which look really nice. Reservations fill up very fast. When I made our reservations for two people, I finally got through 1.5 hours after signing in (right at 8 AM AZ time), and the only available dates were for the next day (lol), and then the end of September - through the end of the year.
Permits are non-transferable. Only one person will be the primary on the reservation, even though you can have up to 6 people on the reservation. That means if the primary person can no longer go on the trip, the rest of the party is kind of screwed, because no one else can check in at the office except for the primary. However, the tribe created a new reservation selling system on the reservation website. If you can no longer go on your trip, you can post the whole reservation, or a part of it (yes, you can split the reservation up) on the website. You can also get a direct transfer link if you need to transfer the reservation to a specific person. Once someone elects to buy it, you cannot take it back. If no one buys it, you are still responsible for the cost. Once someone pays for your reservation, you’ll receive a refund, minus 10%. The reservation office handles all of the transfers. Direct re-selling is prohibited.
If you noticed, I’ve been calling this a reservation up until now. That is because you are making a reservation, and you have a reservation until you get to Supai village (8 miles into your hike) and check in at the Tourism Office. Once you check-in with you reservation number and photo ID, you will be given a permit, paper overview maps (these are not topographical maps), and most importantly, wristbands that indicate you are allowed to be there. You must check-in at the tourism office to receive your actual permit. You also need to provide your car make/model/license plate # during the check-in process, so if you have a rental, make sure you know all of this stuff! The Tourism office is open from 6 AM - PM May - October, and 9 AM - 3 PM the rest of the year, so take this into consideration when planning your hike in!
When Should You Try To Go? Basically anytime that is available! Permits are highly sought after for this trip, so whenever you can get one, take it. You can now visit year-round too. Weather and daylight will vary throughout the year, but the water temperature is consistently ~70* F according to the tribe. The main weather considerations are Monsoon Season, which is late June - late September, and extreme heat (100*+ F) in mid-summer. Our trip was at the very end of September, which ended up being good. We had warm days and nights, but also had an afternoon of rain and wind. Our hike in and out saw pretty mild temperatures, thankfully!
Getting There
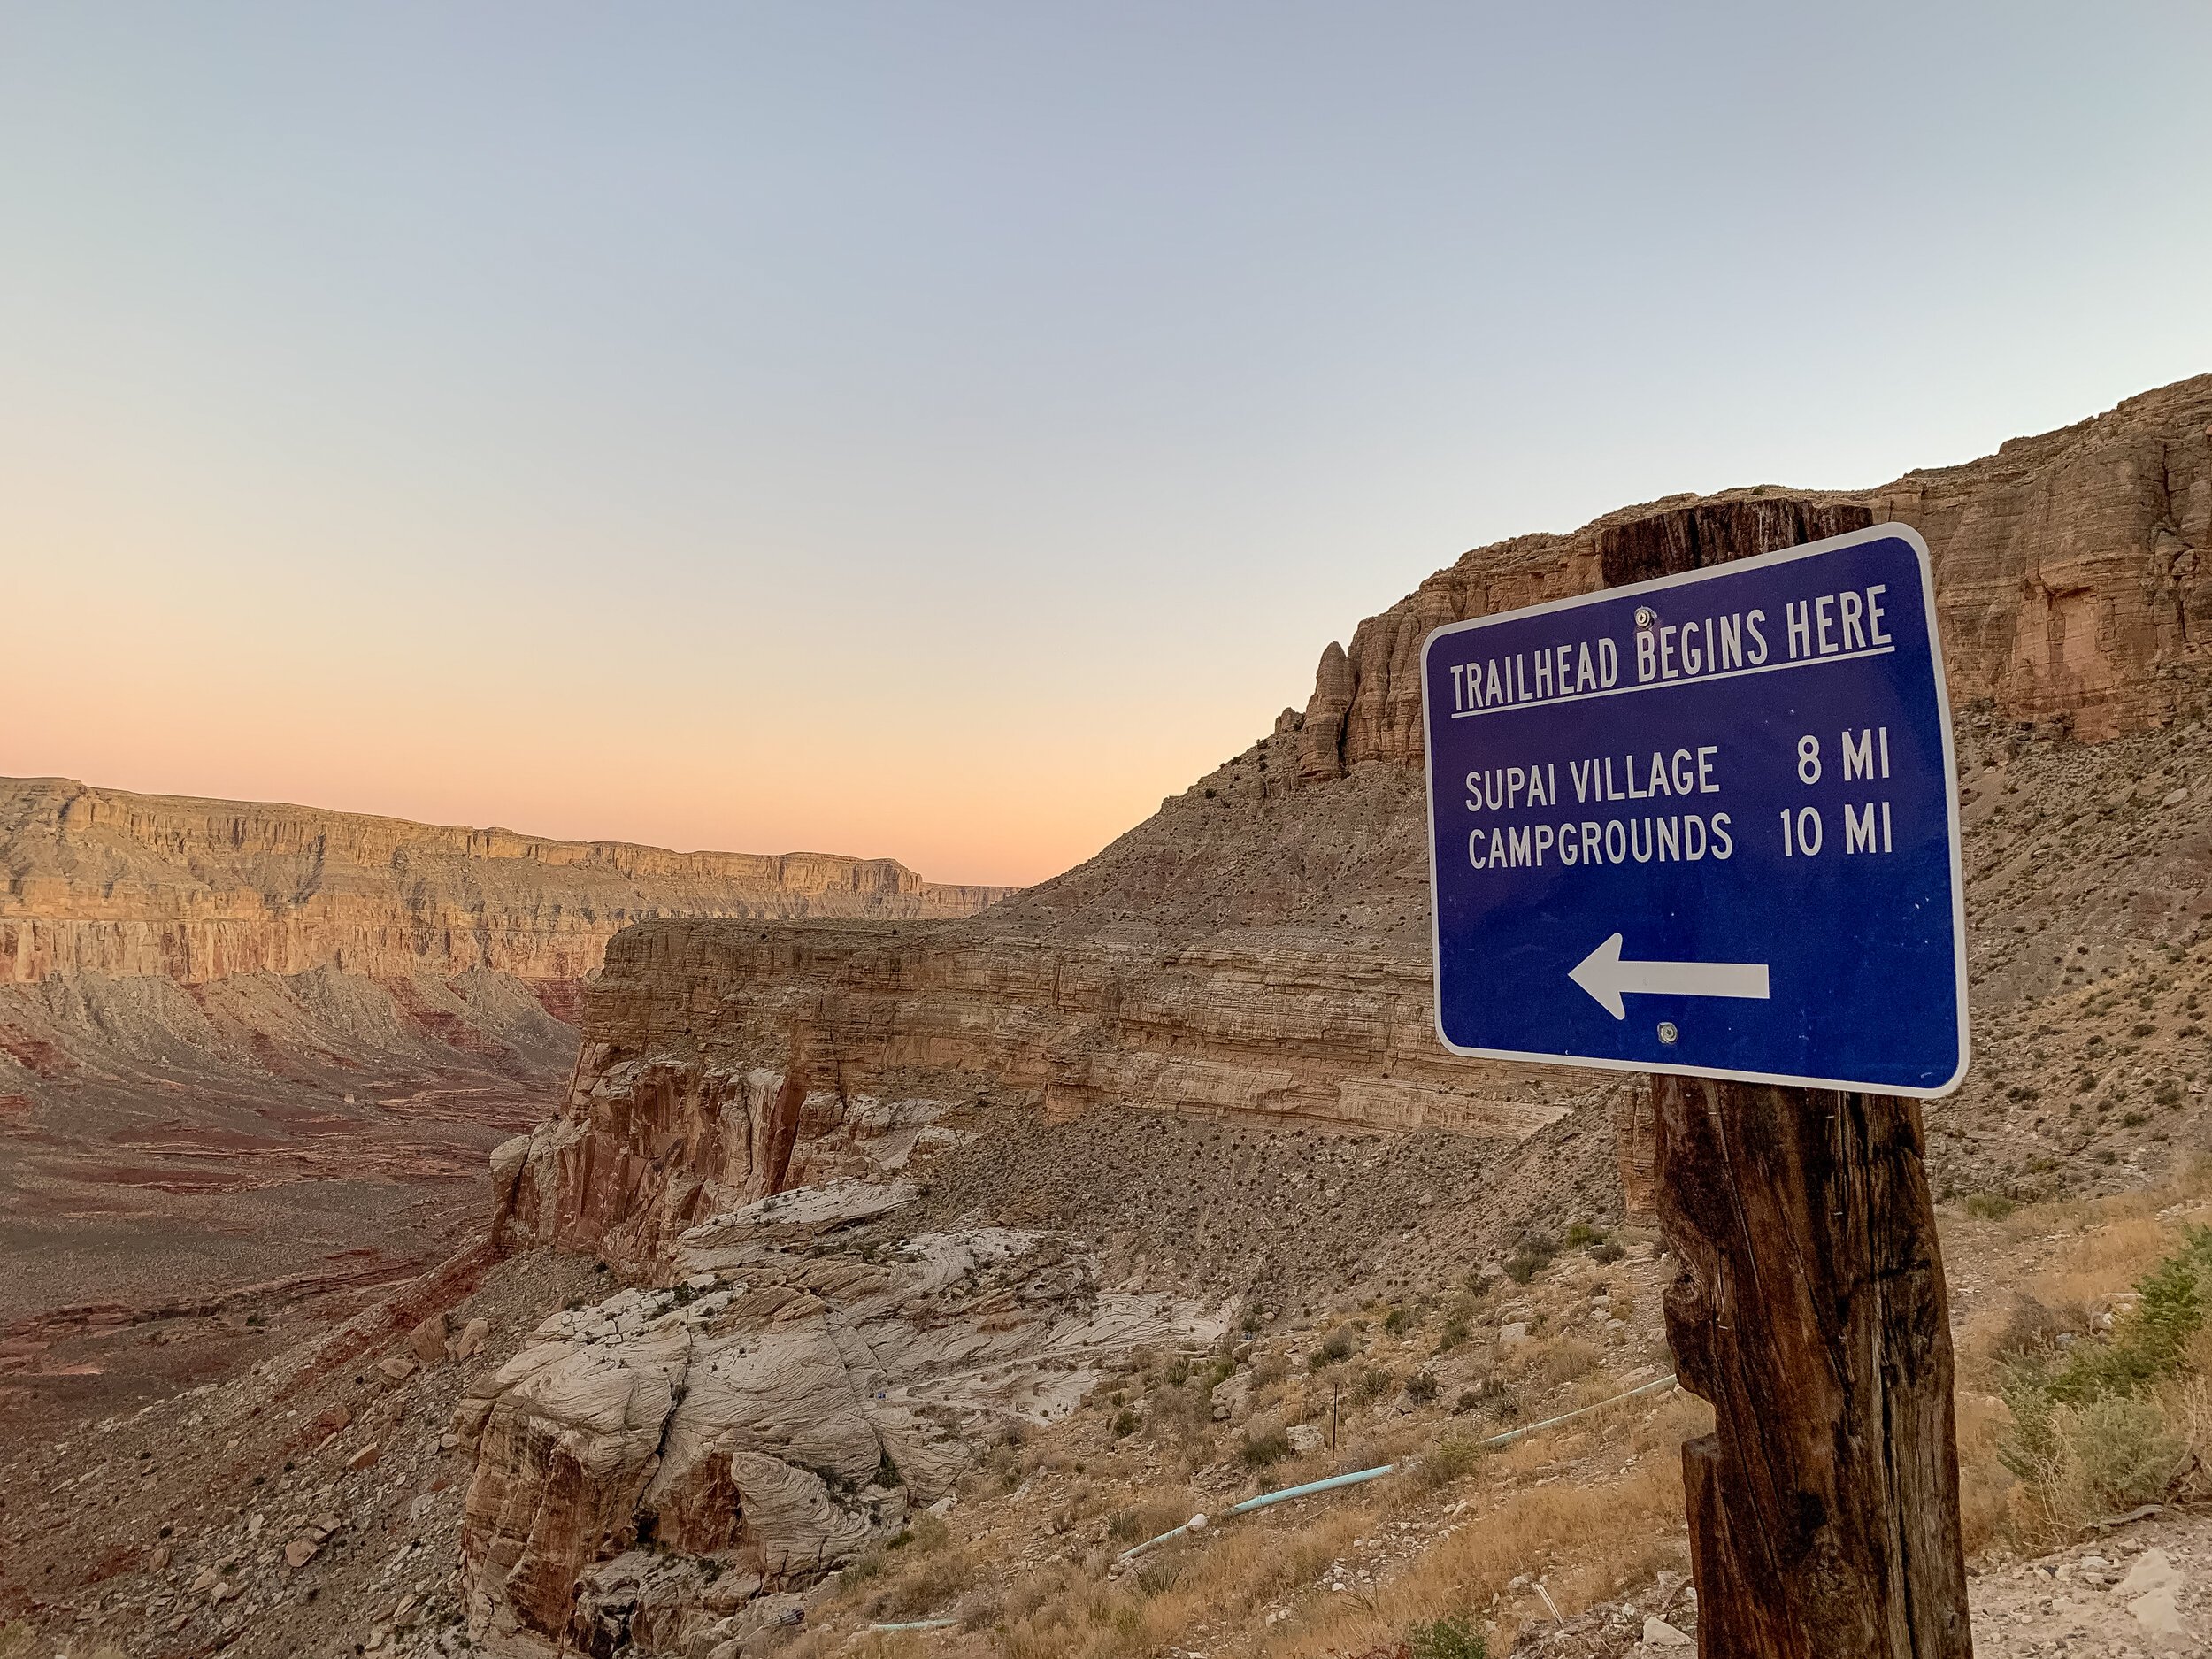
Arriving to Havasu Falls is an adventure in itself! The trailhead, Hualapai Hilltop, is located 67 miles from Peach Springs, AZ on a paved, but remote road. There are no street lamps on this road, so caution must be exercised when driving in. There are numerous cattle grates along the way, and wildlife can possibly cross the road, so be careful & pay attention! The only way to get to the trailhead is by driving a car. If you are traveling from far away, you will need to fly into a nearby airport and rent a car. You’ll probably want to fly into Las Vegas, NV, or Phoenix, AZ.
Pro Tip: There is no water available at the trailhead! Make sure you bring in enough water for yourself for you to get down to the campground.

My mom and I road-tripped in our camper van from the Bay Area, CA. We did the drive in 2 days, arriving the afternoon before our permit entry date. There is ample parking there, but do note that no spaces are really large enough for a huge RV. The one thing I wasn’t exactly prepared for was the Checkpoint, a few miles away from the trailhead, on the road. Here we had to stop the car, and were greeted by 2 tribal policemen. They checked our permit reservation confirmation, went over rules of the reservation and specific hiking rules, took down our car information, and asked us to get out of the van for an inspection. I suspect that they inspect all vans/ RVs just because there’s probably a higher likelihood for contraband to be in them (remember: no alcohol allowed on the reservation!). They were really nice, were passionate about their home, gave us a brief weather report, and reassured us that sleeping overnight at the trailhead was OK. If you don’t have a camper van, and are arriving the day before, I’d ask them where you could camp outside of your car. I’ve heard there is space, but I didn’t personally see it when we were there.

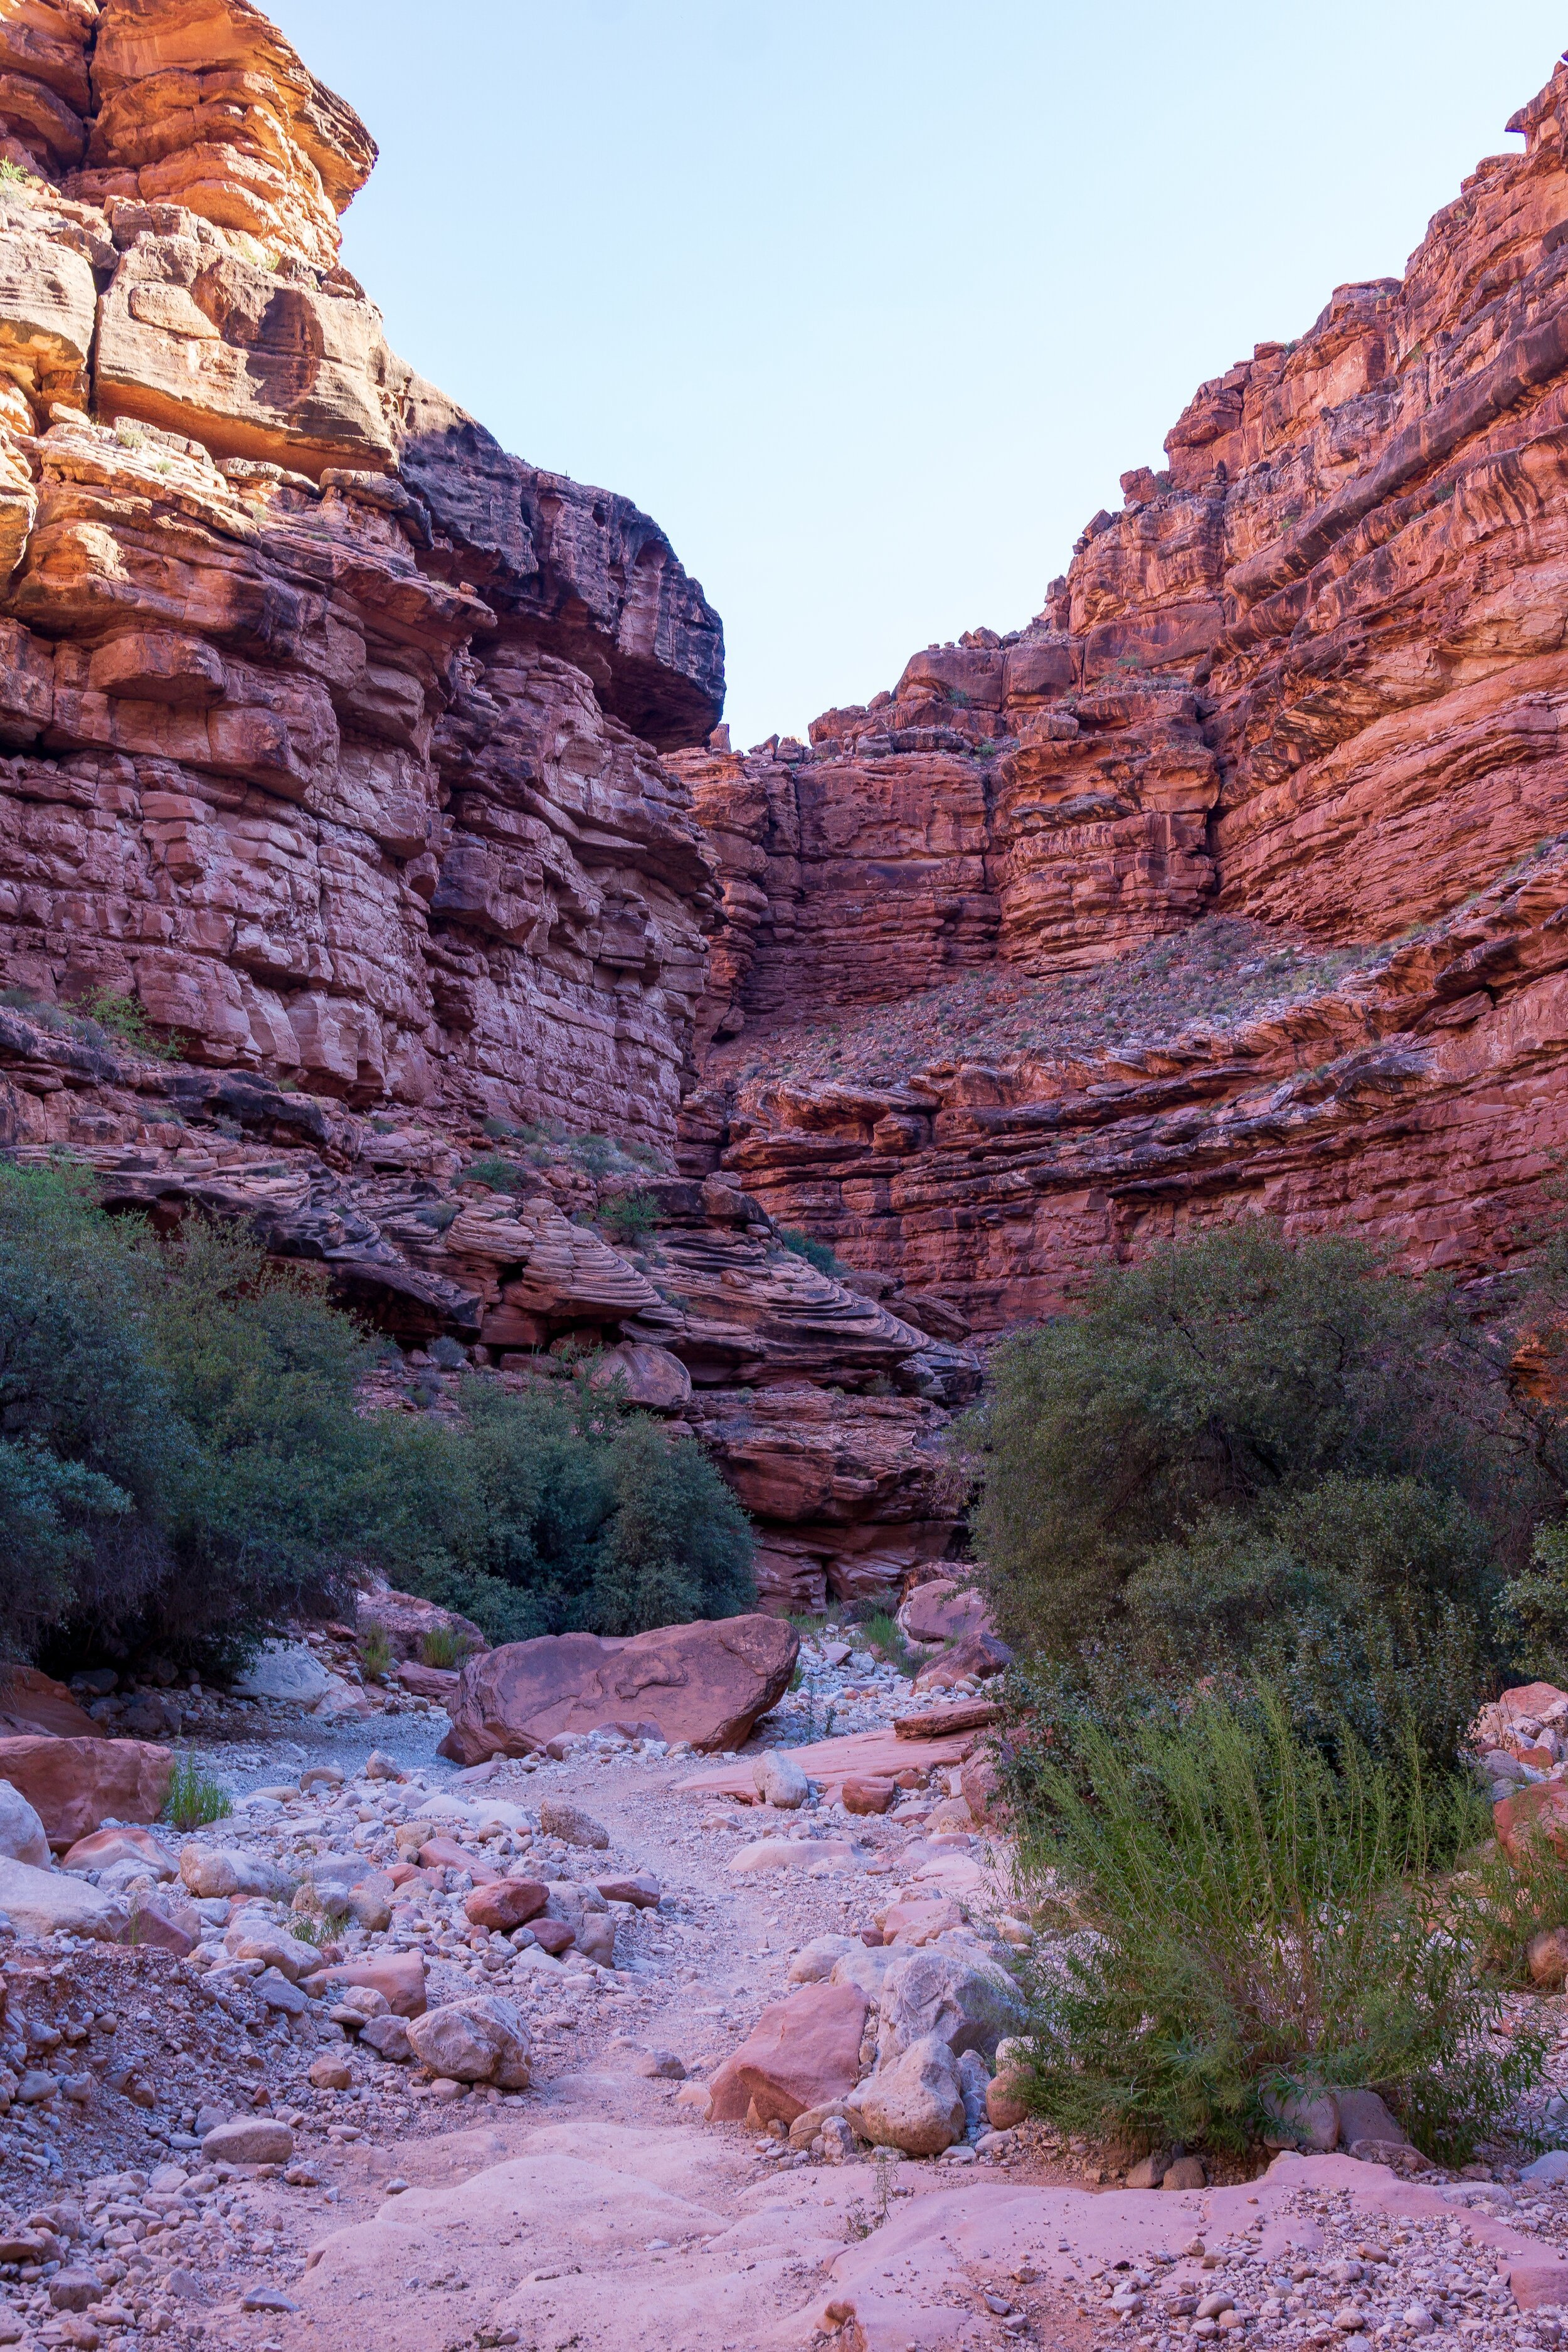
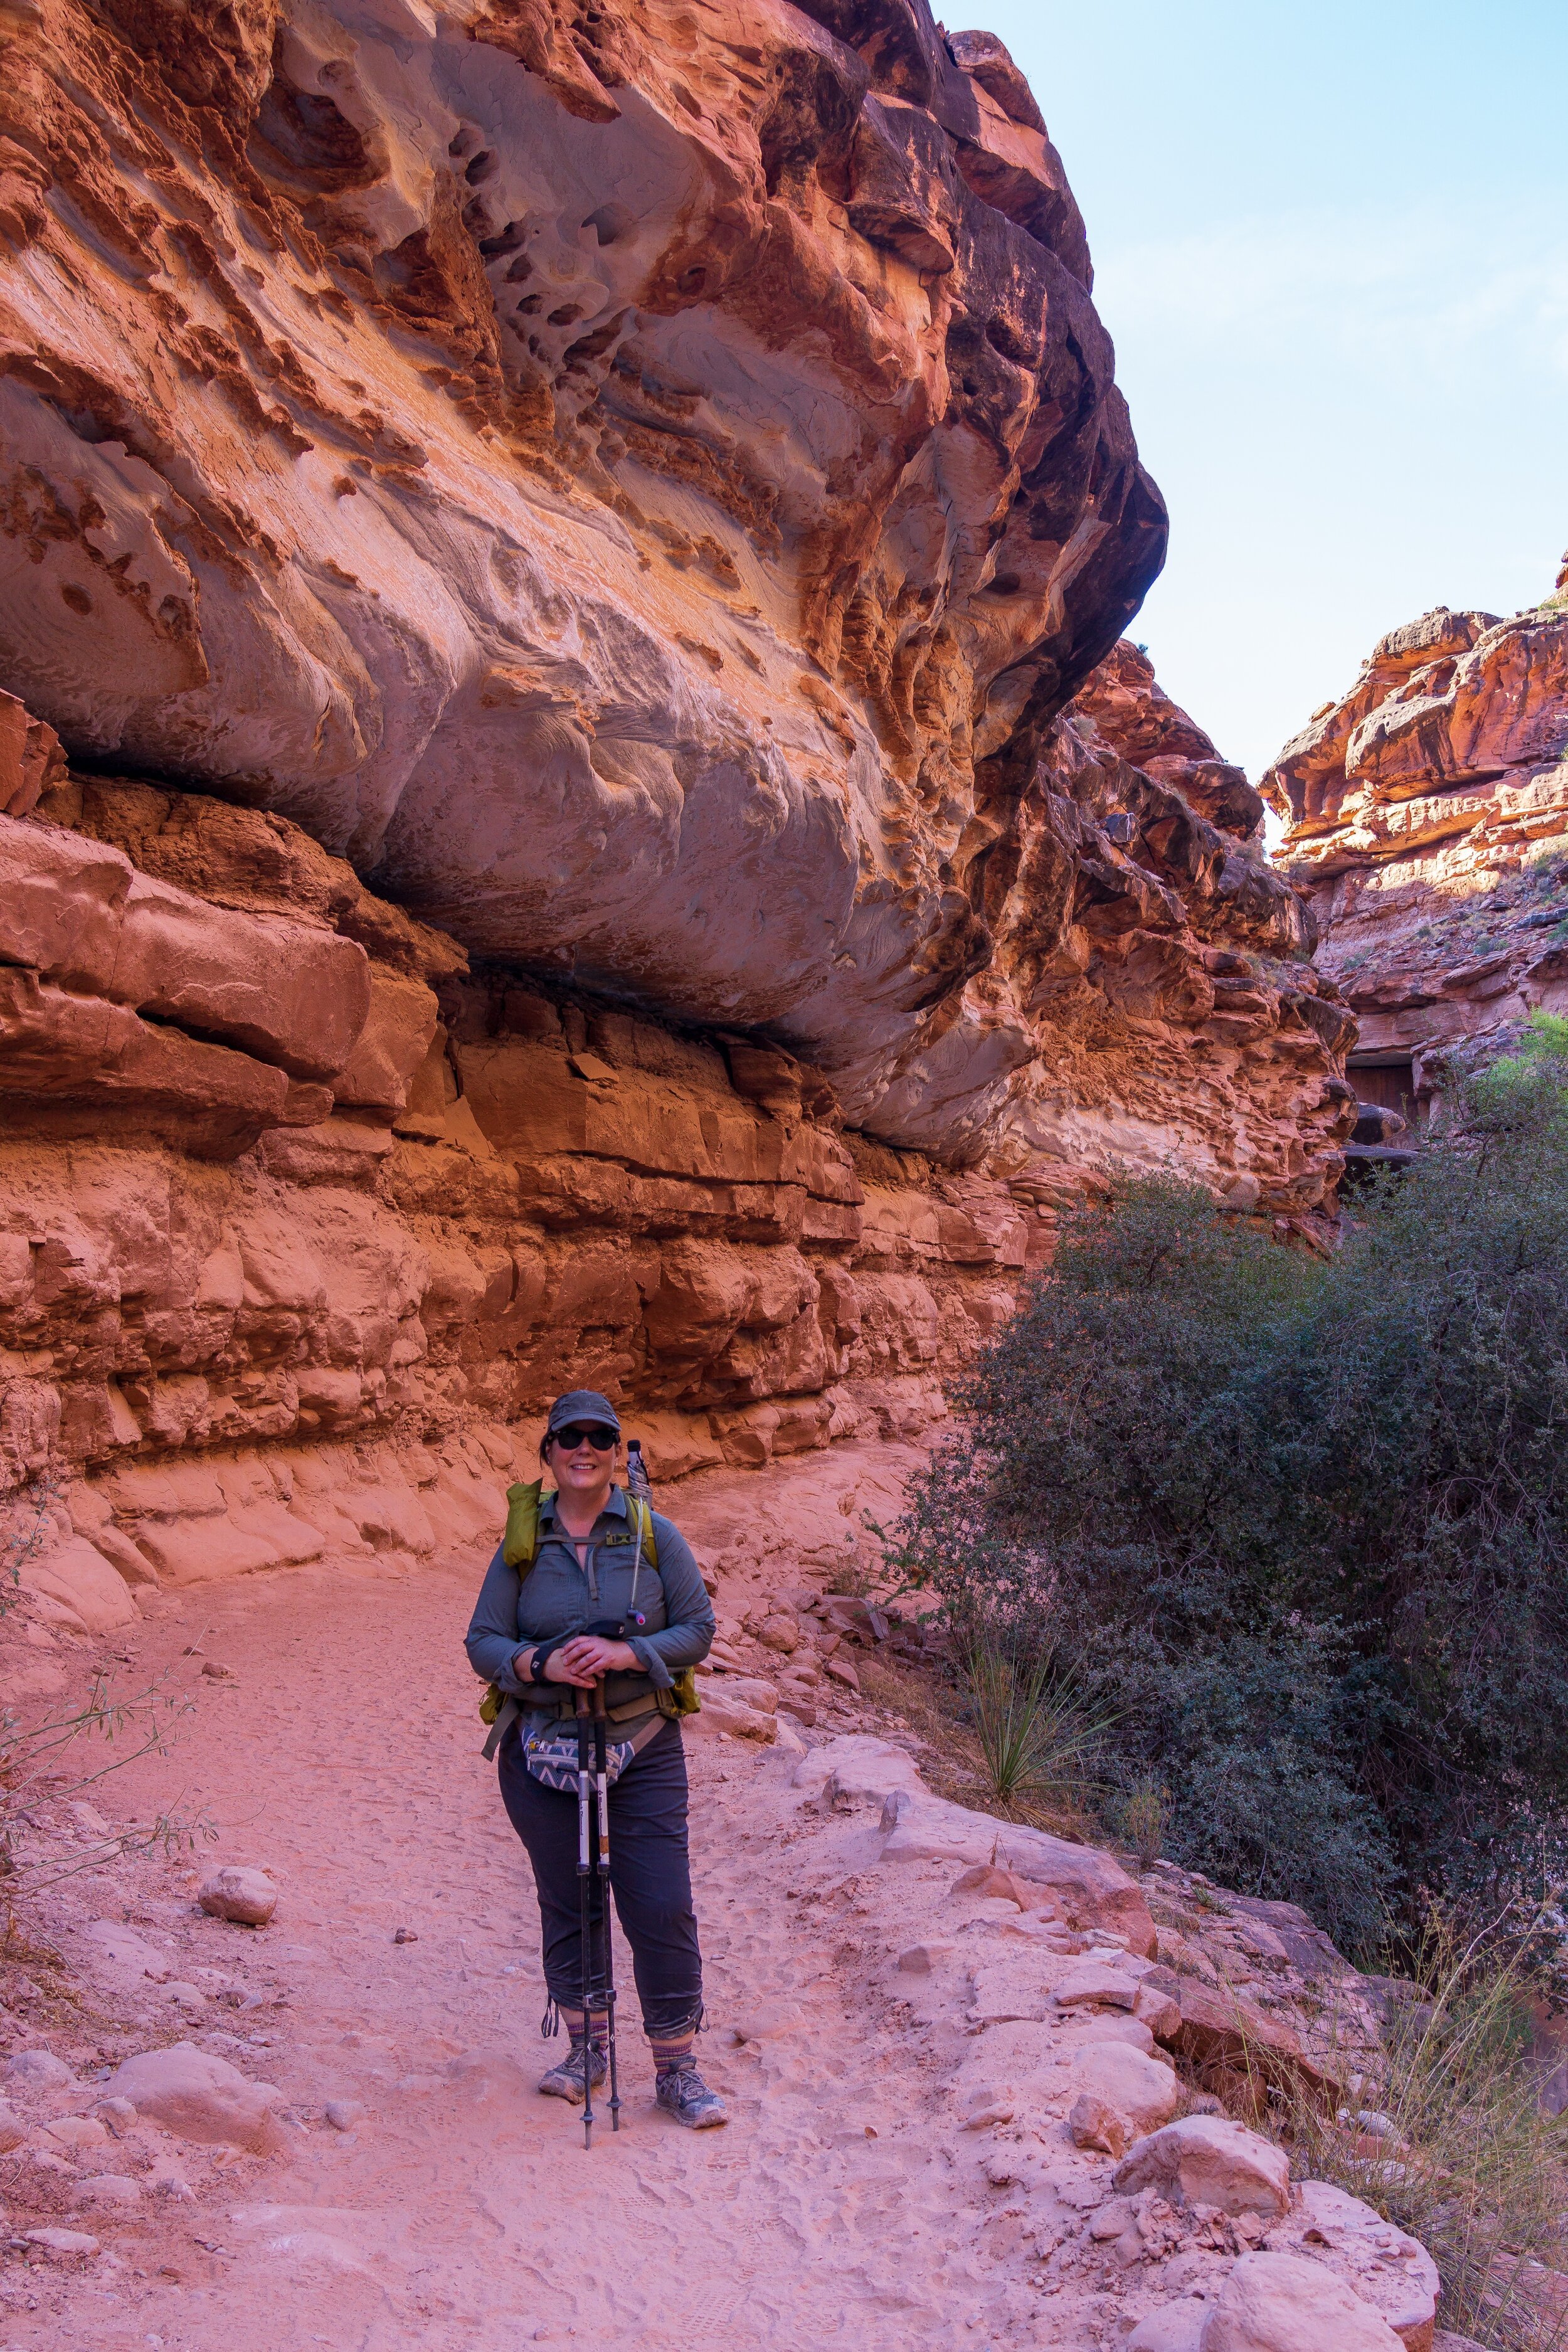
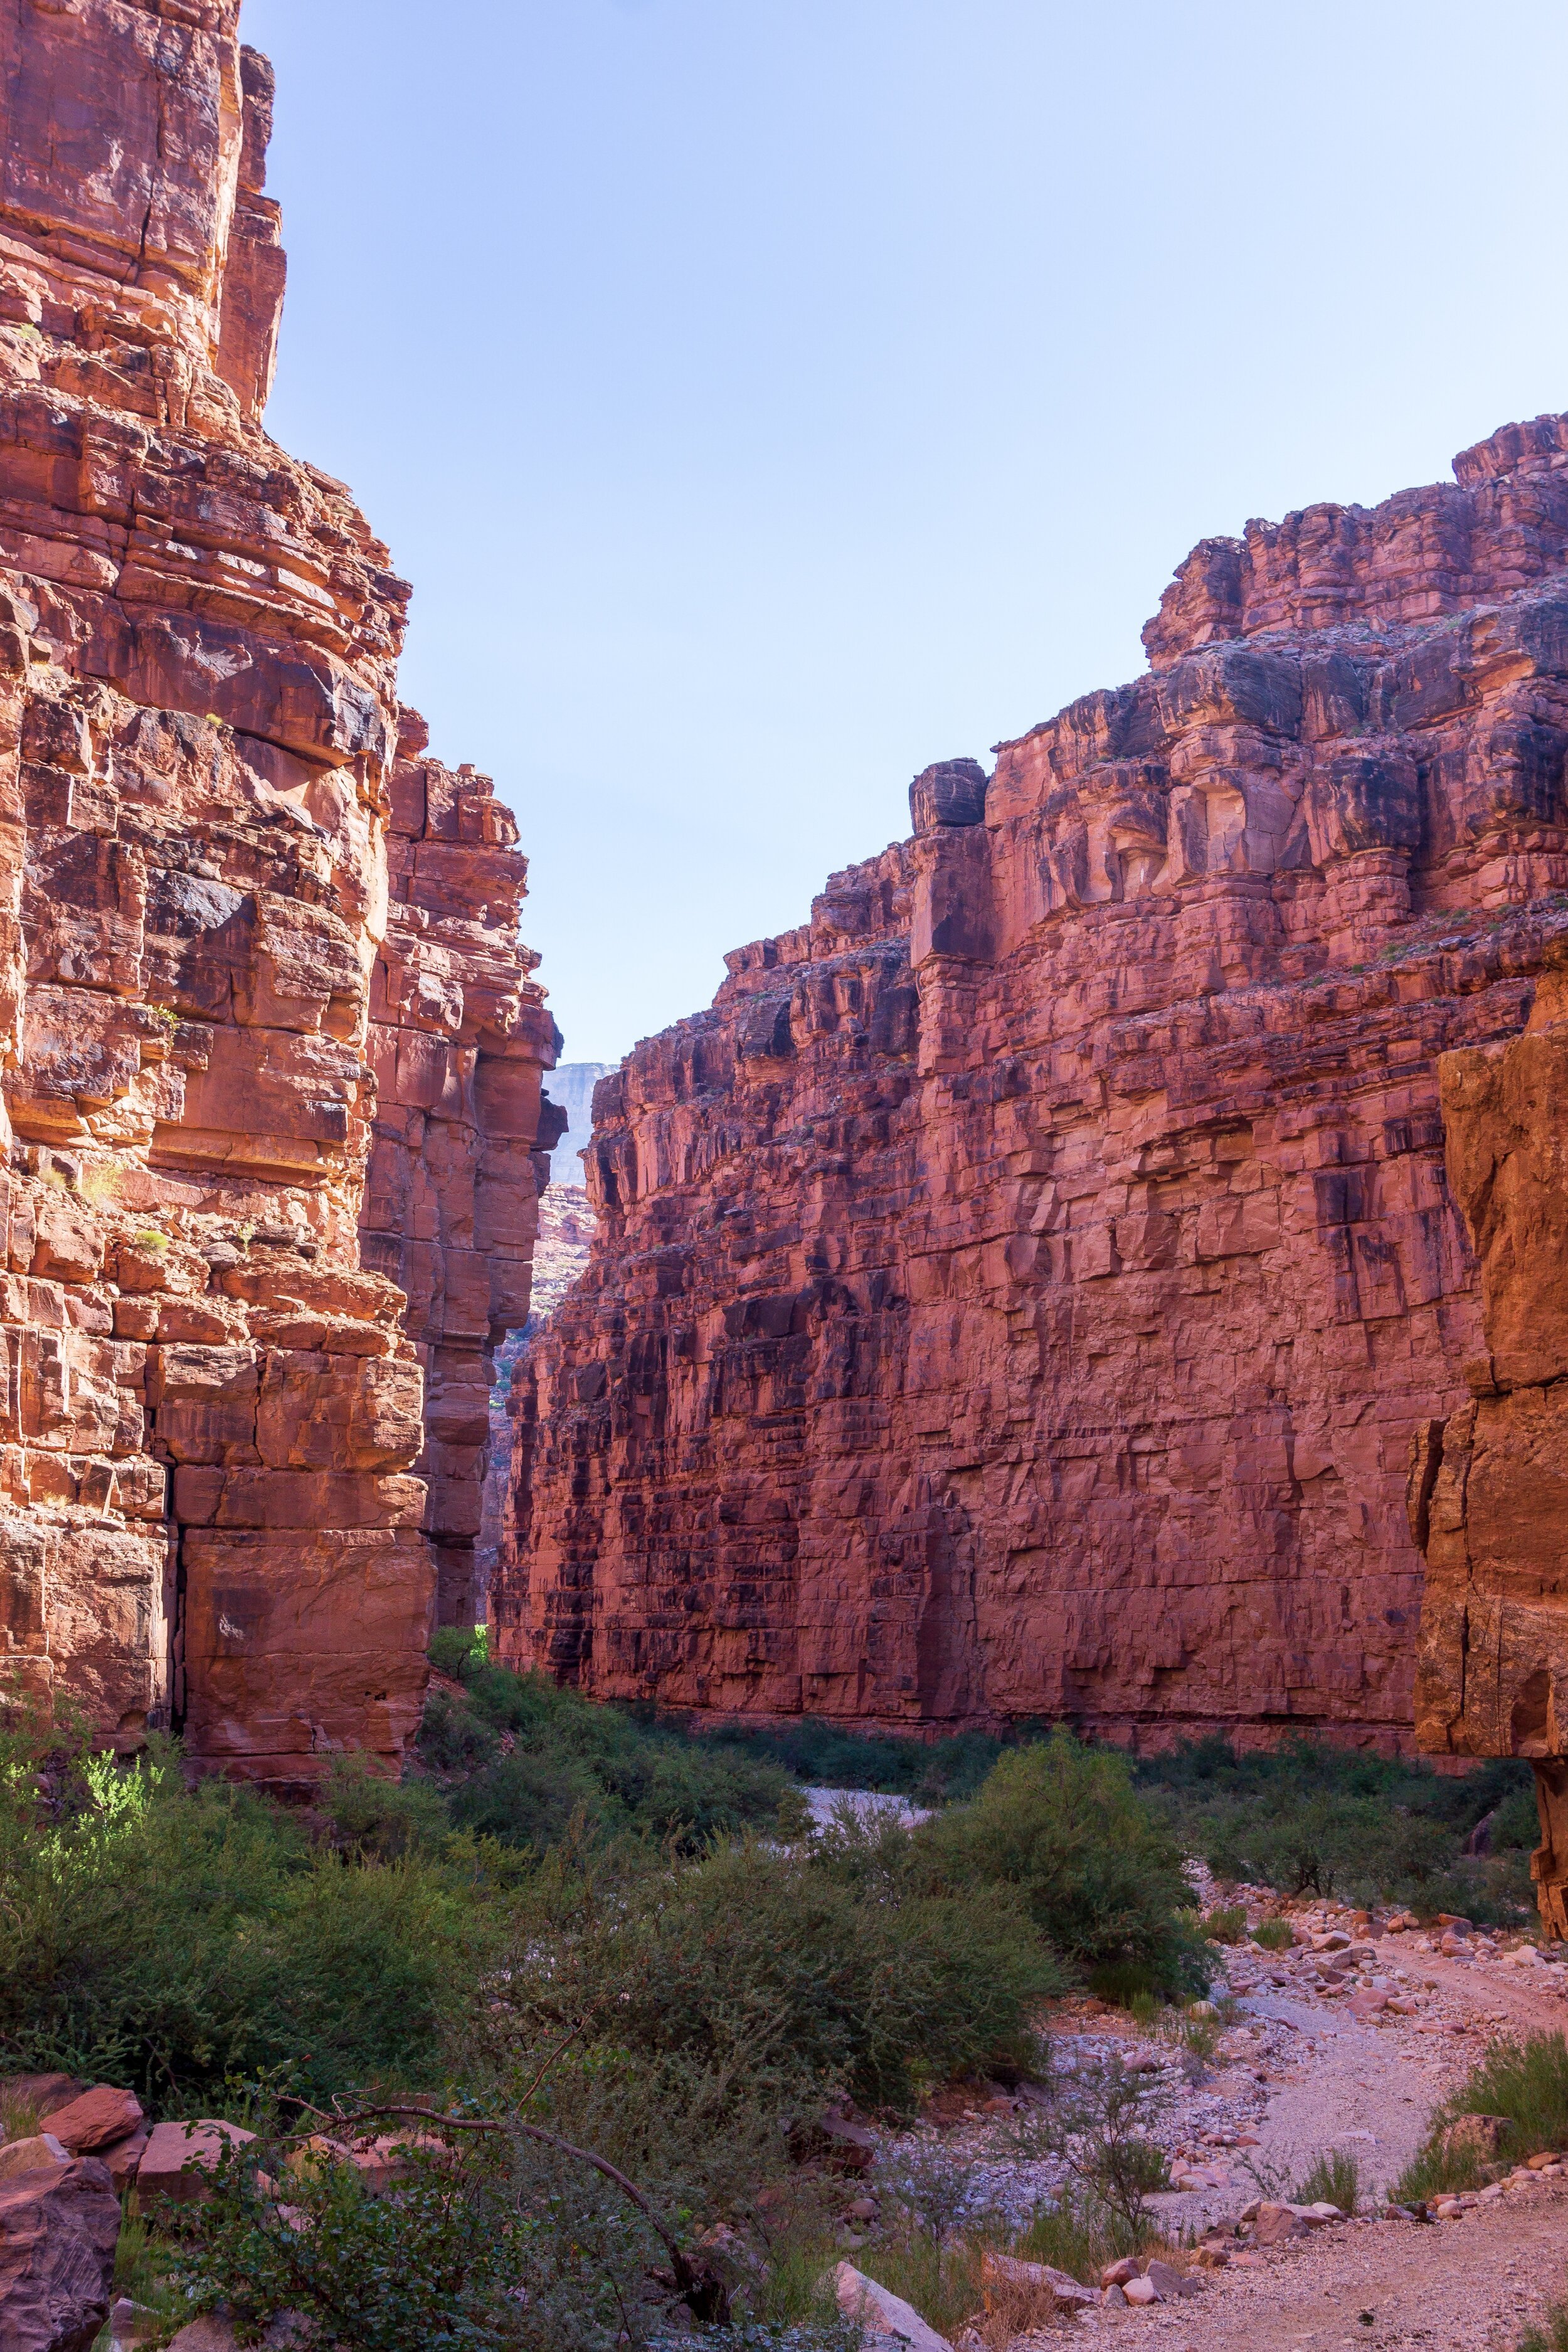
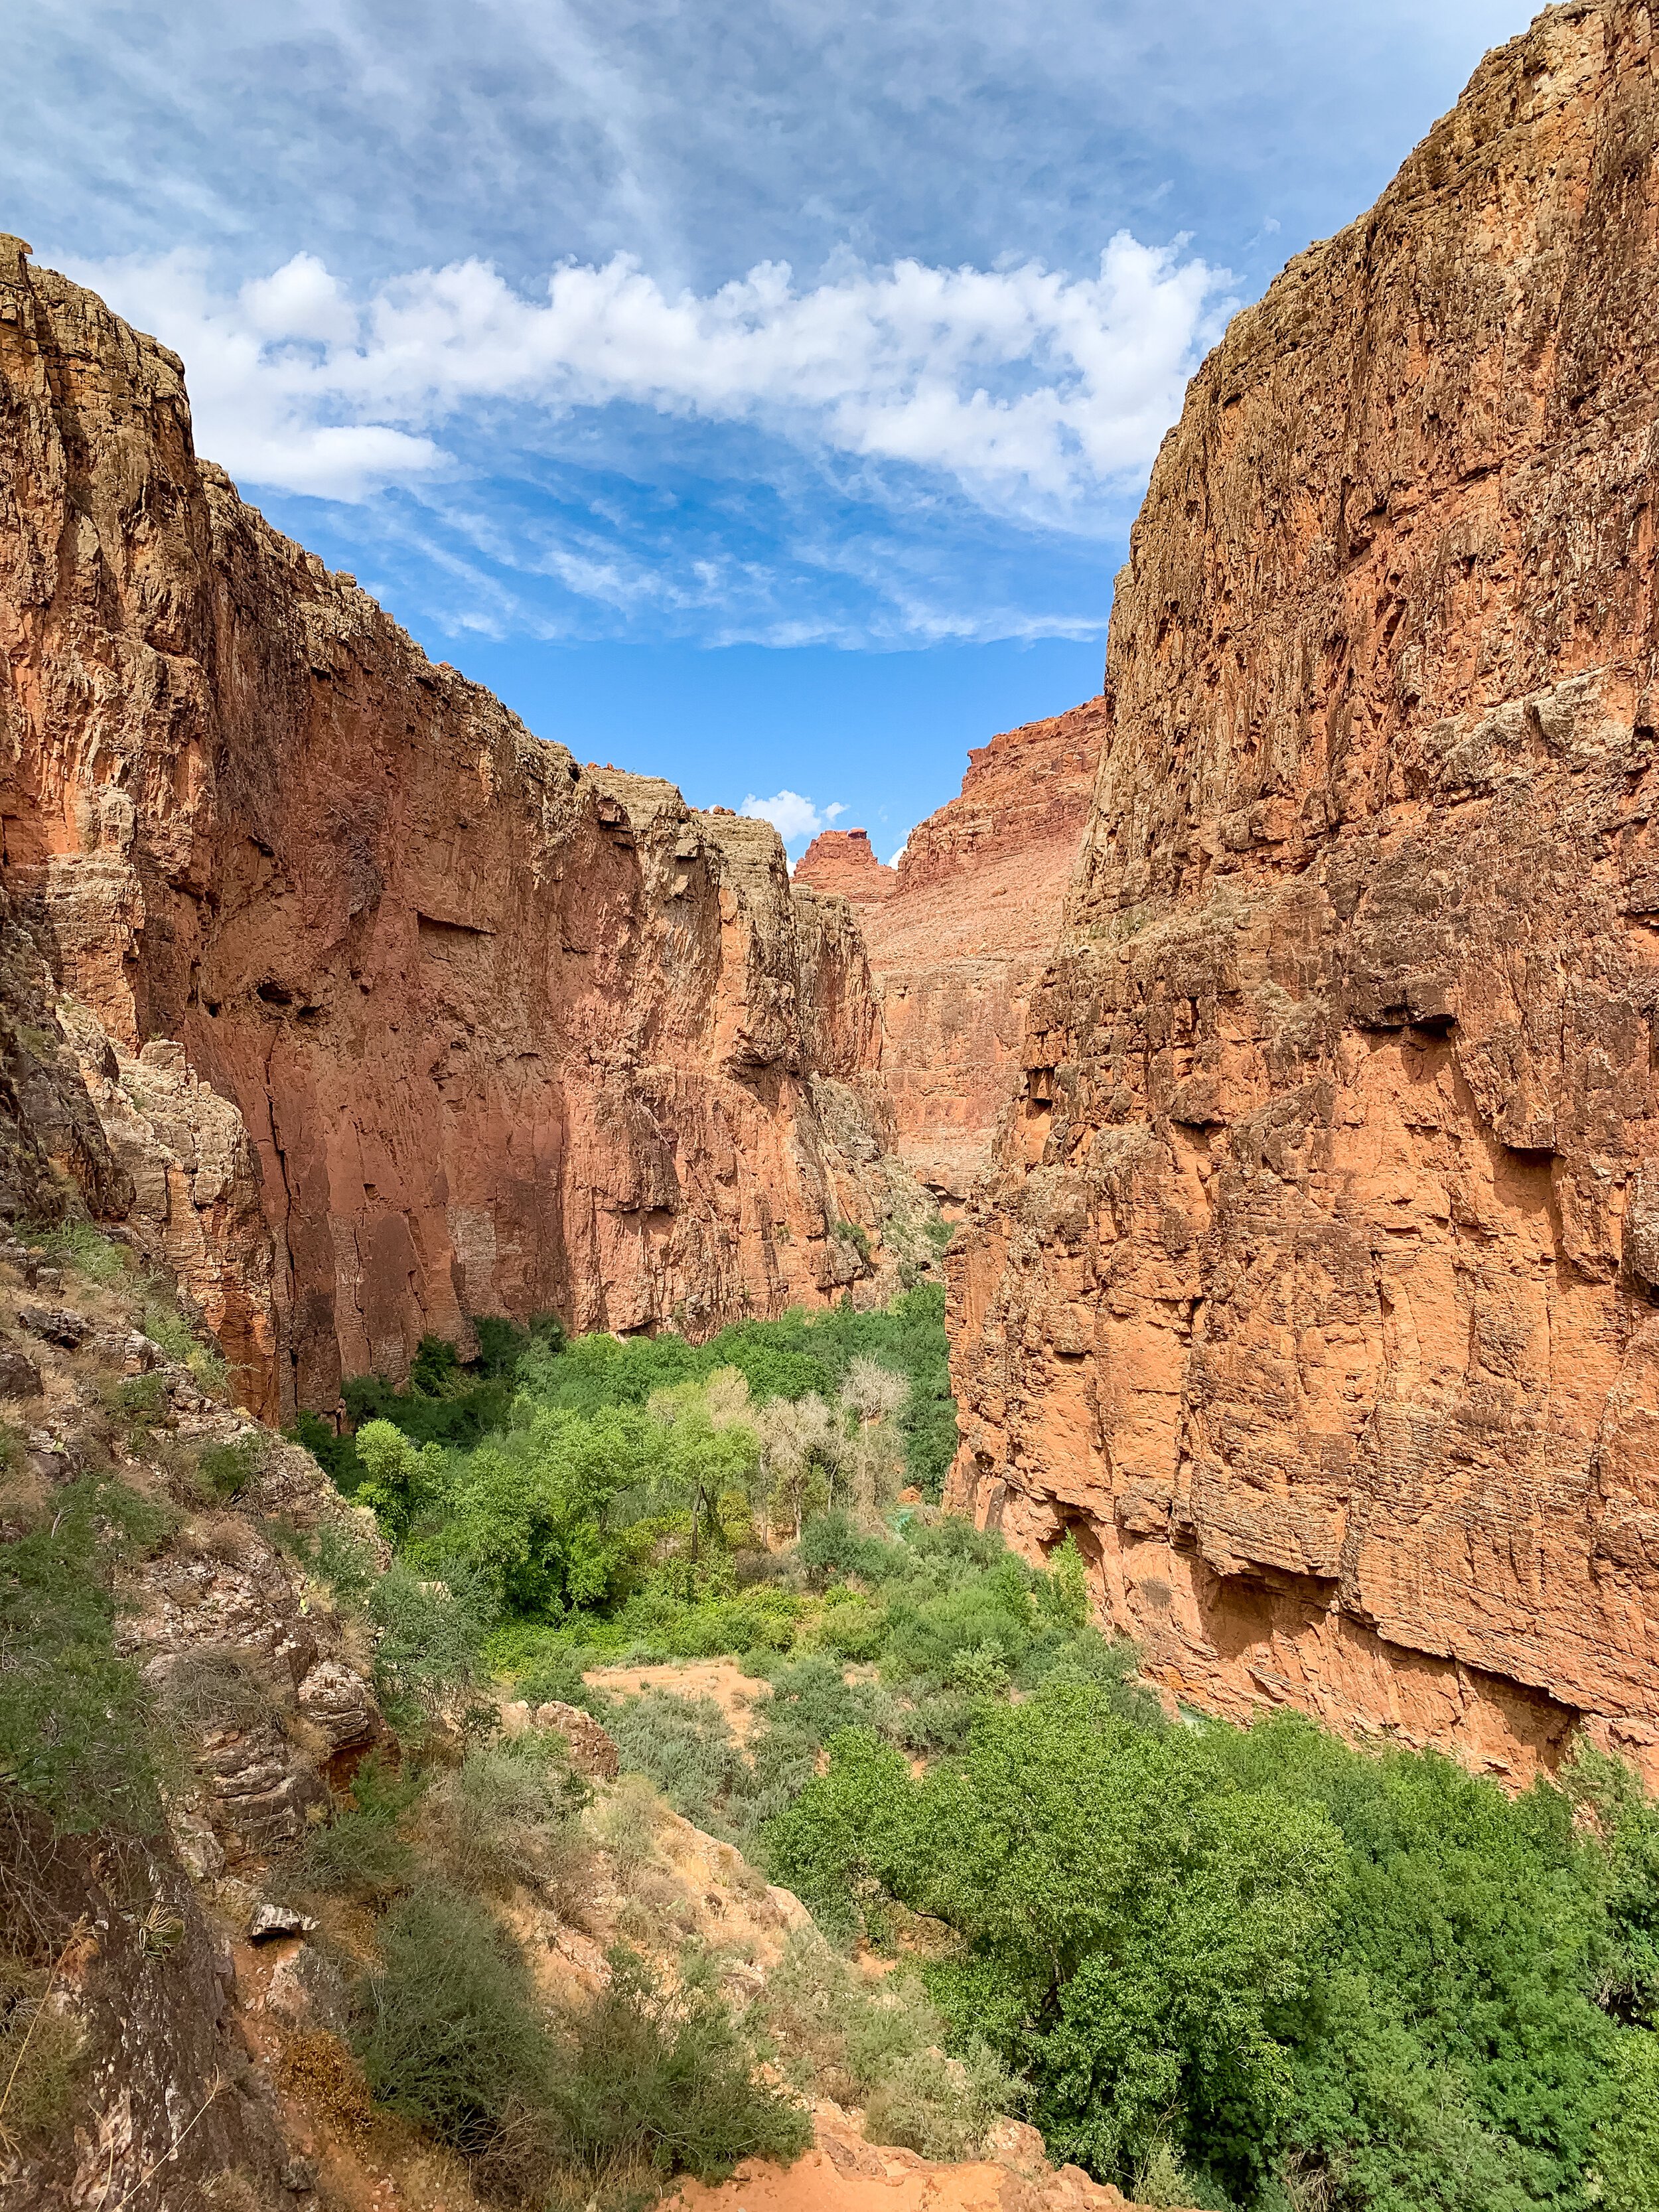
The hike down to Havasu Falls is really nice, though a little long. It clocks in at 9 miles to the entrance of the campground. The first mile is downhill along switchbacks, and then you are in a wash until you get to the entrance of Supai. The trail is sandy, but easy to follow. There are little paths that seem to spurt off from the “main” trail, but they always link back up with the main trail shortly after. Some of these little social trails will clearly take off a few hundredths - tenths of a mile from the main trail. Sometimes we walked on them, sometimes we didn’t. There is only one tricky area, which is difficult in the dark, and on my hike in, I saw one woman almost go up the ravine, and on my hike out, a whole group turned the wrong way into the ravine and were trying to bushwhack up it. I could see their headlamps below where the trail actually is. Thankfully, we were able to guide them back to the main trail. You will probably walk past this point in the daylight when you hike in, and you should make a note of it for your hike out, especially if you’ll be starting your hike early in the morning. It is about 1 mile from the entrance to the town of Supai. Basically though, you will not be doing anything close to bushwhacking on this trail, so if you end up doing that, you are not on trail and should re-trace your footsteps back to the trail.
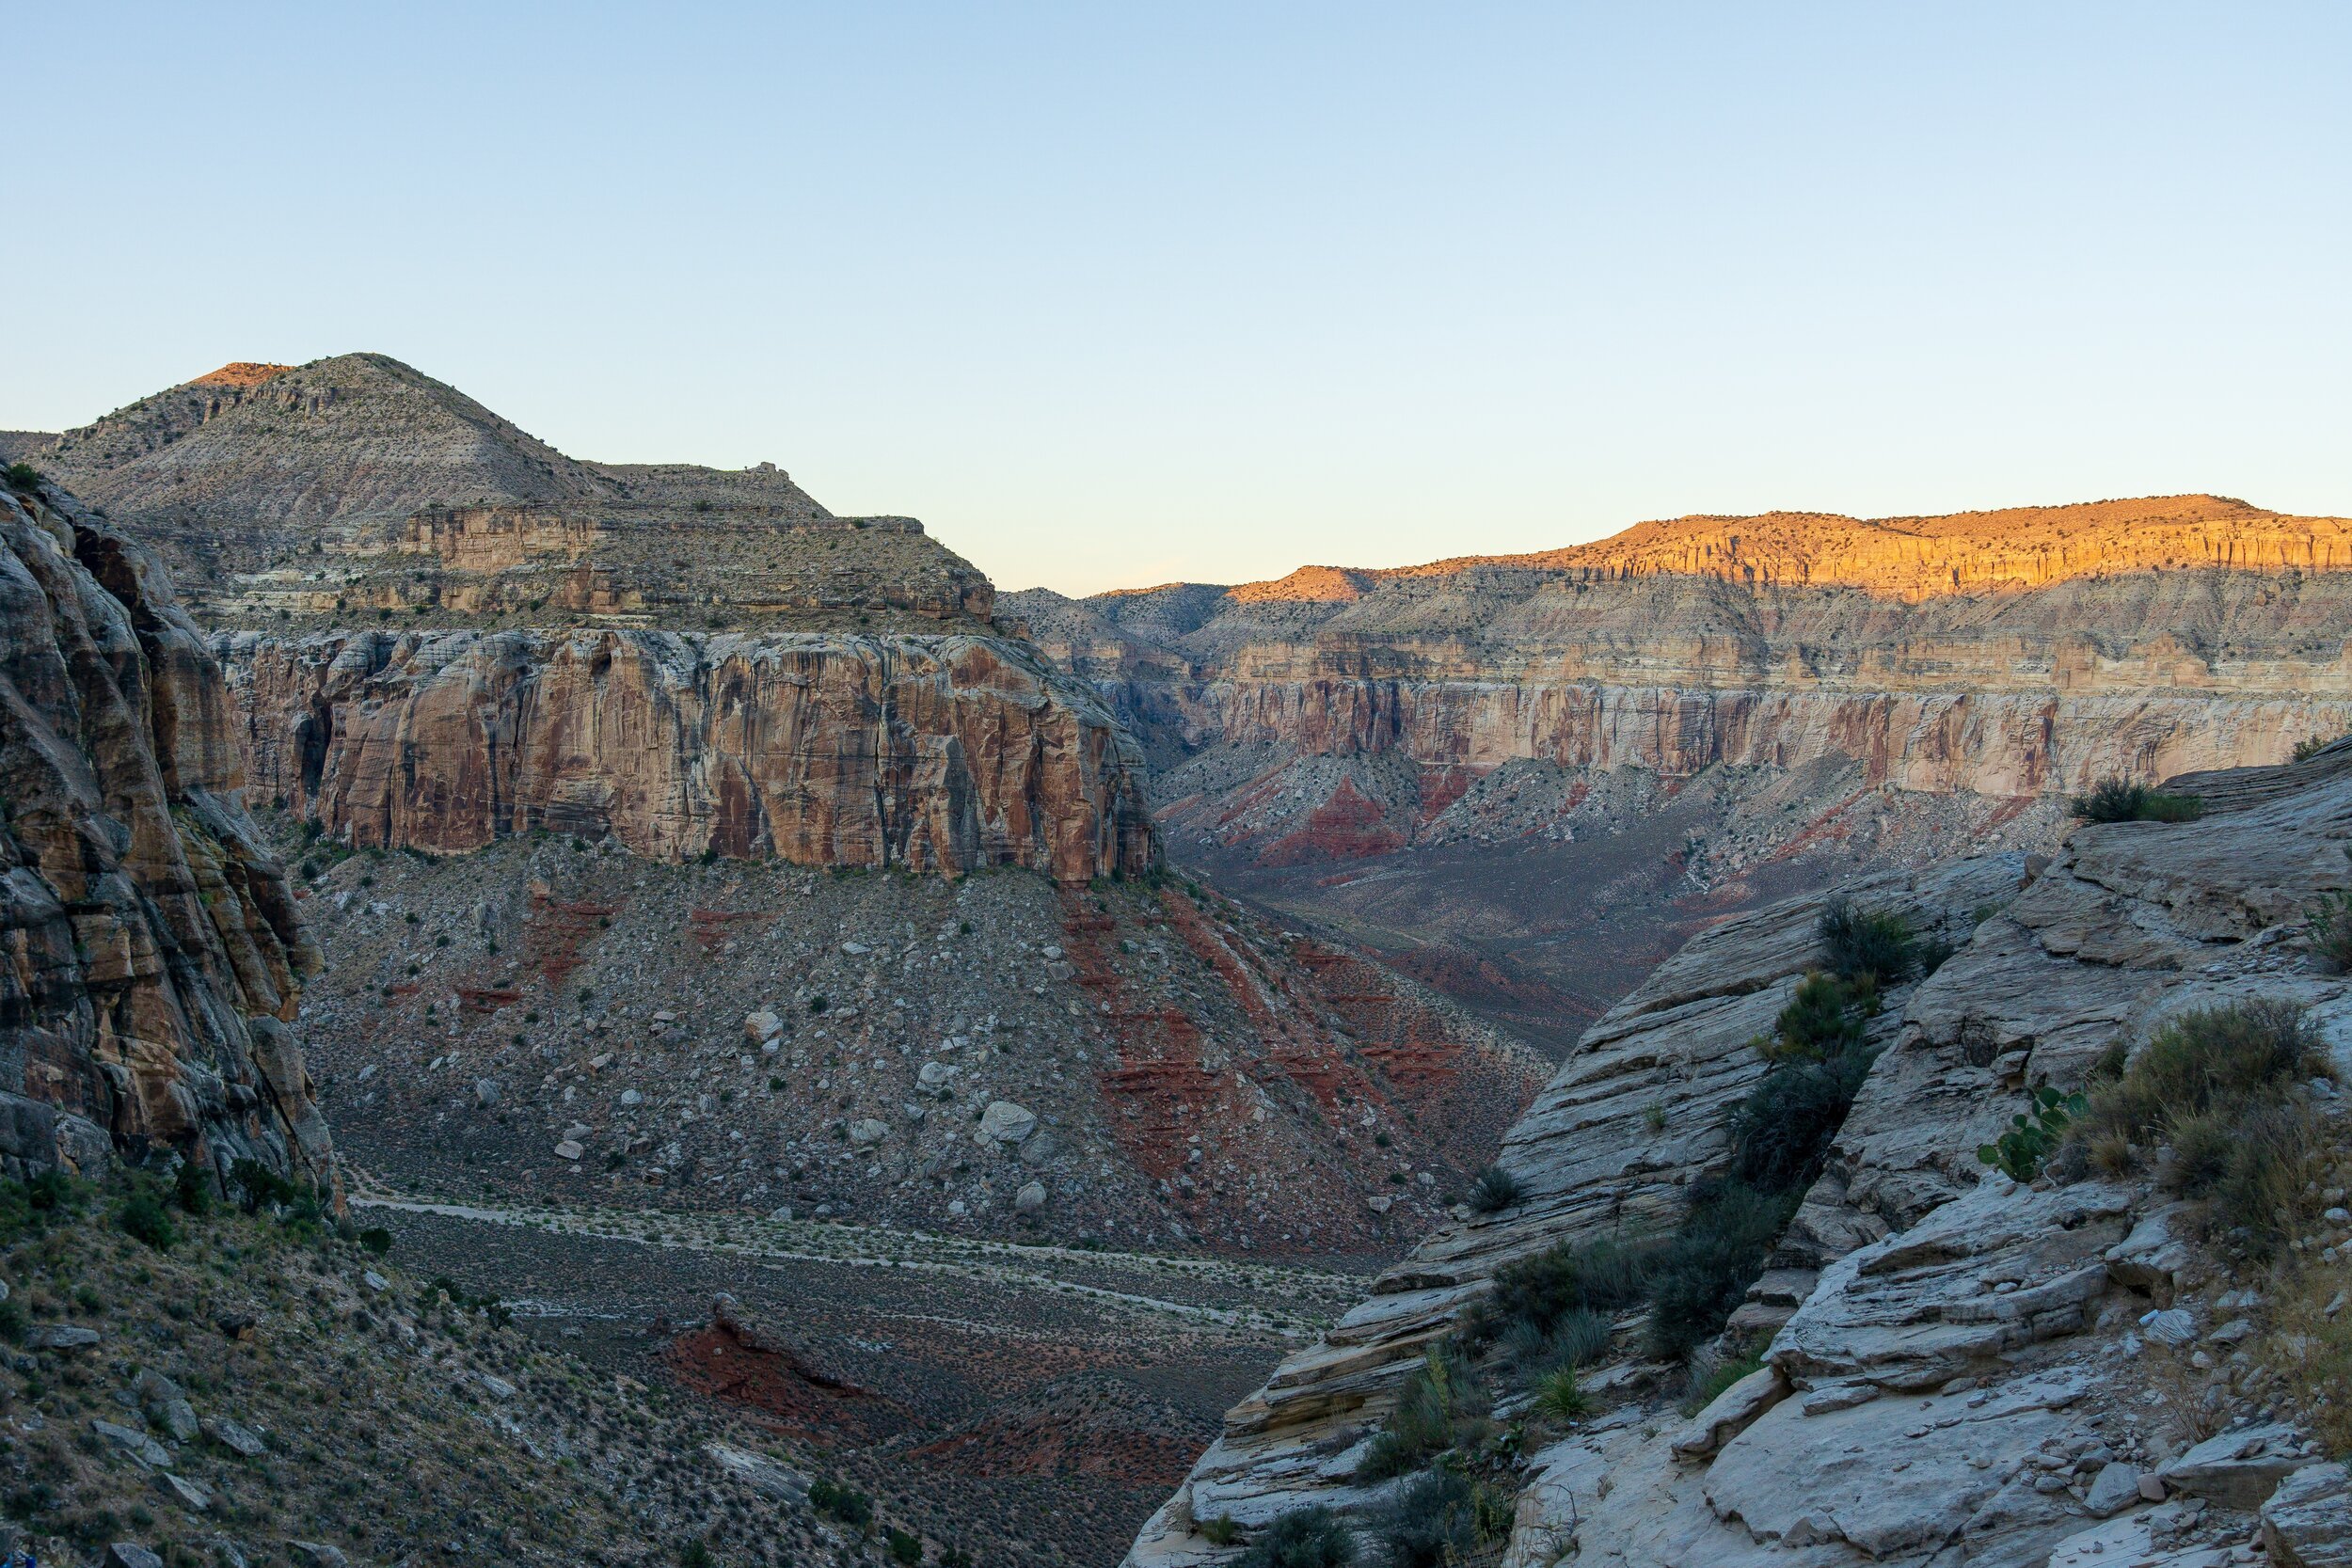
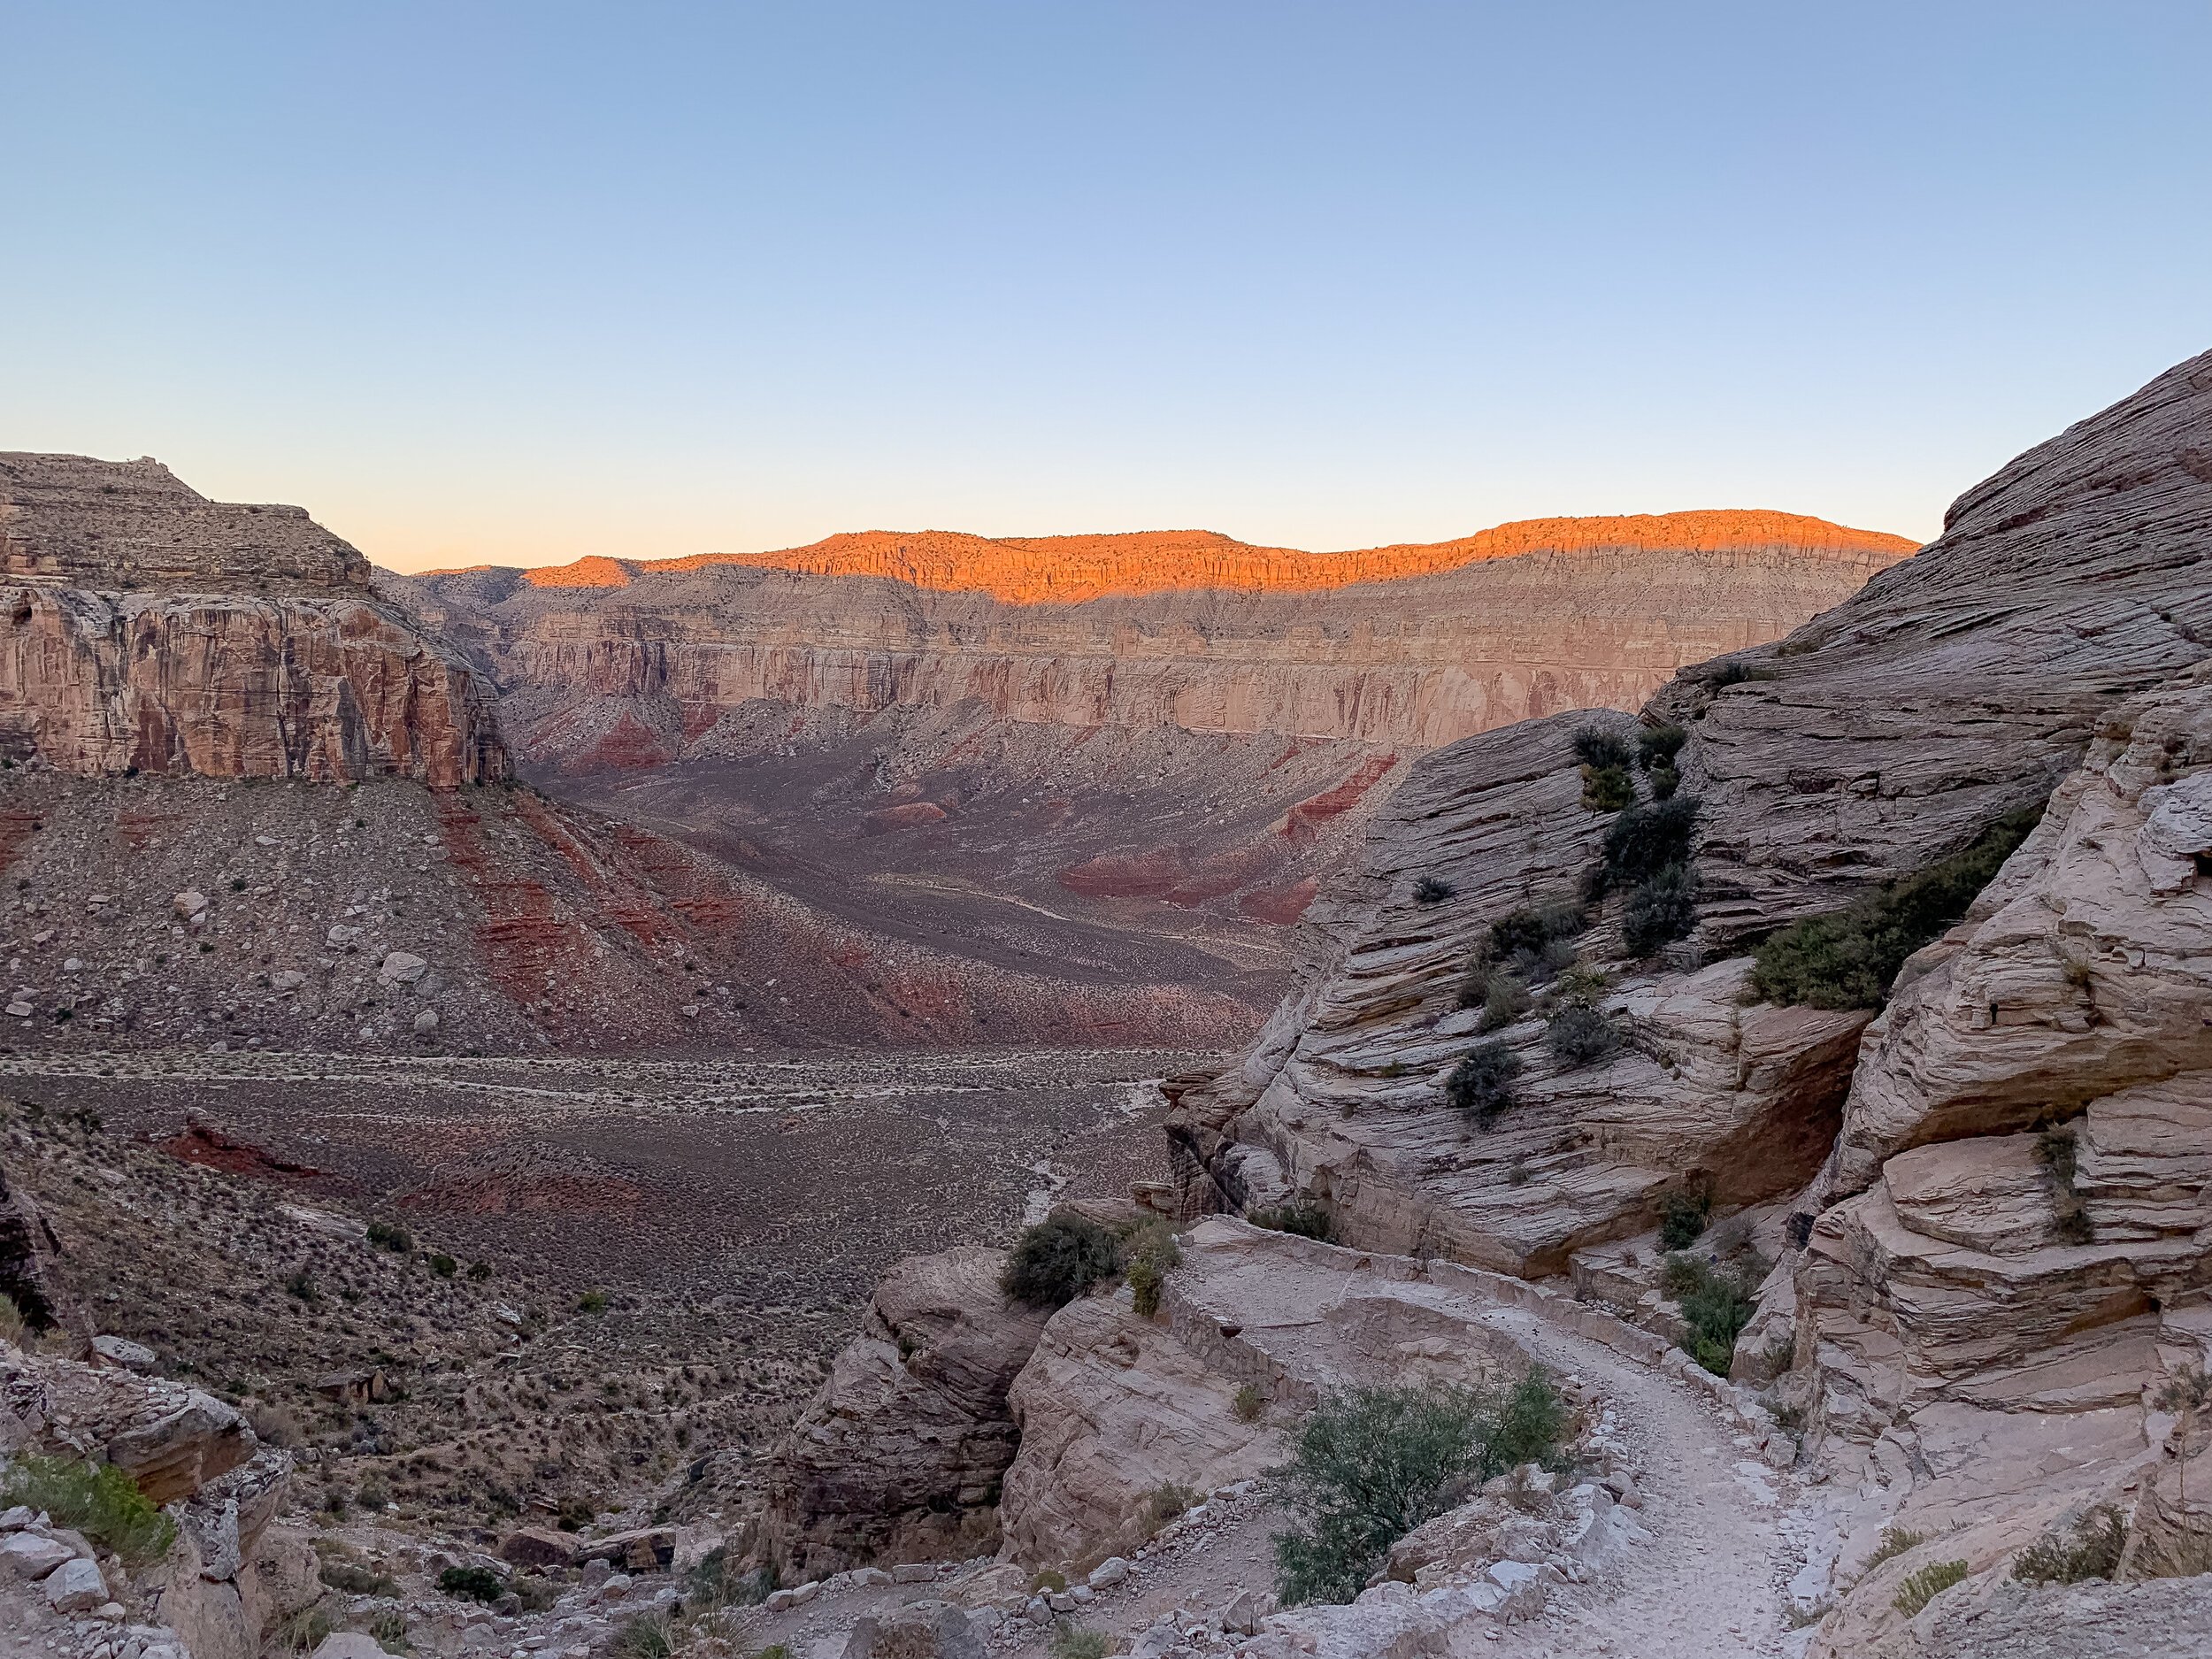

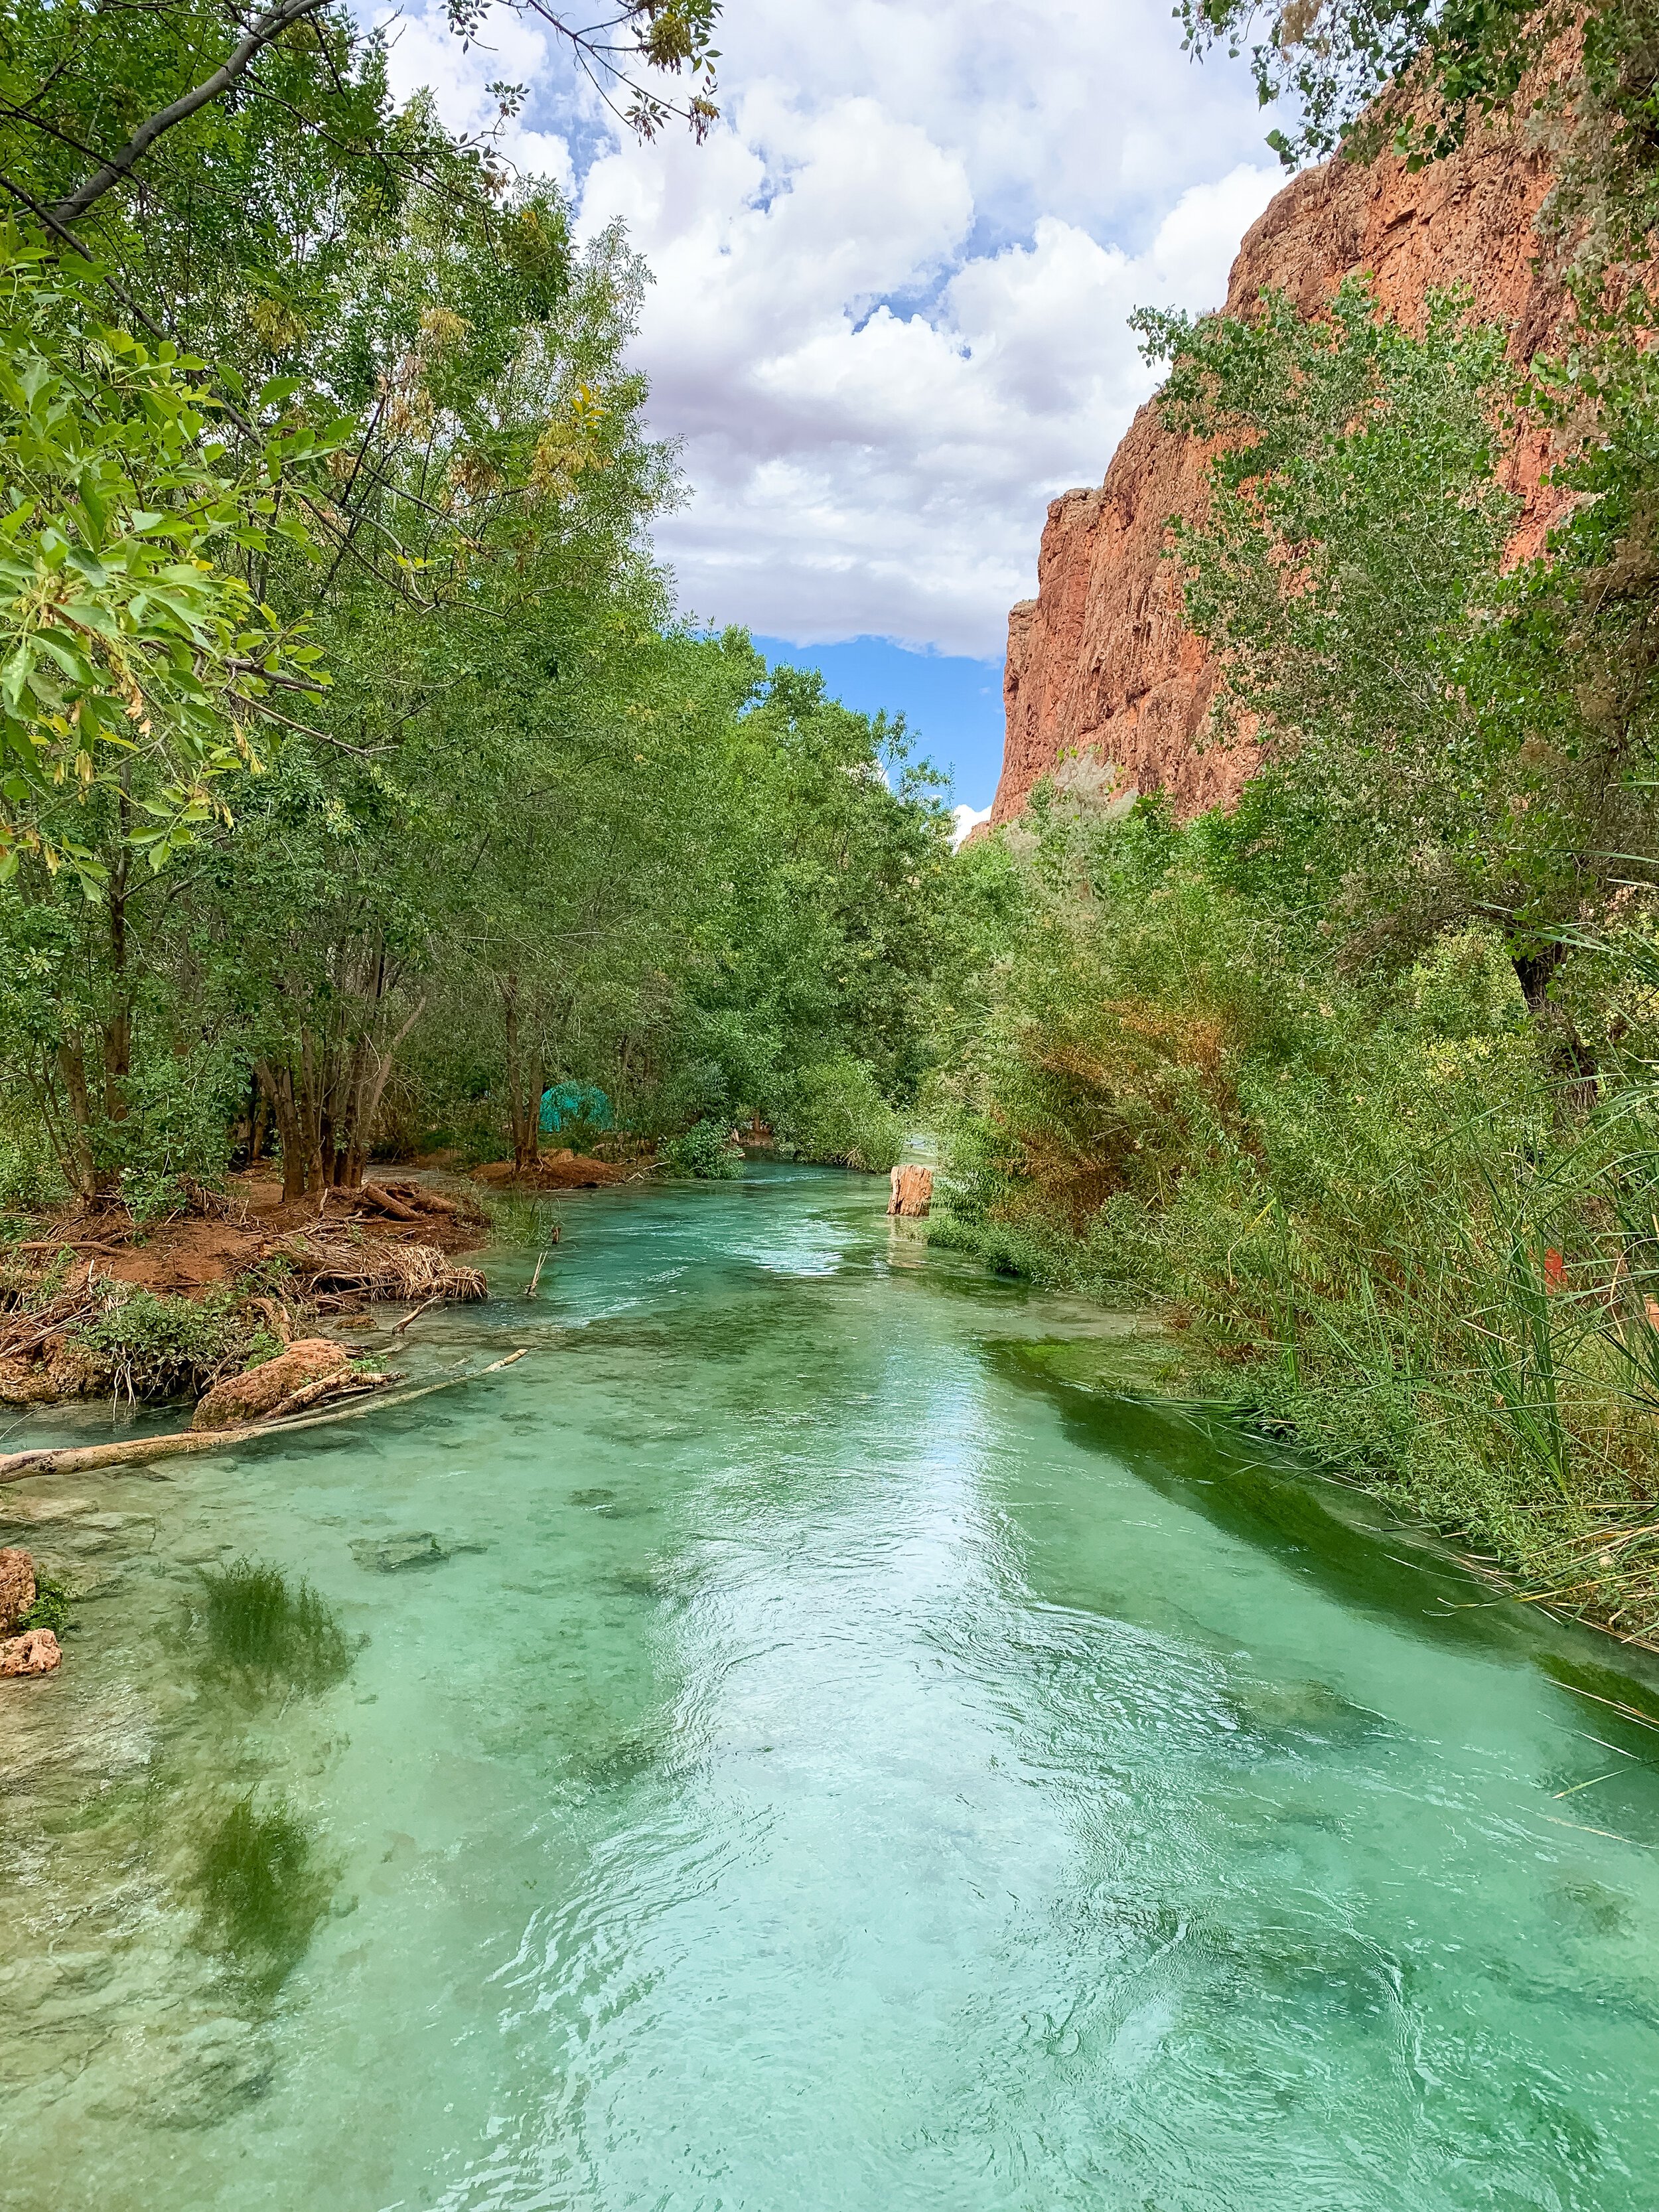
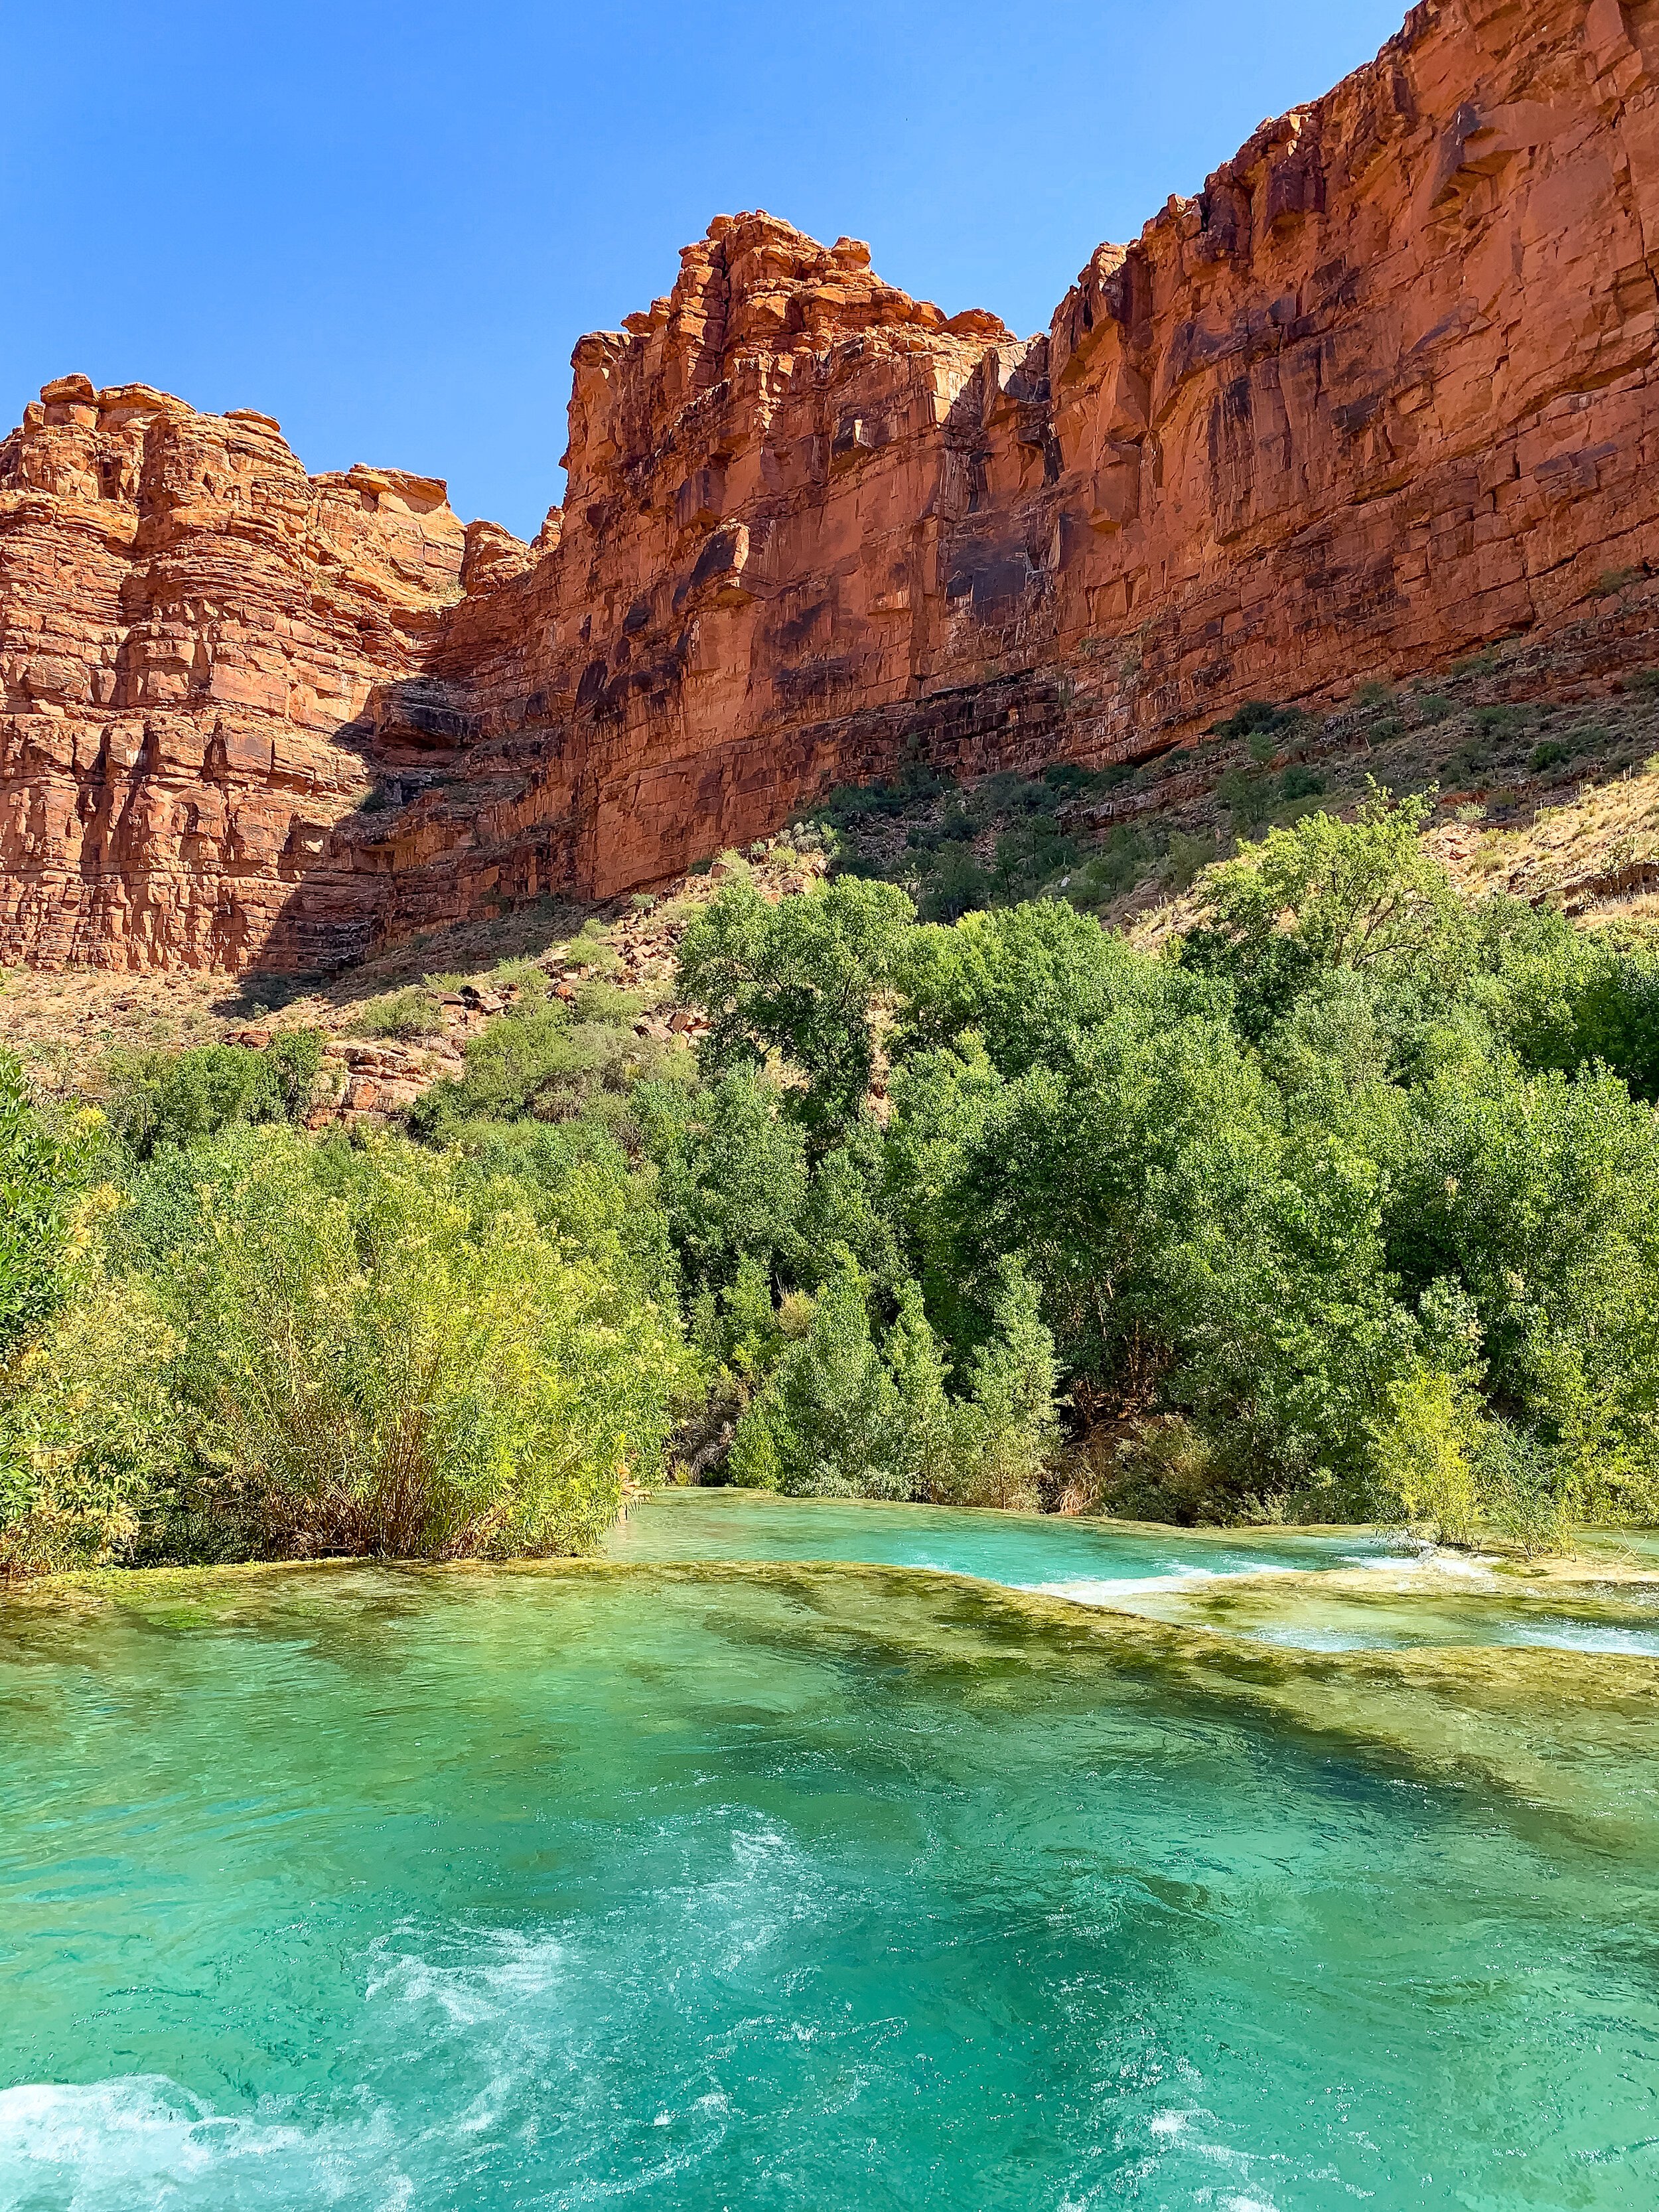
The red canyon walls during the hike in are really beautiful, and they get even better the closer to Supai you get. This was my mom’s first time hiking in red-rock country, so it was exciting for both of us. Once you reach a sign pointing to Supai, you’re getting close! A little while later, after passing through a particularly lush area, where you get your first views of the blue-green water, you’ll see a sign posted to the tree that states you are entering the village, and to not take photos. The hike through town is flat and lasts for about a mile. In the middle of town, you’ll come to the Tourism Office, where you check-in. You’ll also see the heli-pad, and have your last chance to use flush toilets.
Pro Tip: I’d recommend asking about the helicopter here when you check-in if you think you’ll want to take it back out.
After hiking out of town, you’ll quickly come to Fifty Foot and Navajo Falls. We took a dip here because it was so hot. We had plenty of time left in the day, and we also weren’t sure if we would come back up here. After these falls, it’s about another 0.75 miles to the top of Havasu Falls, and just beyond there is the campground entrance.
Campground
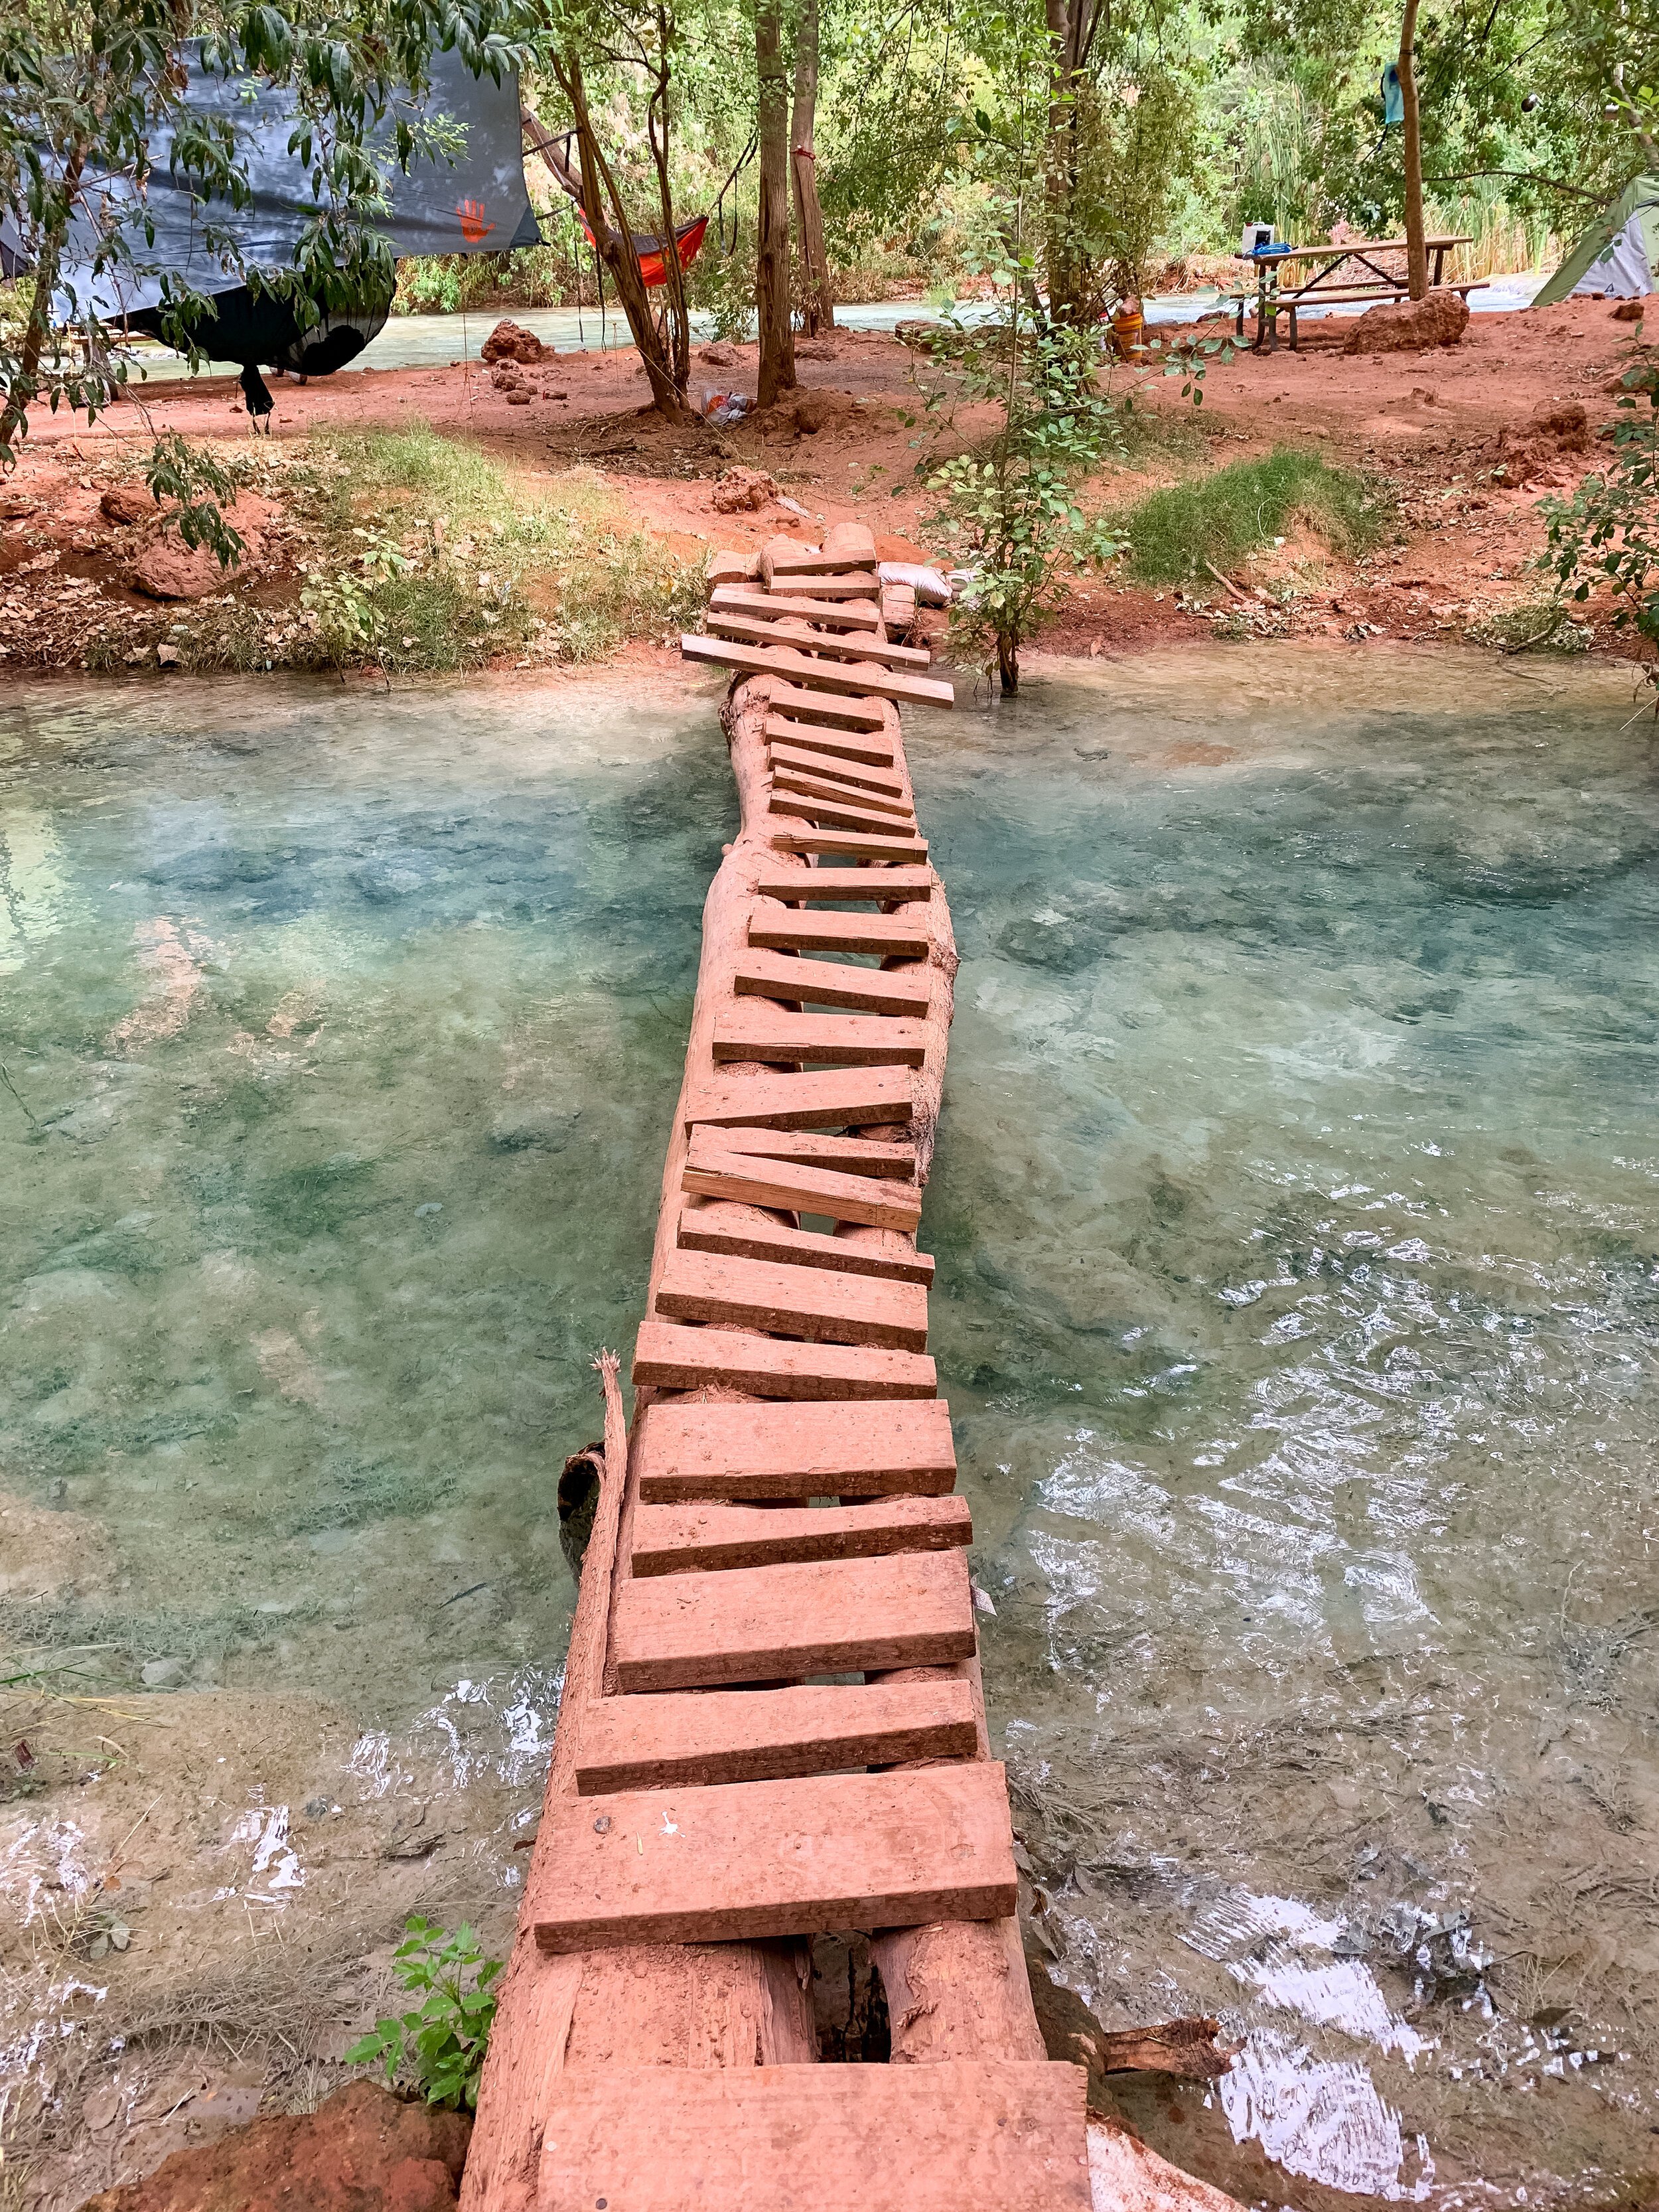
The campground stretches for about 1 mile between the entrance and near the top of Mooney Falls. Specifically, camping is allowed between the first and last bathrooms in the campground. It is a “camp wherever” campground. Havasu Creek runs right through the campground, and there are lots of trees. Most of the sites have a picnic table, and also rope left behind, which is handy for hanging food from. Many of the sites are right on the water. While normally you wouldn’t camp so close to the water in the wilderness, it really isn’t an option sometimes at Havasu. There is a spring, called Fern Spring, near the beginning of the campground. Usually, you will not need to filter this water. They’ll let you know at check-in if it requires filtering. Because the only drinkable water is near the entrance to the campground, camping further back will require you to carry your water for longer, but this isn’t really that big of a deal. Just bring your full water capacity with you and a backpack, and fill up each time you go.
Pro Tip: The ground at the campground is very hard. Make sure you have sturdy tent stakes that can take a beating with a rock to be driven in.
Word of Caution: The squirrels and raccoons in the campground are fearless. We hung some of our food, but kept some of it in orange, lidded buckets that the campground office had for borrowing. Well, in the middle of our first night, I heard some scuffling outside of the tent and peered out and saw those dang raccoons working as a team to open the lid (even though I shoved it under the picnic bench)! They unfortunately got some of our food too, and strew litter around. It was not fun to clean up food & trash at 2 AM. The people across from us had their camp ransacked by the raccoons. Most of their food was destroyed. So, I would highly recommend you bringing a rodent bag, like the Ursack, and actually hanging your food, instead of using the orange buckets. There was rope left behind at our site that was strung between two branches, and we just tied the Ursack up in the middle of the rope, out of the raccoon’s reach. We didn’t see the raccoons again after our first night, suspecting that the amount of food and trash they ate either killed them or made them feel very ill, to the point of incapacitation. The squirrels also jumped onto and ran across our table while making lunch. They are particularly active in mid-morning, and are not afraid of humans. We were actually nervous that we could get bitten. Lessons learned: always keep your food within arms reach in Havasupai, and be alert for the wildlife.
Our Itinerary
Day 1: We started our hike into the canyon at 6 AM, and arrived at Supai around 9:00 AM. We passed so many groups heading back to the trailhead, including one inconsiderate group blasting music. C’mon people - we’re in nature! Also, music bounces off of these canyon walls, and we could hear it for a while before and after. Pretty annoying. I’ll say it until I die: wear earbuds if you want to listen to music! We ate “lunch” at the first restaurant on the edge of town, both ordering the Supai Taco. Beware: the Taco is HUGE! We definitely should have just shared one. But the fry bread “taco” was delicious! After eating, we continued further into Supai, getting to the tourist office to check-in. Excited to see the waterfalls, we left the village center towards the campground. It was a little slow-going for us here: the mile seemed to drag on and it was really hot, probably the hottest part of our trip. We pulled our Gossamer Gear sun umbrellas out and continued down the trail, reaching Navajo Falls. Because it was so hot, we decided to make a pit stop here before going down to the campground. We soaked our feet & legs and marveled at the color of the water before hiking on.
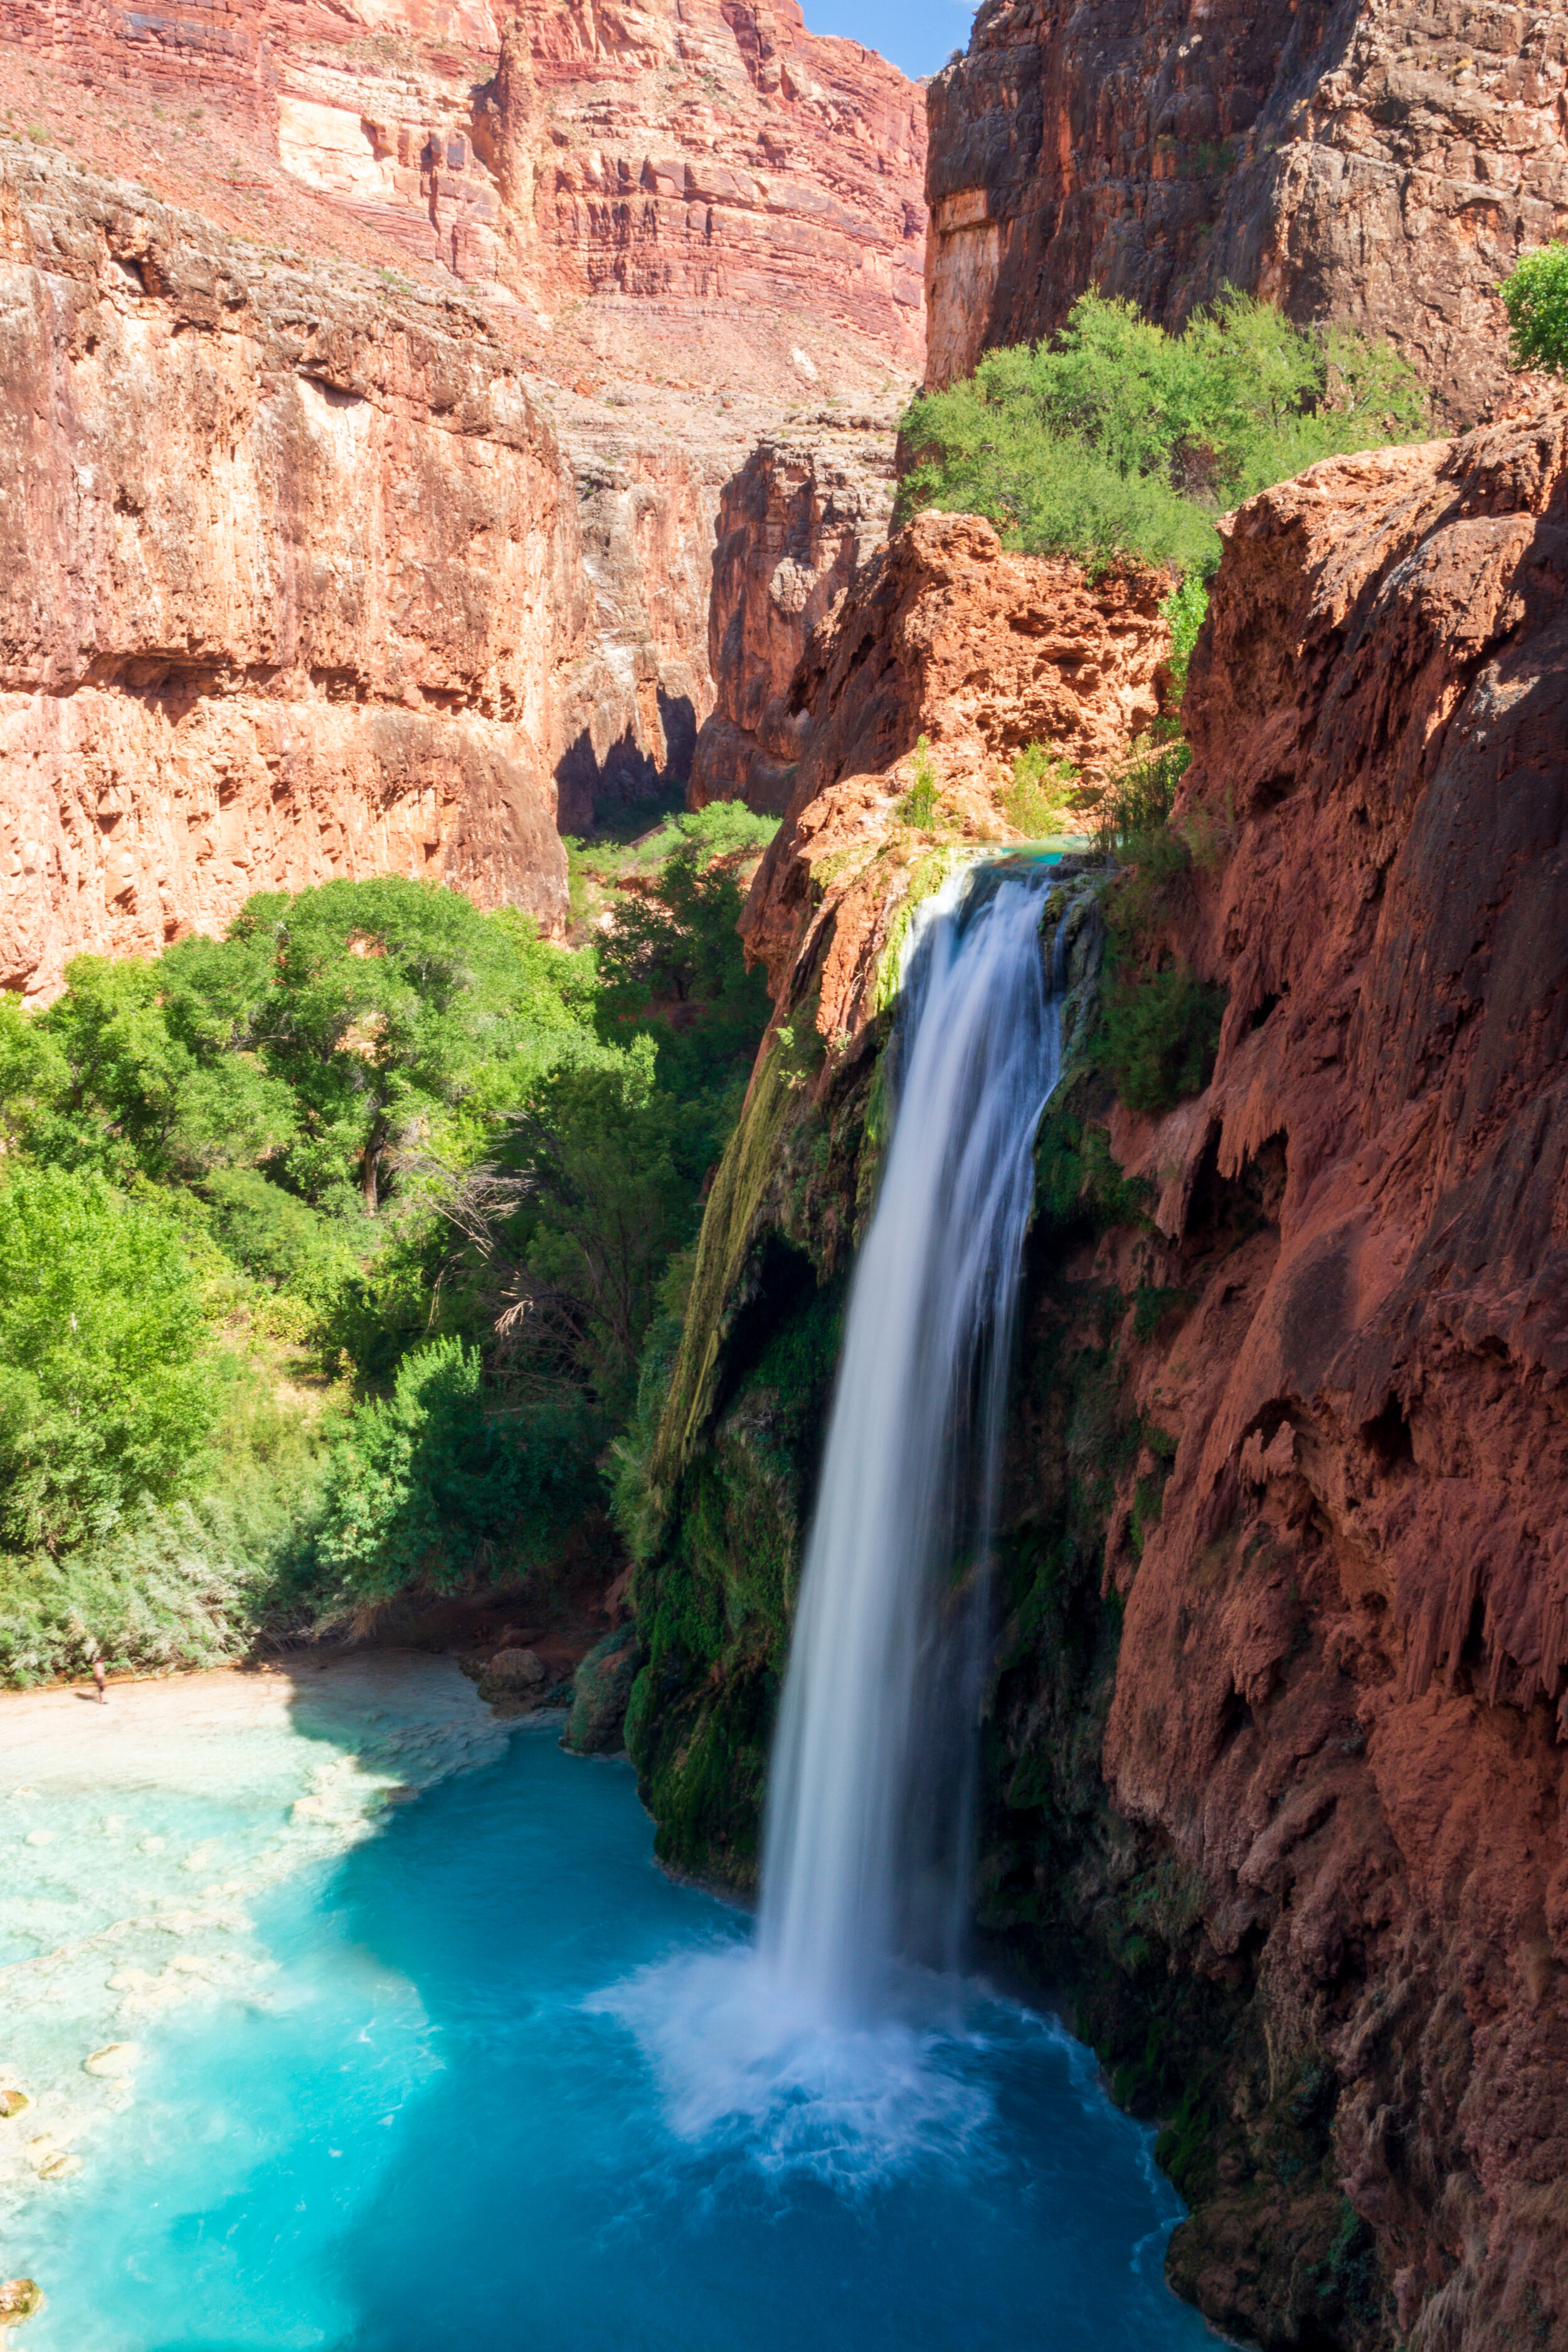
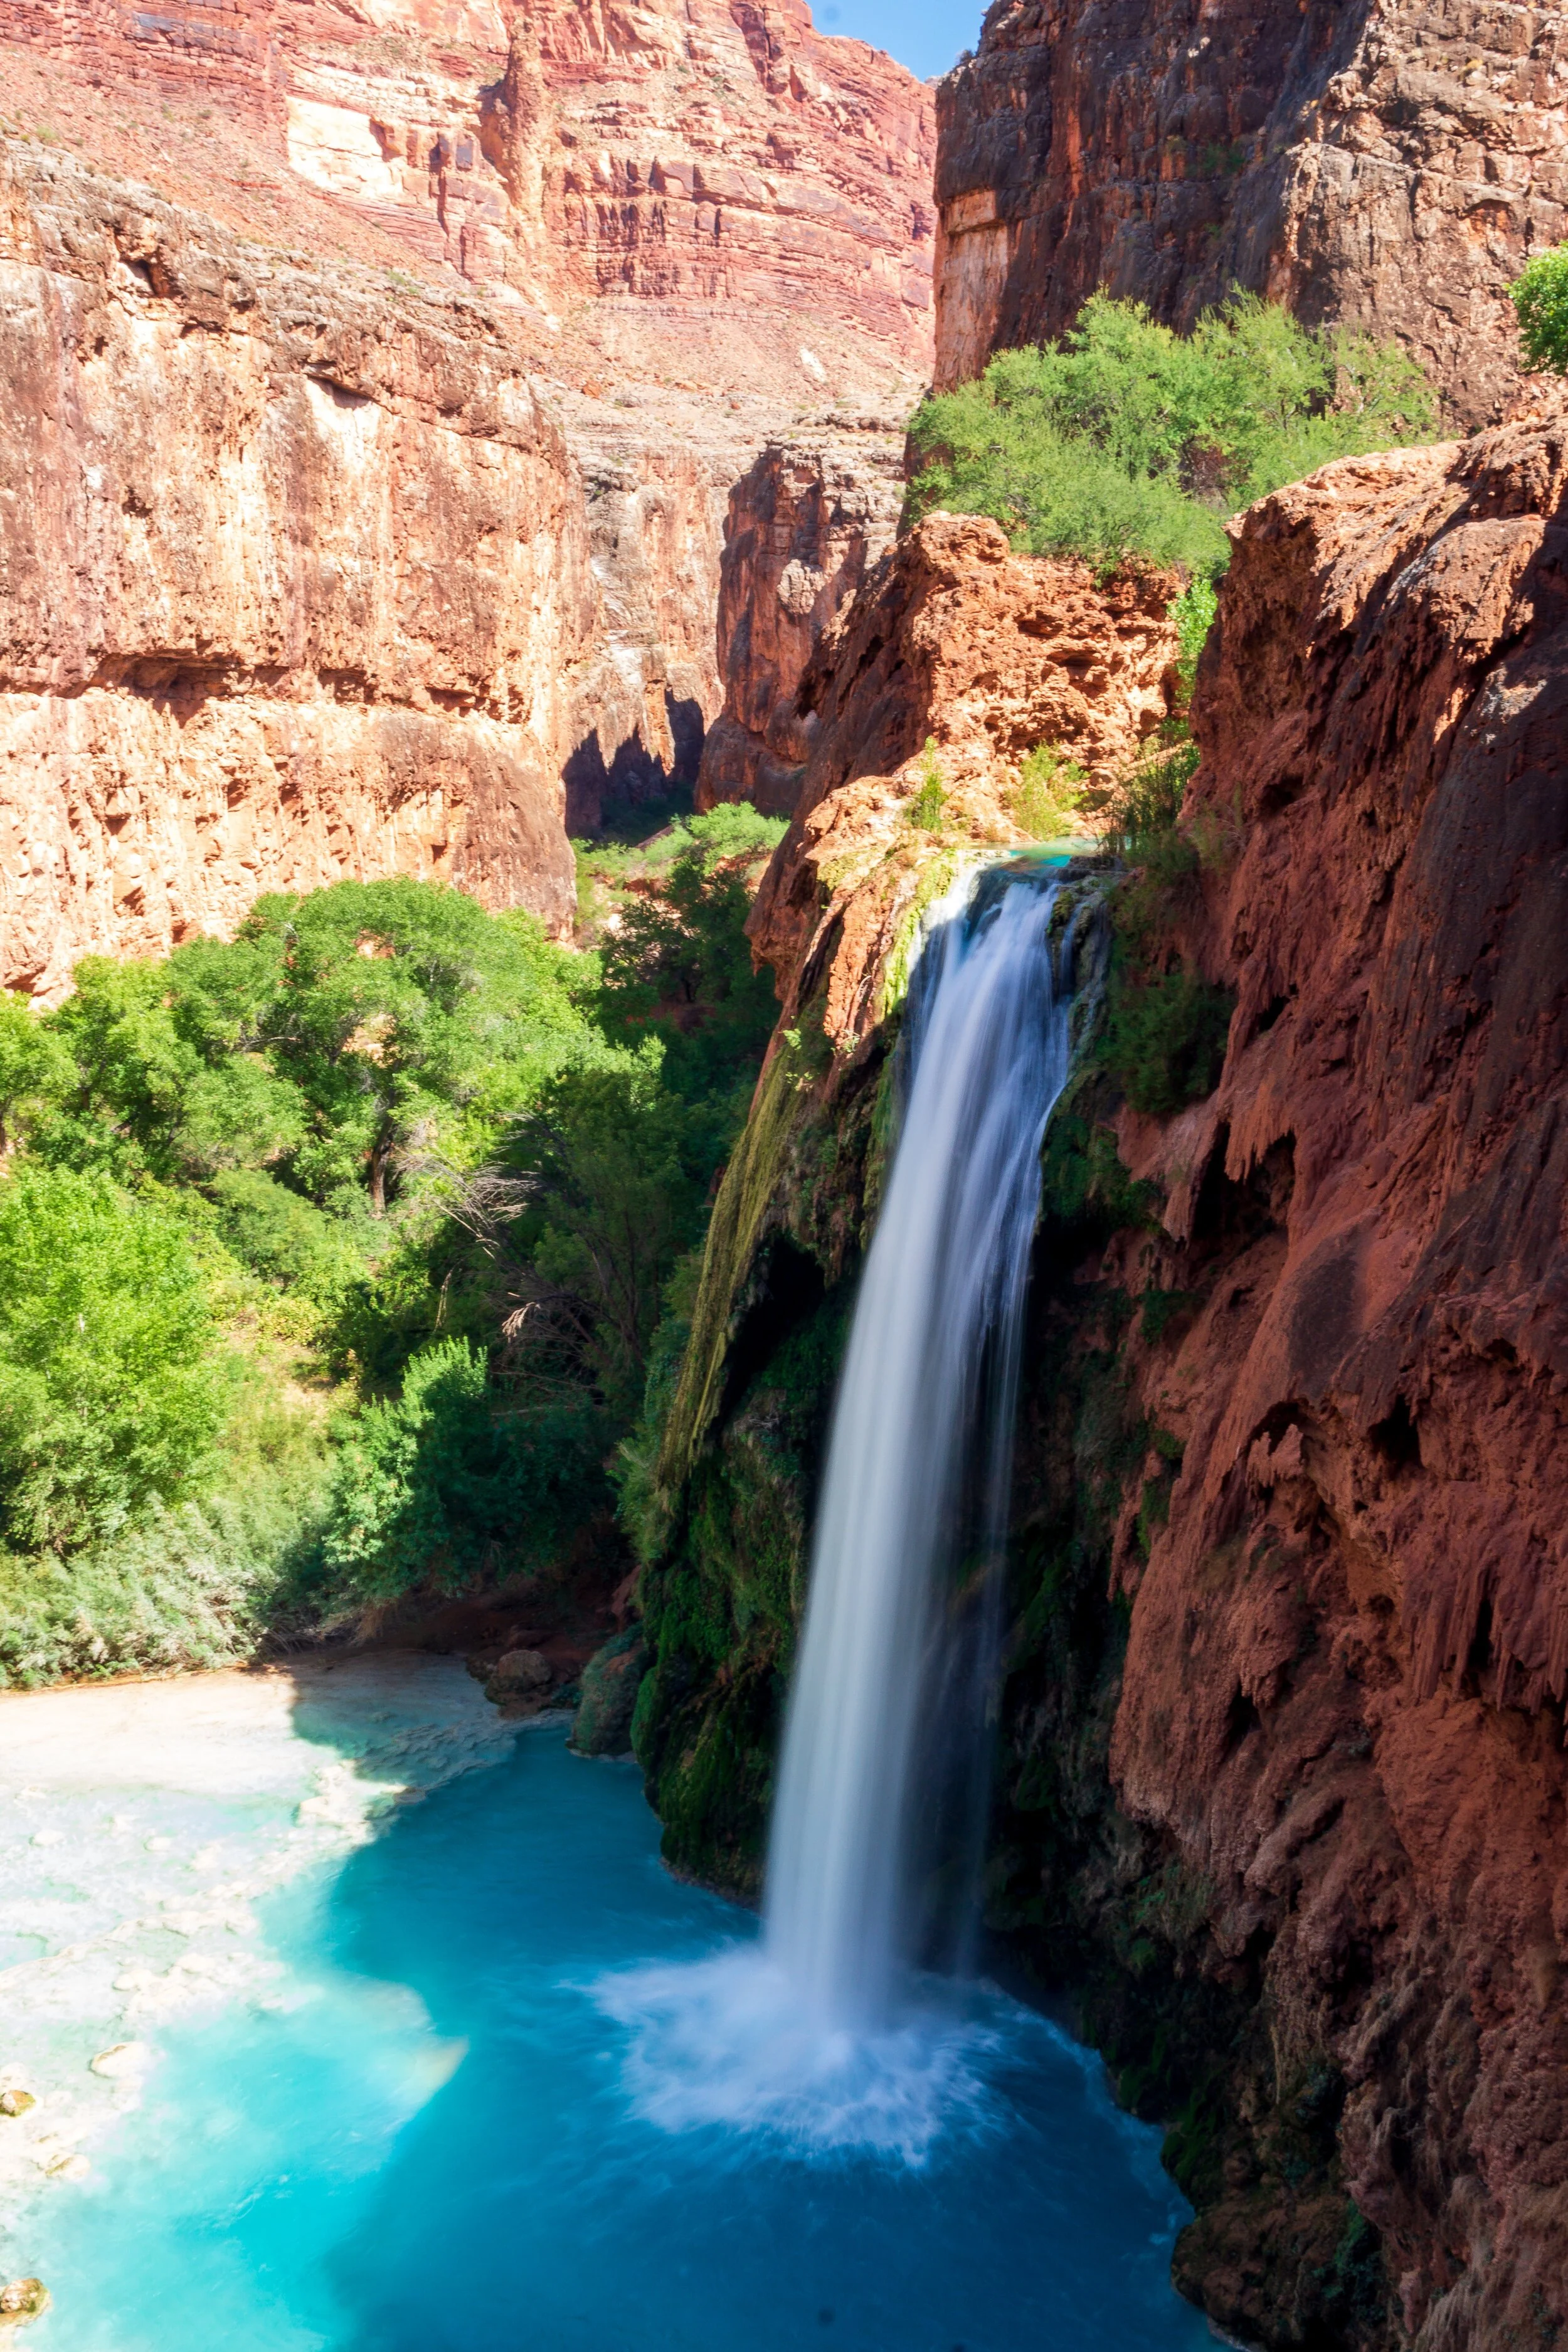
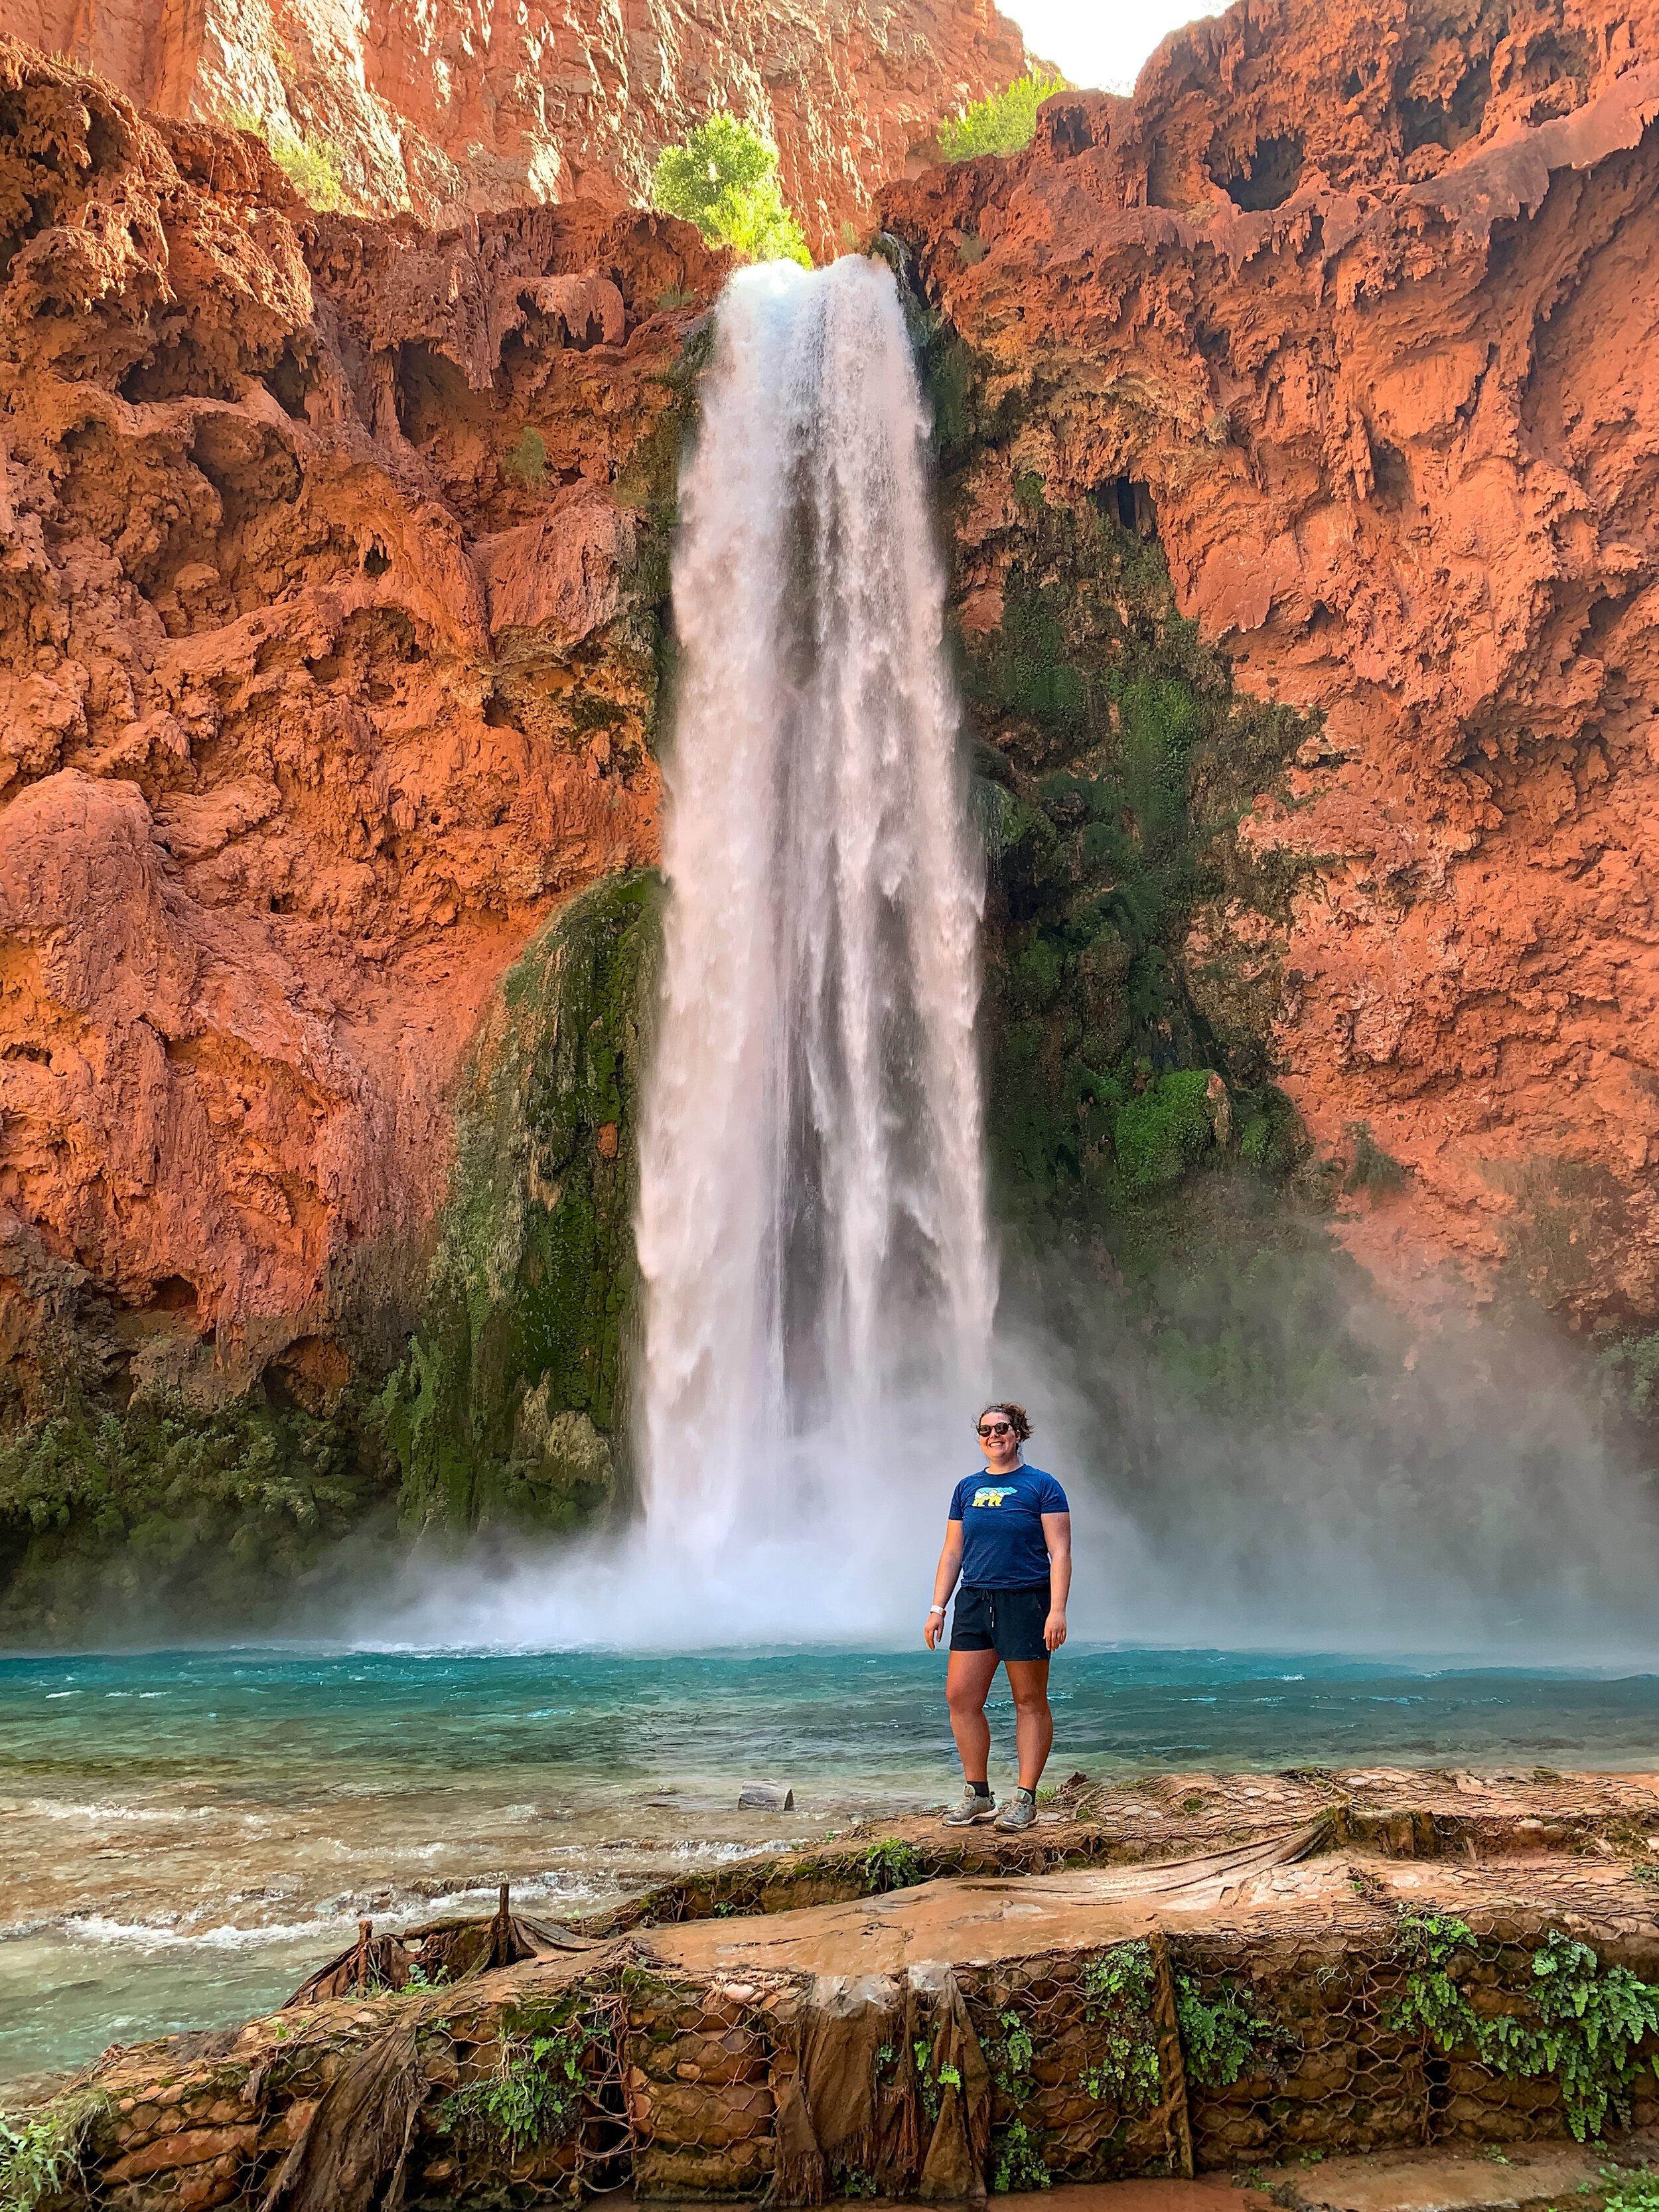
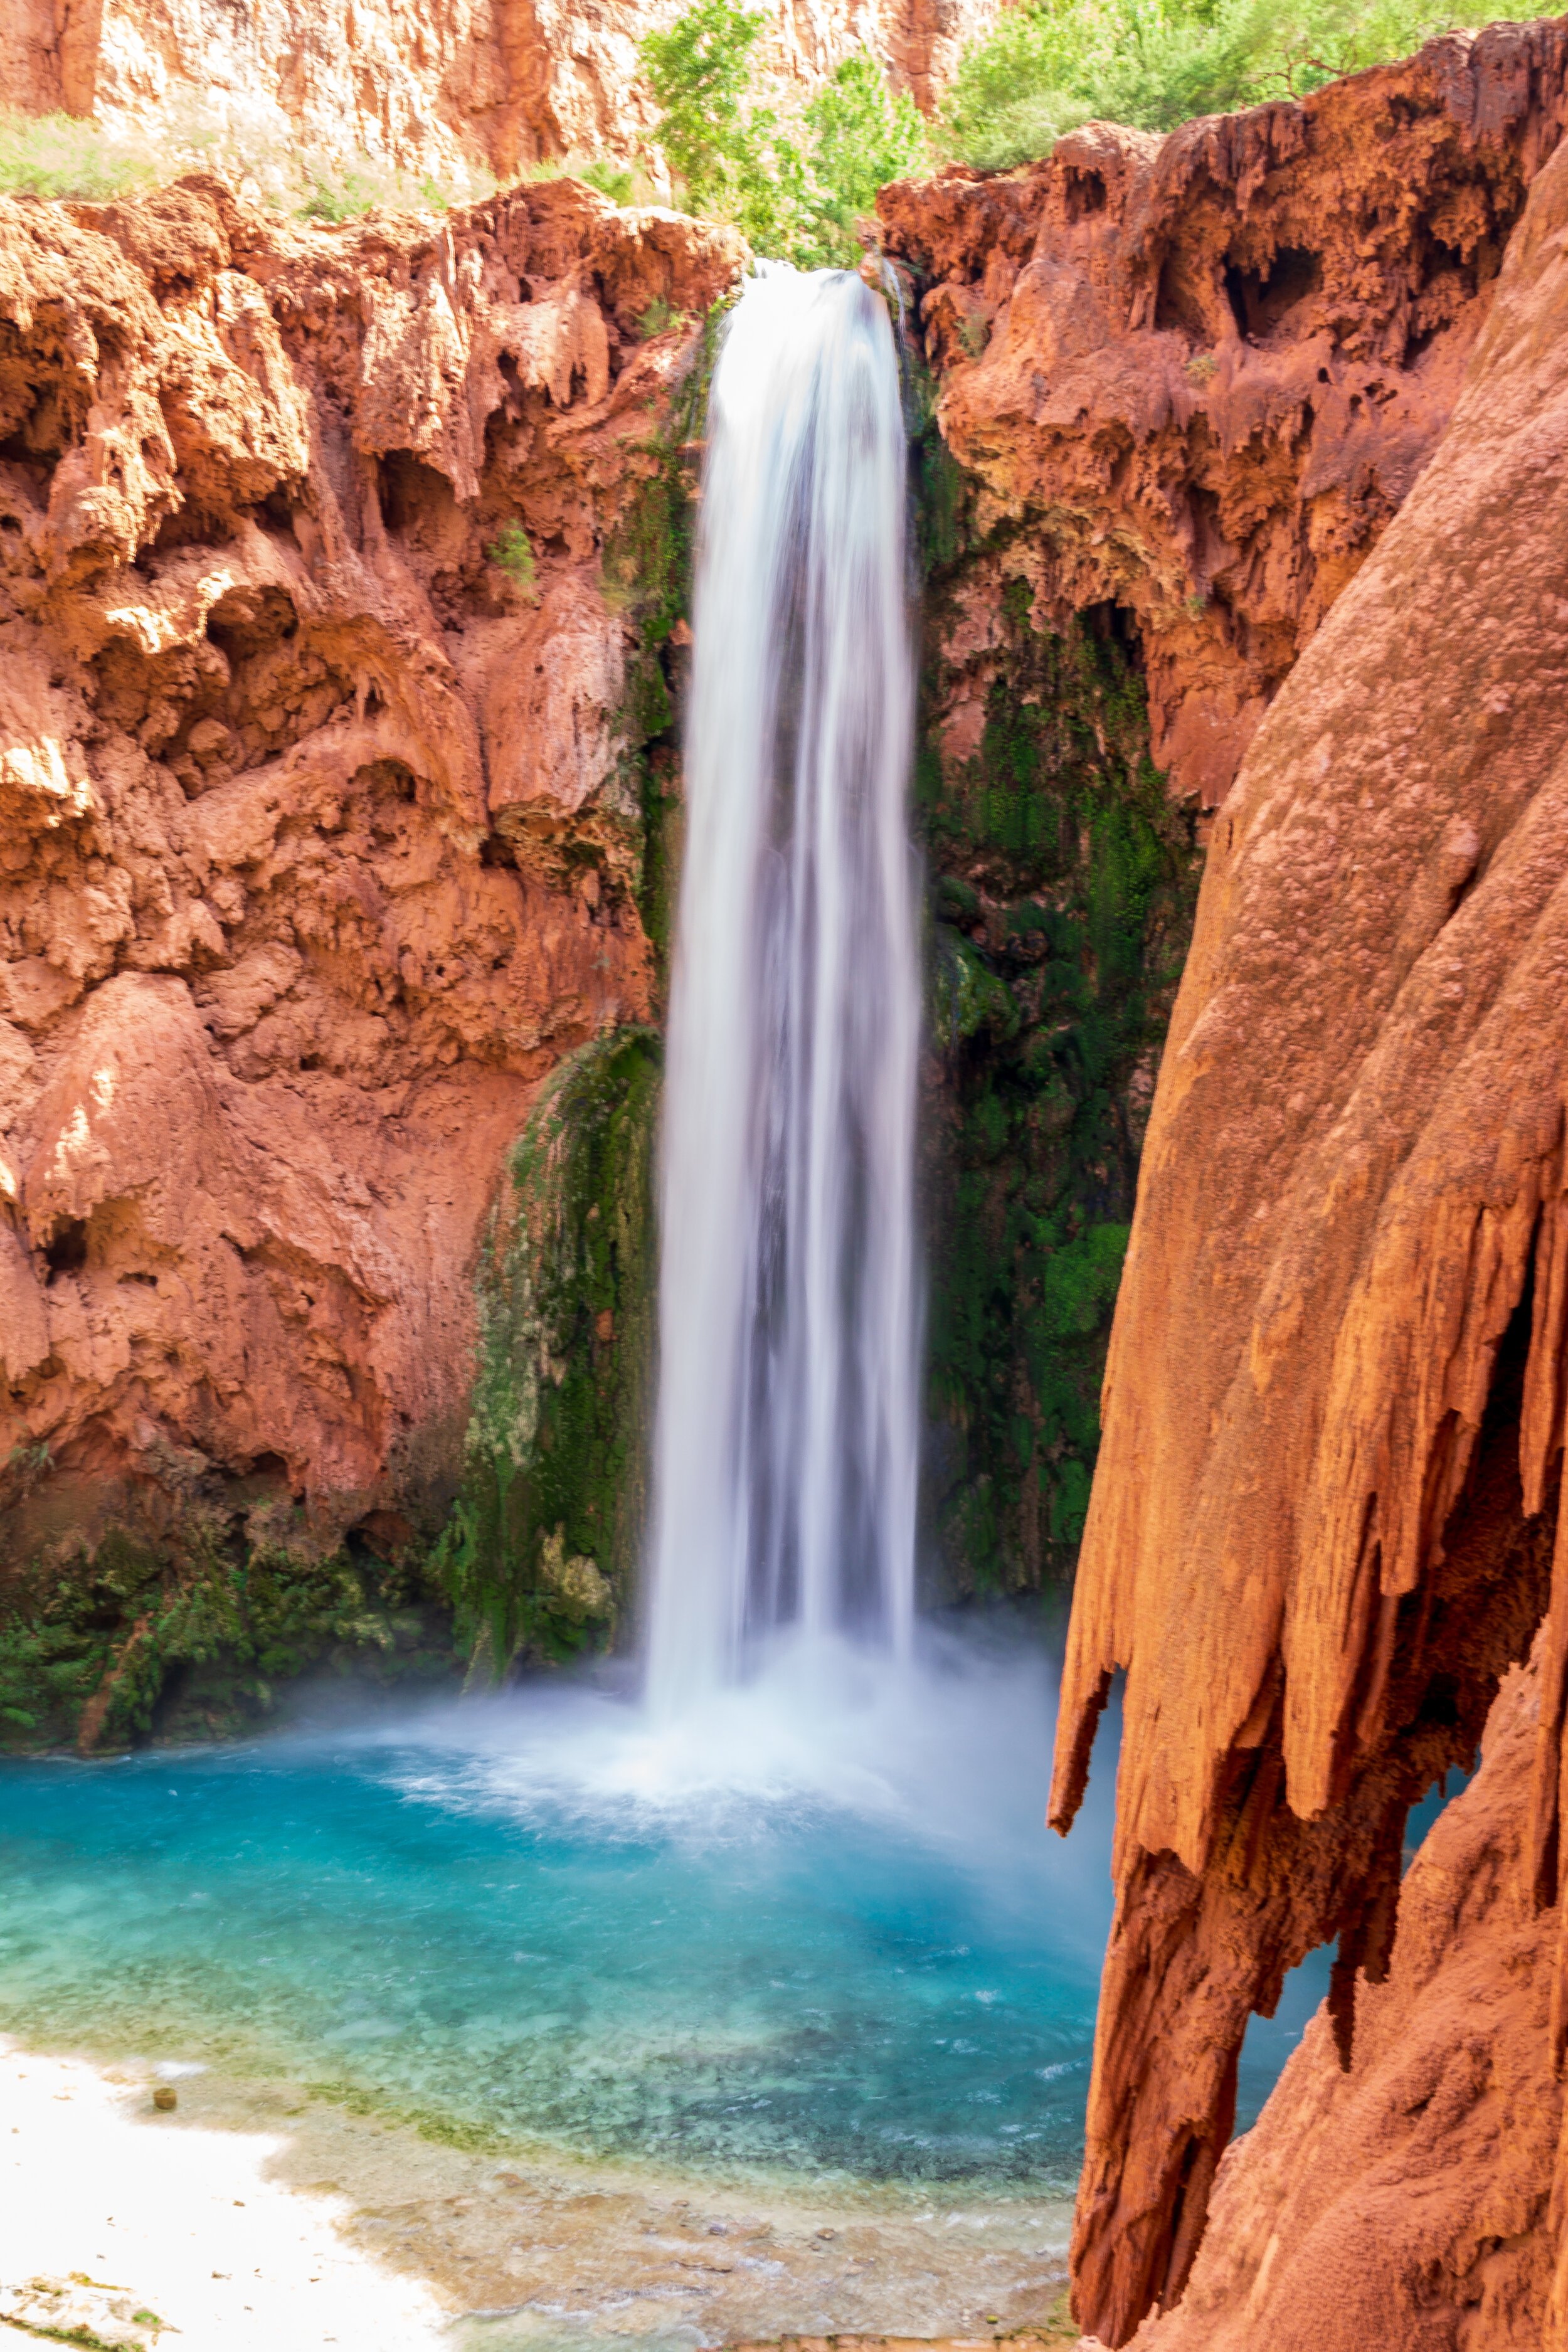
Shortly after, we crossed a bridge and were at the top of Havasu Falls! I had seen so many pictures of these falls that I was a little nervous that it wouldn’t be as grand in real life, but they were even better in person! I couldn’t believe we were finally here! We stopped again to take pictures. We didn’t go to the base yet, instead we walked through the campground trying to find a good spot. We were tired at this point, and didn’t really feel like hunting around, plus it seemed that most of the sites were occupied, especially further back closer to the creek. So we opted for a campsite closer to the beginning of the campground, but it was right above the creek. So beautiful! We set up camp, then changed into our suits and walked back to the base of Havasu Falls. Everything was completely in the shade at this point, and the breeze from the waterfall was actually pretty cold! We just dipped our feet in and sat on the rocks in the creek, admiring the force of the fall and the gorgeous color! Once we got our fill, we walked back to camp, filled up water, played cards, and cooked our dinner.
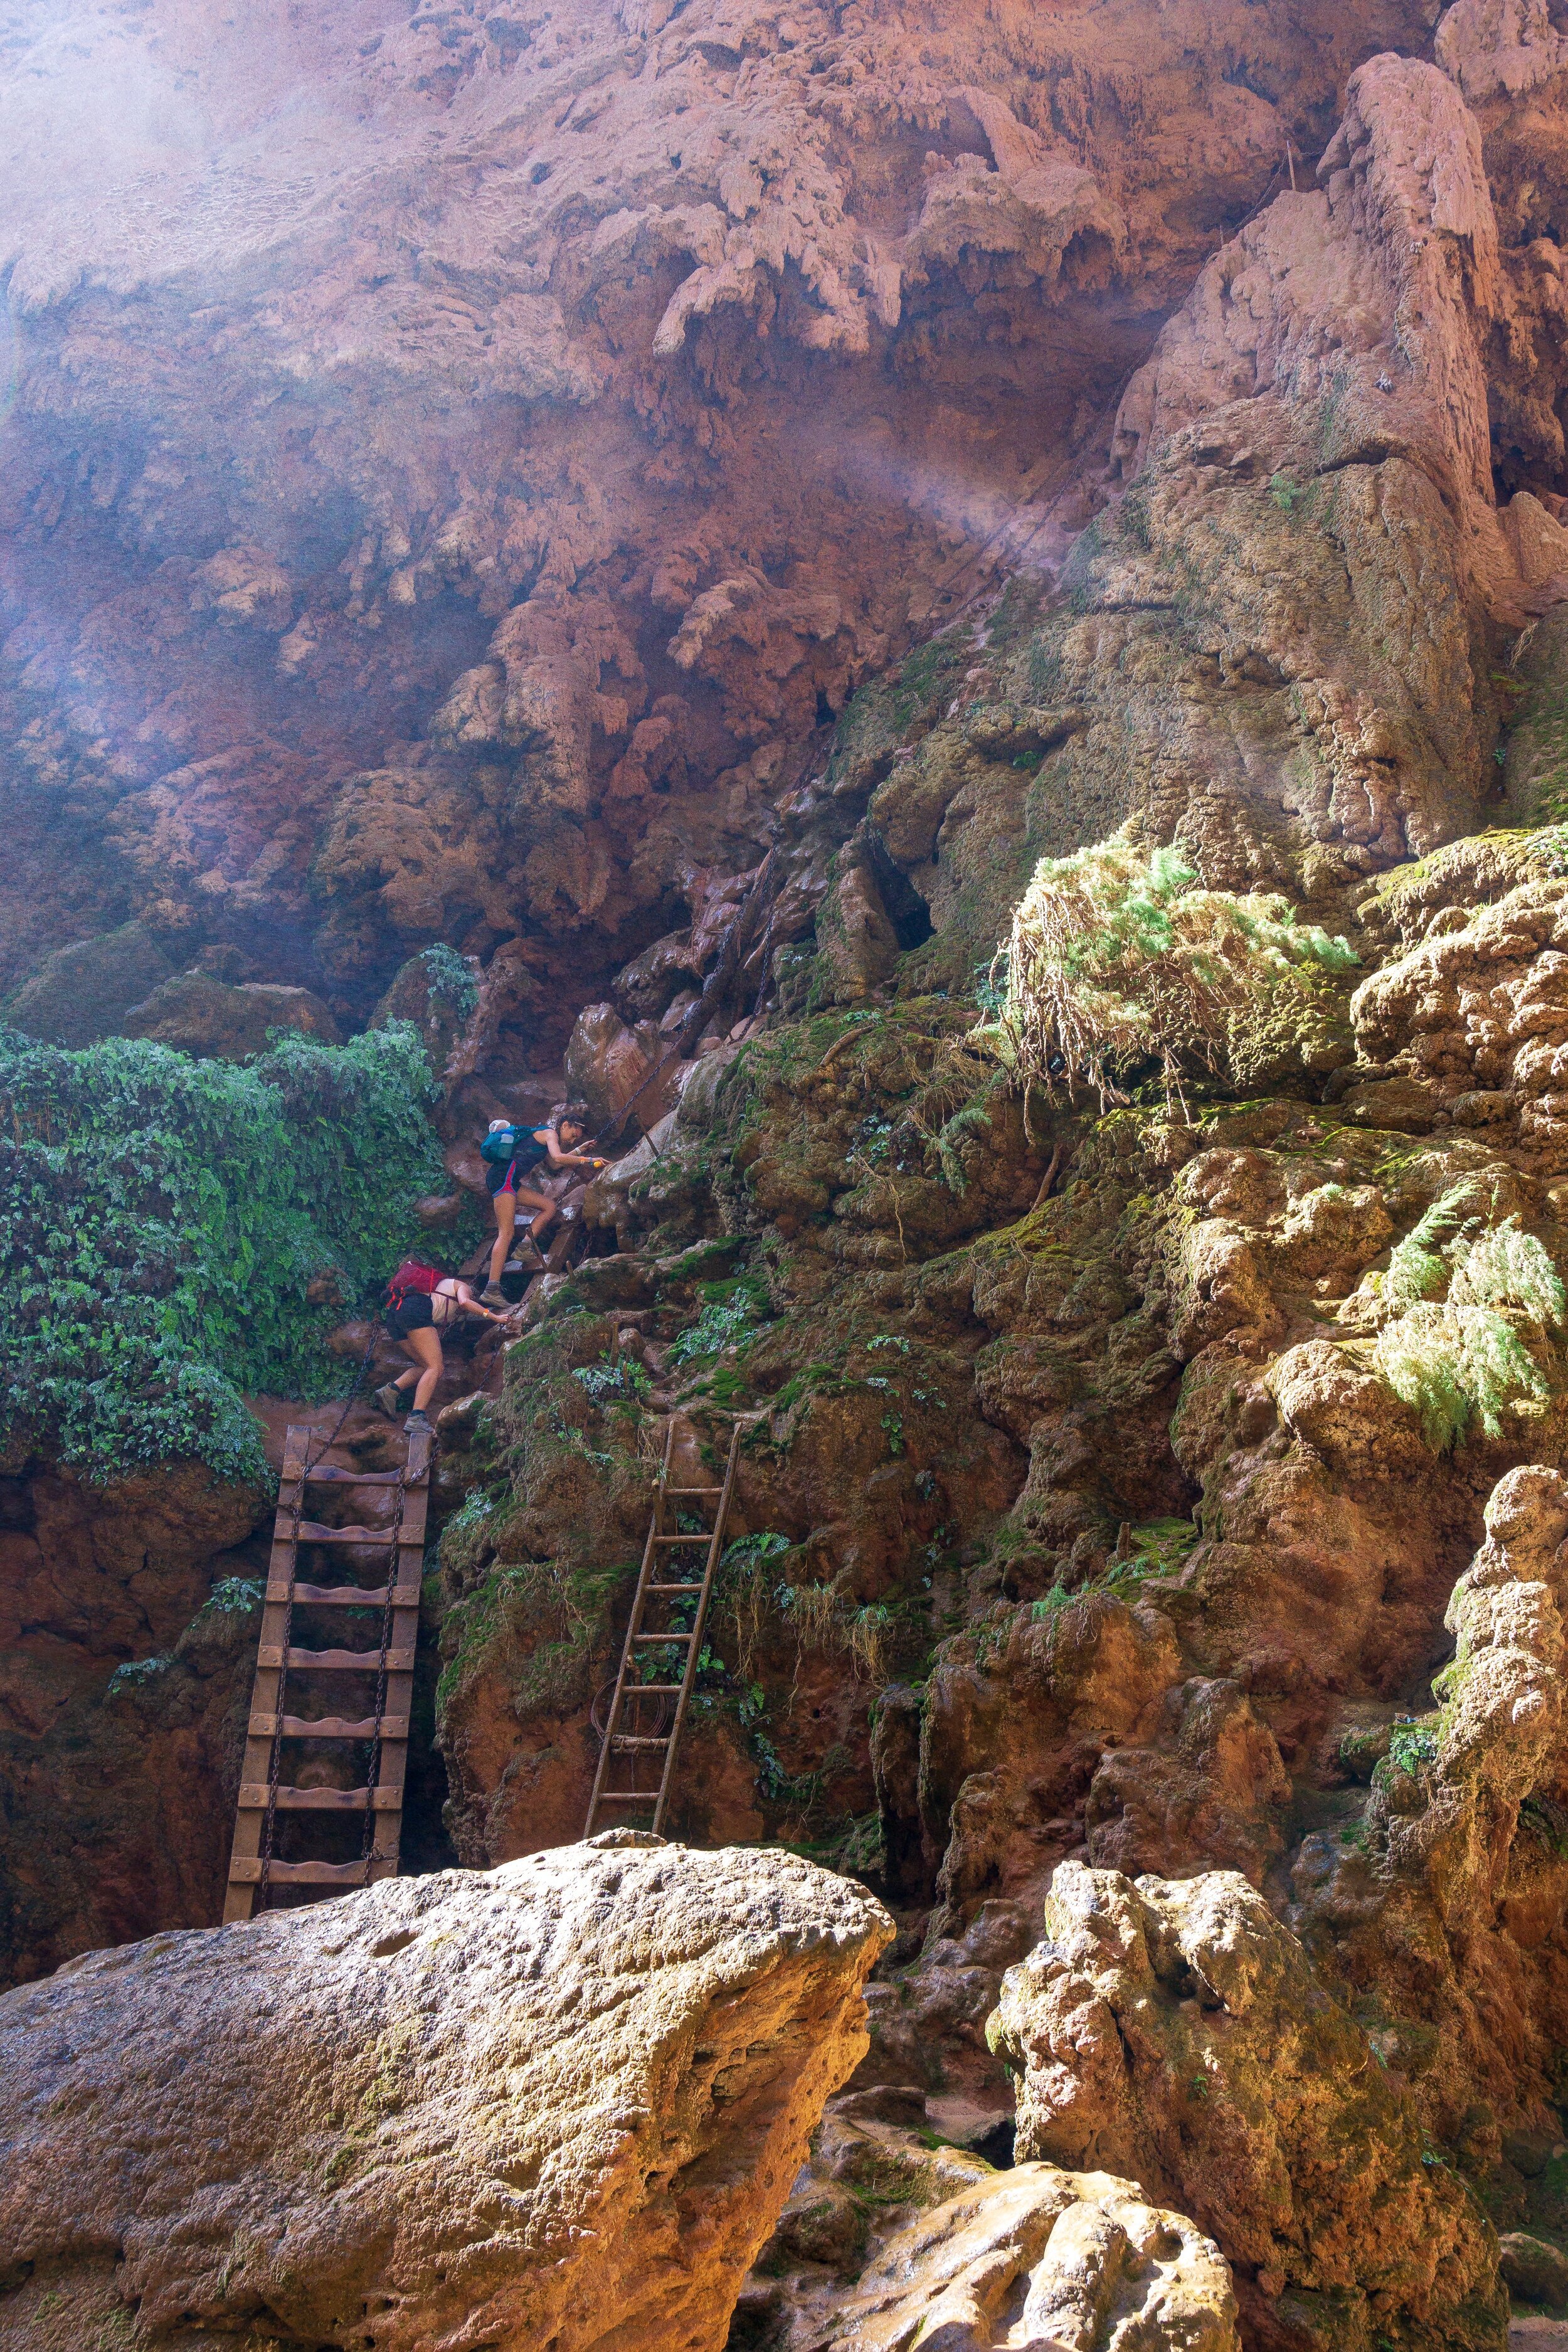
Day 2: We had decided the day before that we were not going to do the Confluence hike today because of the weather forecast of rain in the afternoon, so we slept in and woke up naturally. We made breakfast, packed our lunches, and talked about what to do for the rest of the day. We decided to go to Mooney Falls and maybe down to Beaver Falls since we were both a little nervous about the ladders and wanted a “practice round”. Well, the practice round turned out to be the last round. Mooney Falls was absolutely gorgeous, but yes, the ladders were a little frightening. I’m happy I threw in nitrile gardening gloves that we used on Half Dome into our packs before leaving home, because I don’t think I would have made it down without them! Mom unfortunately wasn’t able to make it down because she wasn’t sure enough of her footing and it freaked her out. I was also not very sure of my footing and was kind of freaking out, but I’m also more stubborn than her and just had to make it to the bottom. And I did. I will say, it was sketchy though! But everyone was really supportive of each other and cheered each other on. And going back up was much better than down. My mom hung out by one of the tunnels while I snapped some pictures.

After I got pictures, I headed back up the ladders and chains and we went back to camp and ate our packed lunch. We then decided to go back to Havasu Falls and spend the rest of the afternoon there wading in the water. After a while though, the wind picked up and we could tell the storm was coming. We went back to camp and changed into dry clothes and hung out in the tent while the wind whipped through the canyon. It was so intense at points, I was holding onto our tent poles! Eventually it stopped, and we went to our picnic table to make dinner & play cards.

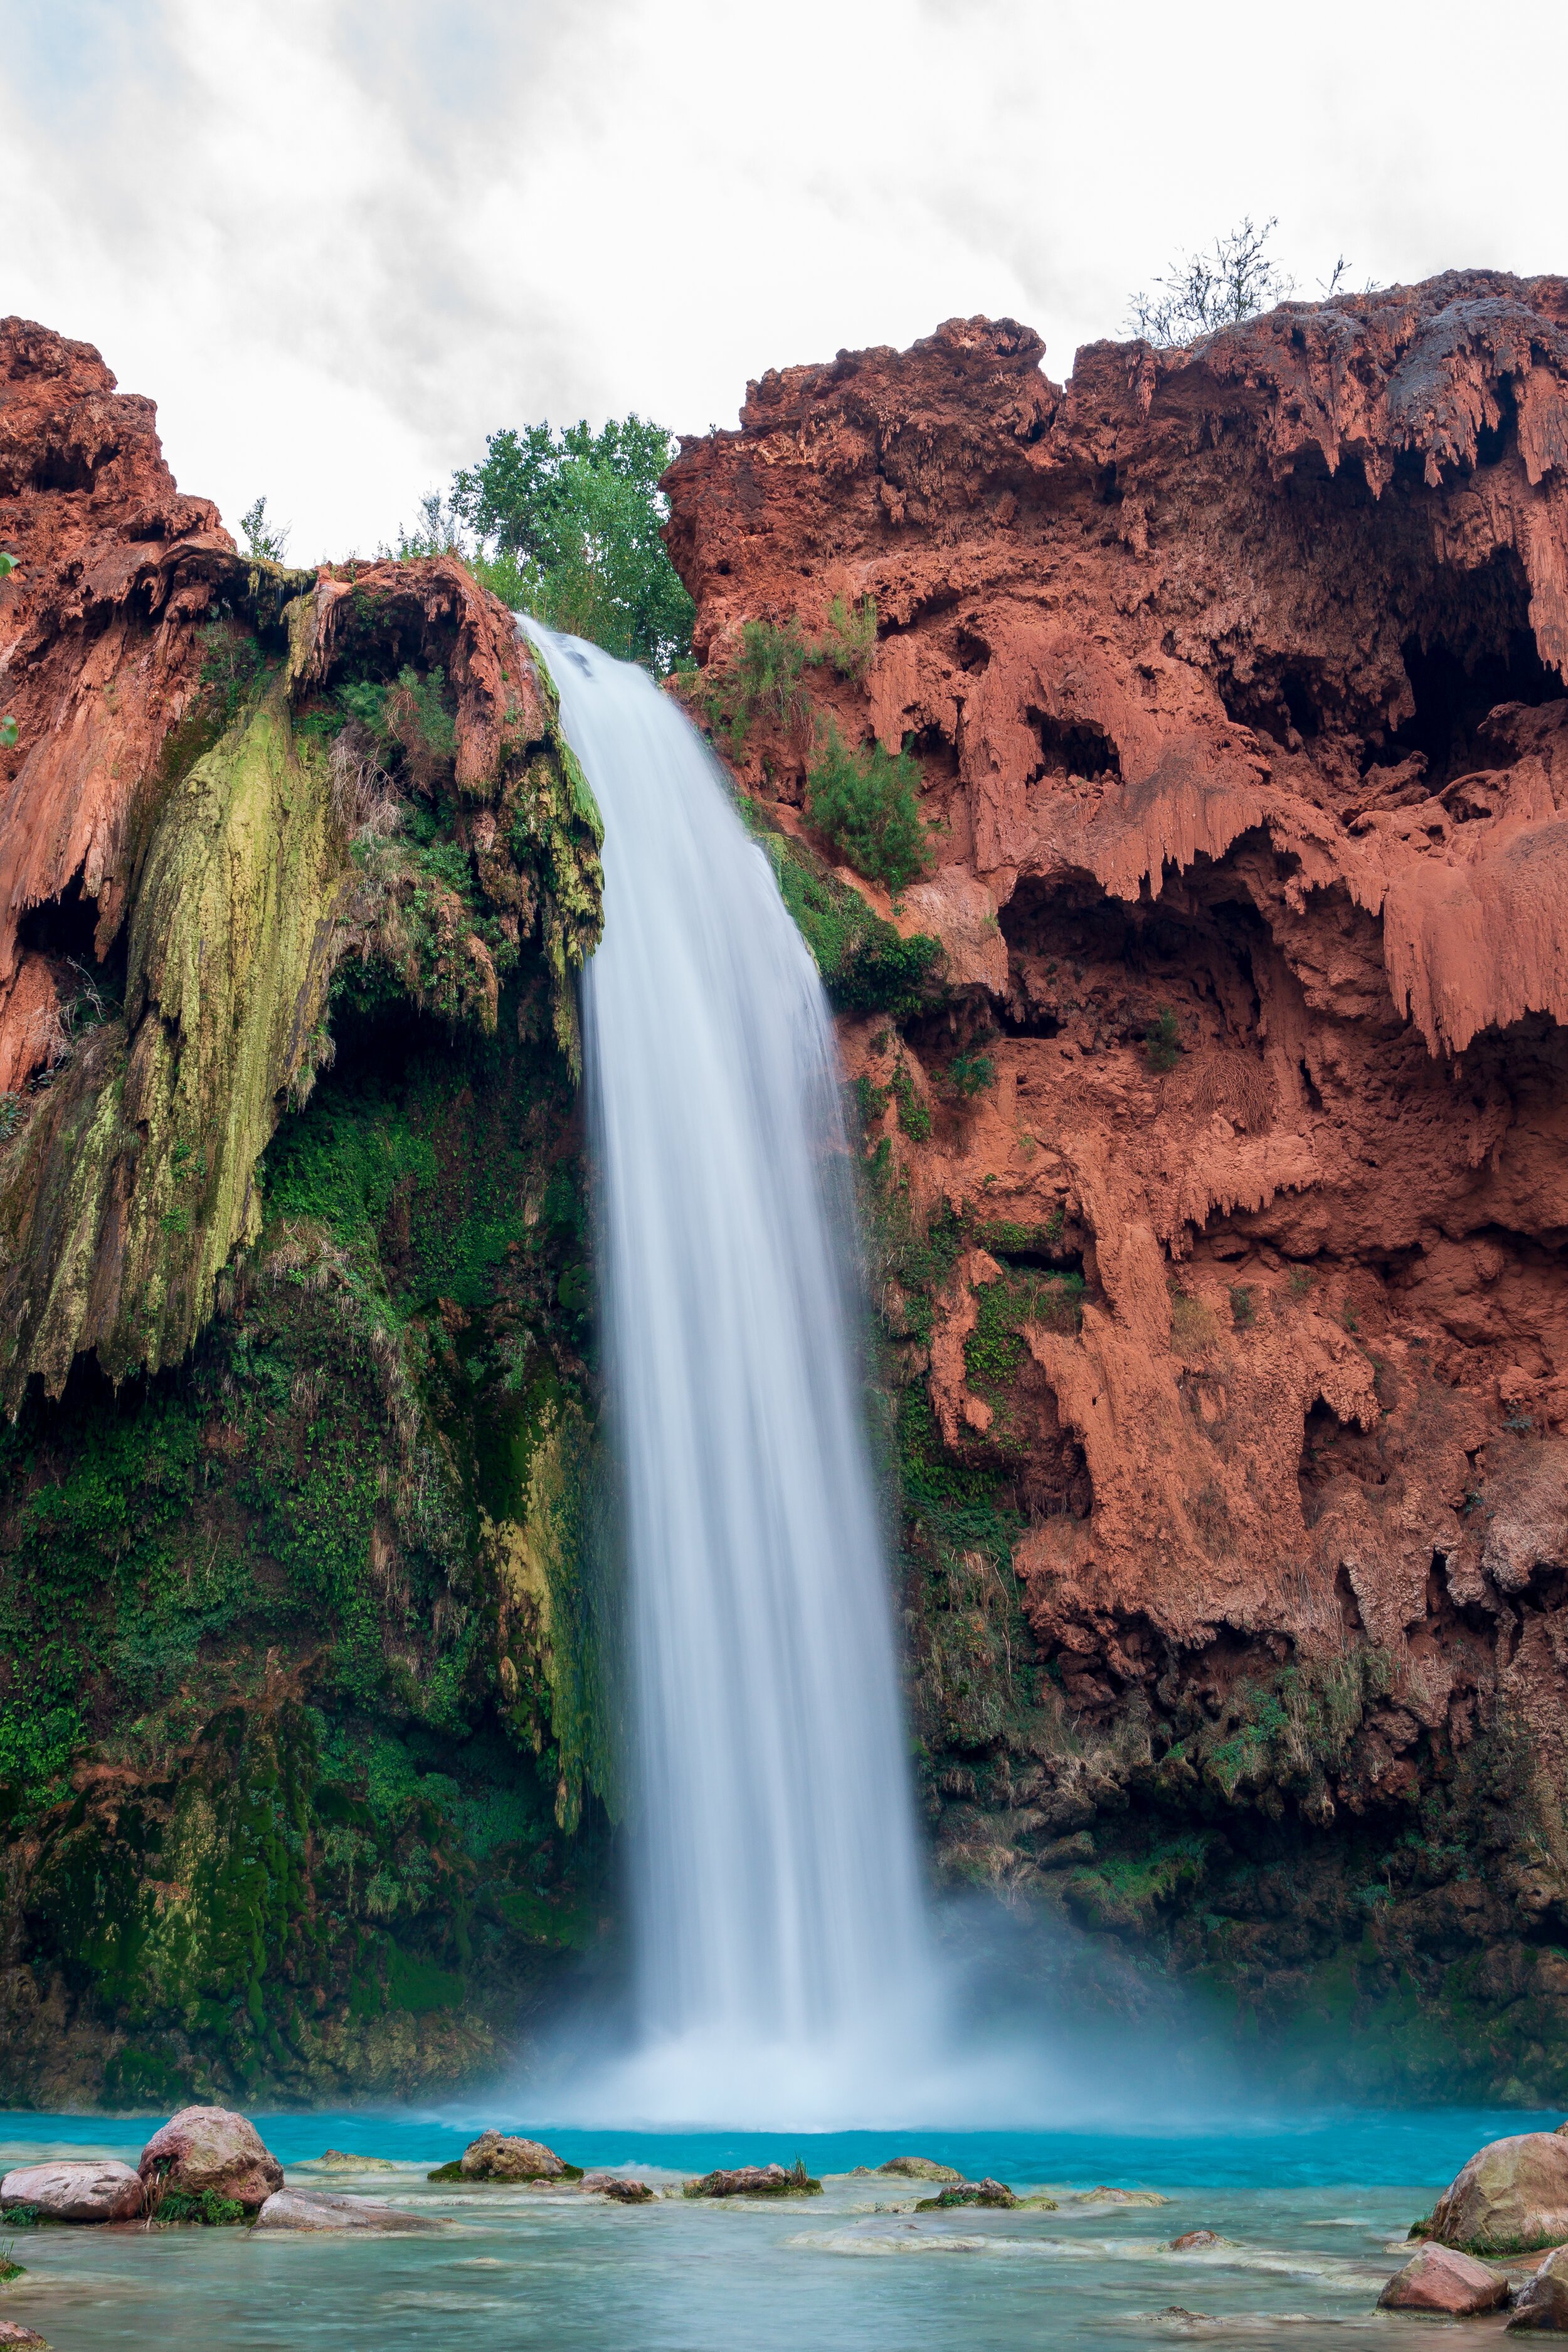
Day 3: Since mom was sure she wasn’t going to attempt Mooney Falls again, she tried to convince me to do the hike to the Confluence by myself. I didn’t really want to do it by myself though, so I suggested we hike back up to Fifty Foot & Navajo Falls and spend the day there. This was a really great choice. The weather was beautiful, and we had lots of fun sitting in the pools all day long. Once we had our fill, we walked down to the base of Havasu Falls, stopping at the Fry Bread hut at the top of the falls for one last fry bread of the trip. We enjoyed our last views of the falls before turning back to camp to play cards & make dinner (I’m sure you’ve noticed a pattern in our nightly activities by now). Even though I was sad about the hike, I’m more sad that my mom couldn’t do it either. I vowed to return to Havasupai another time to go to Beaver Falls & the Confluence.

Day 4: We started our hike from the campground at 4 AM. It felt really nice to be hiking in the cool desert air. We were using our headlamps until about 6 AM, well after we had passed through Supai. The hike back was not as bad as people had made it seem. It was very mild, and we reached the last mile, and finished, before the sun hit the bottom of the canyon. We were in the parking lot by 9:00 AM! We then took a baby wipe shower, changed into clean clothes, ate some snacks, and then were off to our next stop: Zion National Park!
Packing Tips
This is not an all-inclusive packing guide. If you’d like to read about my gear lists, you can do so here. Going to Havasu Falls was not like one of my regular backpacking trips, where I am usually packing my things up every day and hiking on. You stay at one place the whole trip, and do have a fair amount of down time if you go for the full 3 nights. So, these are my *special* gear considerations for Havasu.
Camp & Water Shoes: I would highly recommend bringing a separate pair of shoes for walking around the campground and in the water. I used my Salomon water shoes that I bought years ago for when I hiked the Narrows, and instantly regretted bringing those over my Bedrock sandals (the rubbing was so terrible). Next time, I’m hiking down in my trail runners (Altra Lone Peak), and using my Bedrock Sandals for camp/ the waterfalls.
Blister Treatment: There’s a lot of sand at Havasu Falls which gets into everything, especially shoes and socks. My water shoes weren’t the best, but I’m sure happy I brought my Leukotape along with me. I cleaned & dried my hotspots, then applied a strip of Leukotape over those areas and all of the tape stayed on for my whole stay at Havasu - even a full day of soaking in the water & the 10 mile hike out. The tape is really a miracle.
Entertainment: Whatever that is for you (except prohibited items & loud speakers), bring it! We brought a deck of cards and are very happy we did since we had lots of down time in the evening and weren’t particularly tired. I also read my book on my iPhone’s Kindle App.
Swimsuit: Swimming is kind of a big thing at Havasu! The water is pretty warm, and you won’t want to miss out on the experience, and you probably don’t want to get your clothes soaking wet. Bring a suit for swimming!
Towel: While it can be really hot, I found that bringing a small pack towel really wasn’t a big deal and I was happy to have it to pat myself (and hair) off before getting into my dry clothes. The towel also dried insanely fast, so it was always ready to go for the next day!
Paracord & Bear Bag: Just in case your campsite doesn’t have line, you should pack some cord to make a hanging system for your food, as I alluded to earlier. Trust me, you don’t want to have your food ransacked by squirrels & raccoons.
Water Storage: Because you’ll probably be camping decently far from the campground spring, you probably don’t want to make a ton of trips between your camp & the spring. I’d bring at least a 3 L water storage container per person to cut down on the number of necessary trips to the spring. I saw some groups with 10 gallon collapsible plastic containers too.
Back-Up Water Filtration: Because there is a spring in the campground, I wouldn’t worry about having a primary water filtering system. But because it could become contaminated, and you don’t know until you check-in after hiking 8 miles into Supai, bring some iodine tablets or Aqua Mira.
Hammock: We didn’t bring ours, but since we ended up relaxing more than hiking, this would have been a good addition to the gear! It would have been nice to sit somewhere other than our sleeping pads & the picnic table at our site, but it wasn’t terrible that we didn’t have one.
Tripod & ND filter: If you are a photographer, like me, you probably want some nice pics from this beautiful place. Because it is really bright in the canyon, you’re going to need a ND filter and a tripod to get some nice long exposure shots of the waterfalls.
Day Pack?: My lightweight backpacking pack (for this trip, the Gossamer Gear Gorilla) is small and light enough that I used it as a day pack for around the area so I wouldn’t have to bring another pack. Some people might want a super small dedicated day pack though. I saw many Sea to Summit Ultra Sil packable daypacks & running vests (especially from the hotel crowd).

Mules & Helicopters & Hotels
We opted to not use any of these services for our trip. My mom and I are both against using the horses for a backpacking trip, especially with rumors of possible animal abuse. I do have to say, I did not see any animals that appeared underfed, overworked, or abused, but I guess I feel that if you are going to hike into the canyon, you should schlep your own gear down. It is worth noting that you will have to wait for your gear if you use the mules.
We considered taking the helicopter out of the canyon if we hiked to the Confluence the day before hiking out. But, since we didn’t do the Confluence, and I was feeling antsy anyways, we decided to hike out. The helicopter also doesn’t fly every day! It was not flying on our day of departure, so we had to hike out anyways! When we were there, it didn’t fly on Tuesday or Wednesday. I would definitely check in with the Tourism office to figure out if the helicopter will be flying on your dates, if this is something you are interested in. I believe that the helicopter is first come, first served, and locals have #1 priority.
Honestly I didn’t even know there was a hotel before we got there and saw a huge group of people all with the same exact towel! The hotel is even more expensive than the campground and is located in Supai. If you have lots of money and don’t like to camp, or maybe can no longer camp due to health issues, the hotel can be an option for you! Hotel reservations are a different process than the campground reservations. More information can be found here.
Havasupai is absolutely amazing and I hope you are inspired enough to visit! Feel free to drop any questions or comments down below!